• Skip to primary navigation
  • Skip to main content
  • Skip to primary sidebar

Magical Treats at Home

  • About
  • Treats
  • Drinks
  • Savory
  • Favorite Tools
  • Etsy Shop

Treats

Hot Cocoa Macaron

January 13, 2020 by Elana Lepkowski Leave a Comment

Hot Cocoa Macaron // magicaltreatsathome.com

Where can I find the original treat?

  • This holiday treat was part of the Festival of Holidays at Disney California Adventure Park.

Welcome back and Happy New Year! Are you in need of a comforting treat? Me too. Sometimes January can feel like someone let the air out of the balloon. There’s the big let down after all the holiday food and decorations have been put away for the year. And yeah, maybe there’s still a little of that, but now January marks the cozy season for me. Also, my youngest celebrates a birthday at the end of the month…. so I’m still party planning even after I put away the Christmas decorations.

Hot Cocoa Macaron // magicaltreatsathome.com

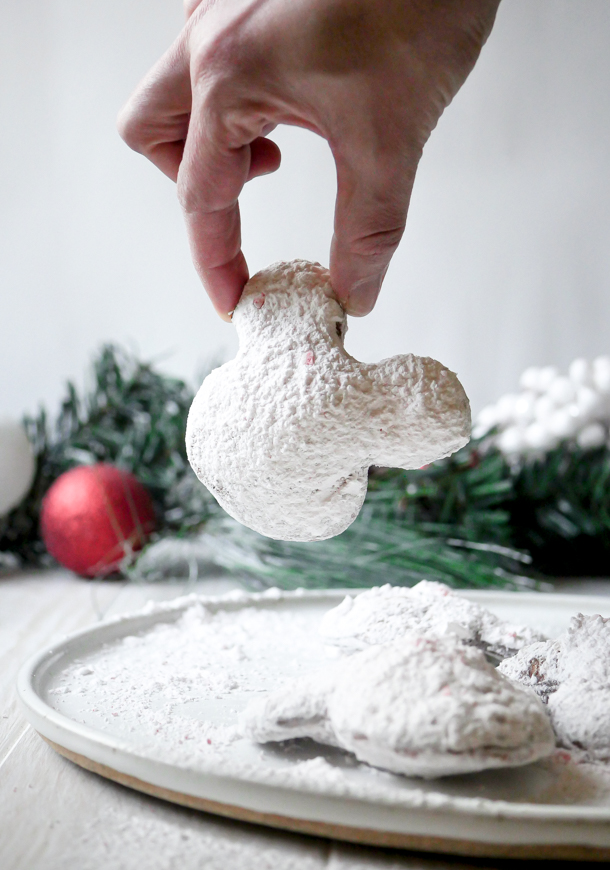
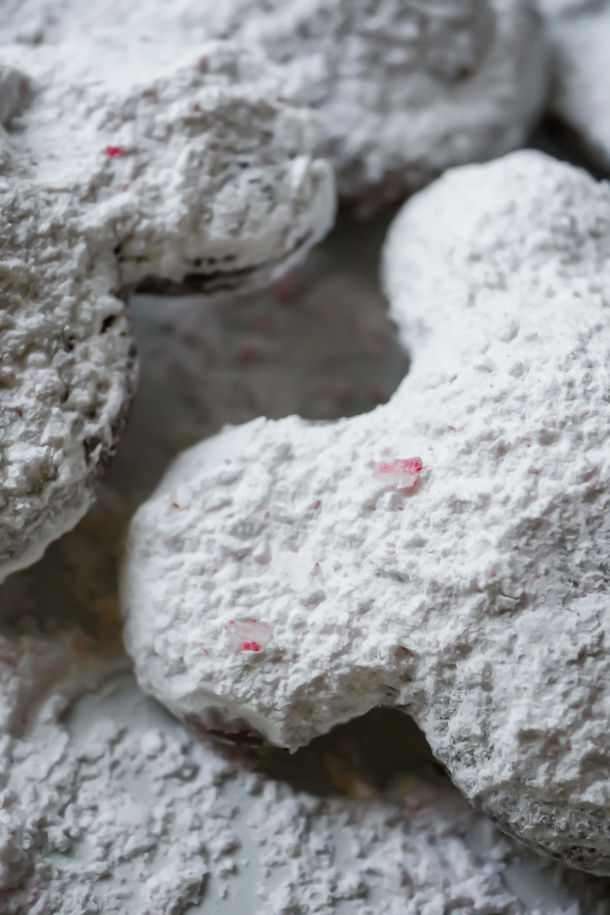
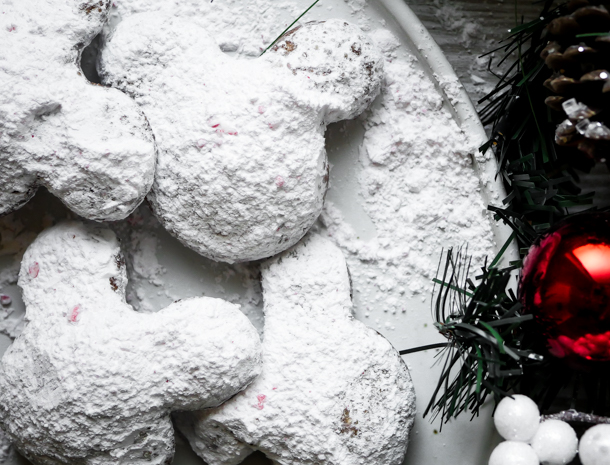
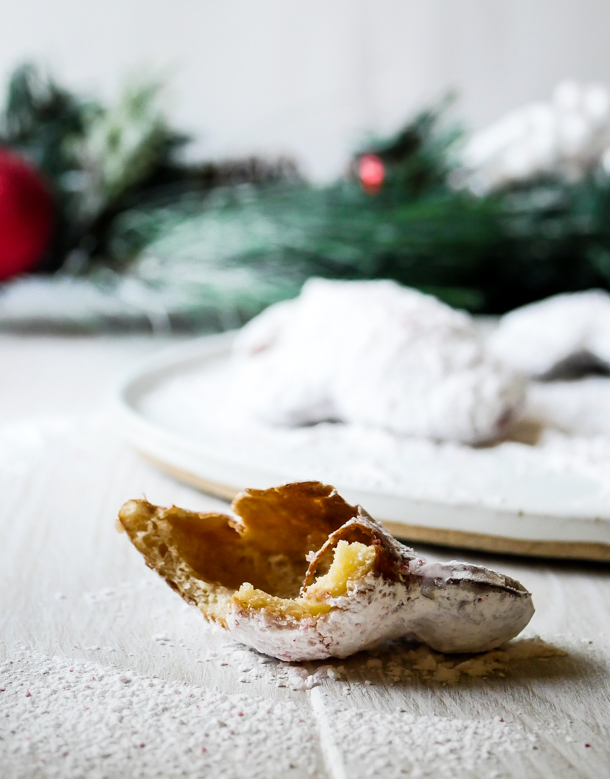
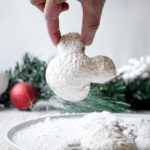
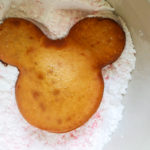
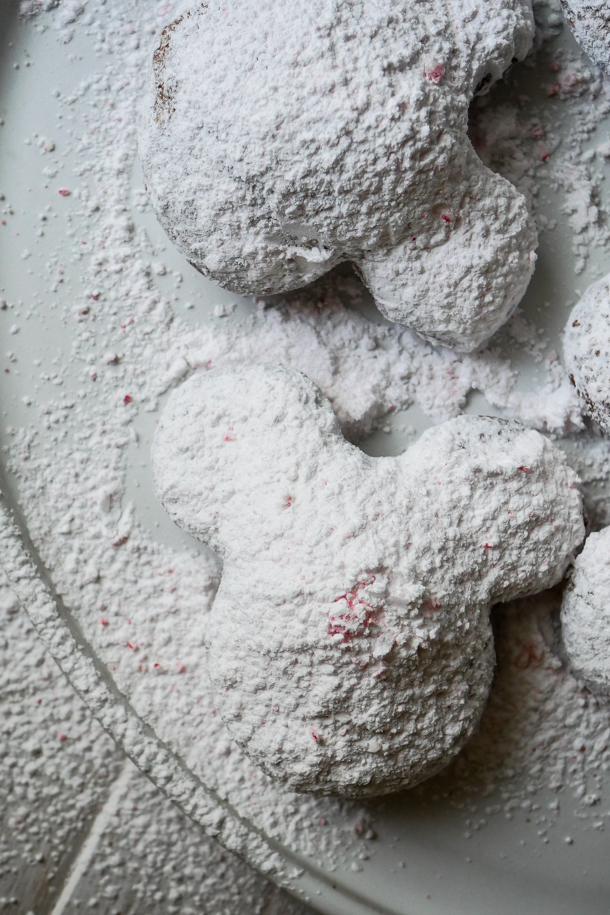
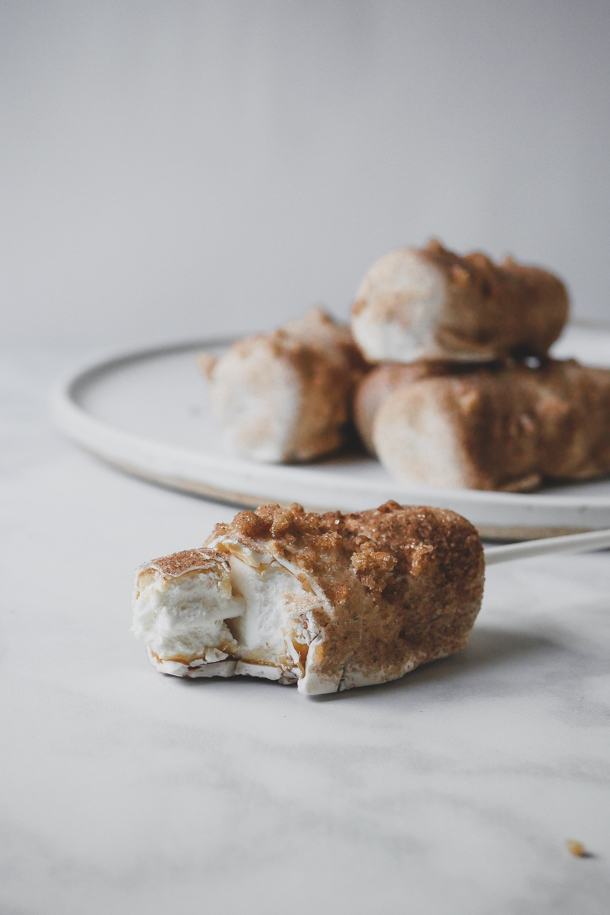
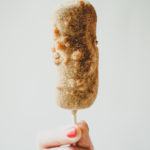
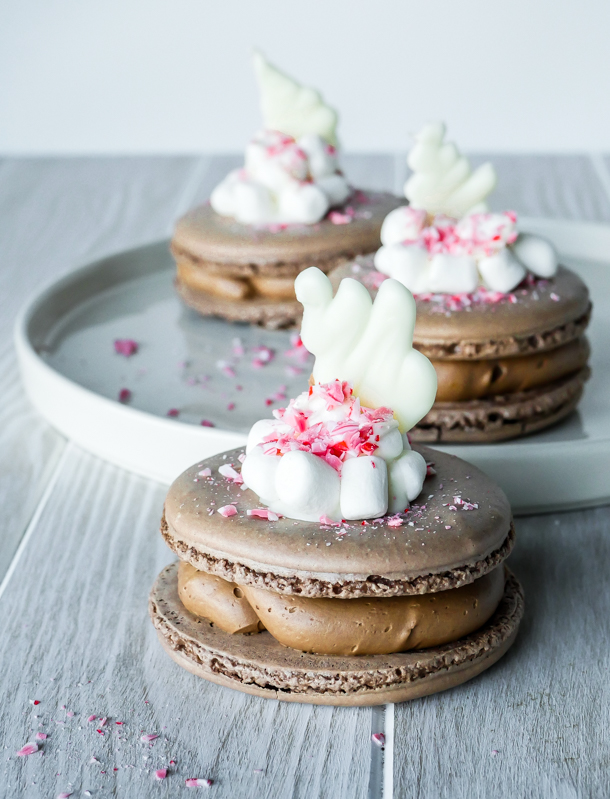
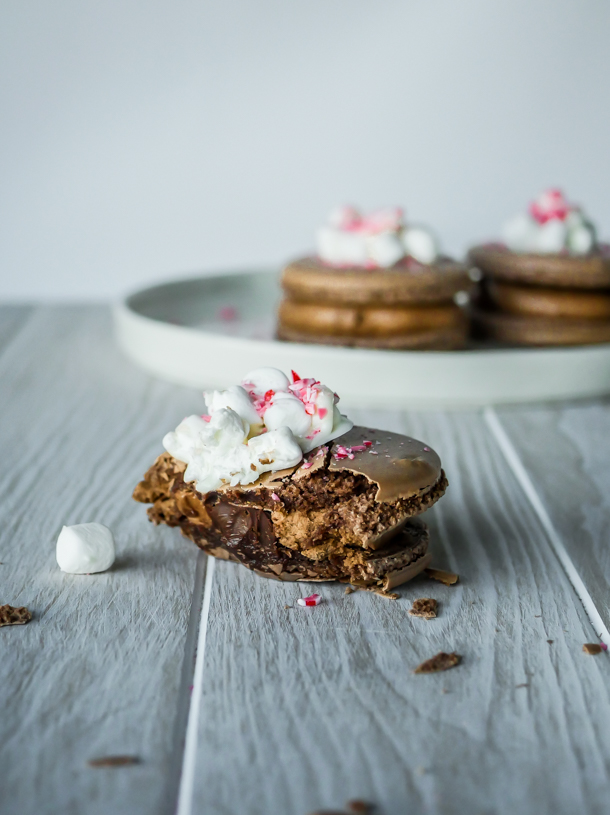
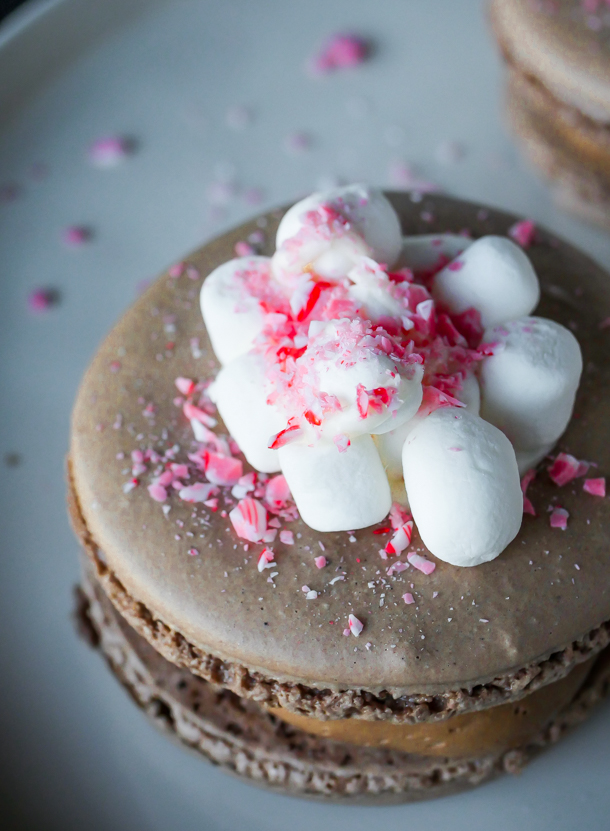
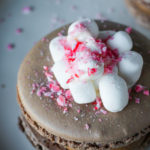
Our first treat of 2020 is like a warm sweater by the fire in cookie form: the Hot Cocoa Macaron! This oversized cookie was part of the Festival of Holidays celebration at DCA and you could have found this at the Making Spirits Bright kiosk.

It really did remind me of the flavors of a cup of hot cocoa, I think part of that was the combination of chocolates, especially the milk chocolate filling with semisweet ganache center. The mound of mini marshmallows on top didn’t hurt either.

Hot Cocoa Macaron // magicaltreatsathome.com

I love making macarons. (We have two other recipes on the site if you’re looking for more after this too!) They require a little patience and technique but honestly, they’re pretty quick to put together and they definitely wow people when you tell them you made them. If you’re looking ahead towards Valentine’s Day presents, these would be a pretty special gift (I might just gift myself another batch…).

I have a whole new set of tips and tricks with these, as the addition of cocoa powder to the macaron mix changes the consistency and texture a bit. So please read through all those before starting the recipe. They will ensure you will have a good batch (and not need to make them 4 times to be perfect… like some people I know *coughcough*).

Hot Cocoa Macaron // magicaltreatsathome.com

BONUS! As a special gift to all of you who want to try this recipe, first, thank you, and second, I’ve made a printable template for perfectly shaped macarons. You really need both halves to match up in order to sandwich the filling, and this template will help you make sure that happens.

Icon

3 inch circle template

1 file(s) 86.61 KB
Download

I’m so excited to kick off a whole new year of treats with all of you! If there’s anything at the parks you’d like to see made on here, drop us a line in the comments below or shoot us an email!

Hot Cocoa Macaron // magicaltreatsathome.com
Print
clock clock iconcutlery cutlery iconflag flag iconfolder folder iconinstagram instagram iconpinterest pinterest iconfacebook facebook iconprint print iconsquares squares iconheart heart iconheart solid heart solid icon
Hot Cocoa Macaron // magicaltreatsathome.com

Hot Cocoa Macaron

5 Stars 4 Stars 3 Stars 2 Stars 1 Star No reviews
  • Author: Elana Lepkowski
  • Yield: 3 Oversized Hot Cocoa Macarons 1x
Print Recipe
Pin Recipe

Description

Cozy up with this oversized hot cocoa inspired Macaron filled with two kinds of chocolate filling and topped with a mound of mini marshmallows and dusted with peppermint. A Disneyland-inspired recipe.


Ingredients

Scale

For the macarons:

  • 85g (1 cup minus one tablespoon) almond flour
  • 120g (1 cup) powdered sugar
  • 1 tablespoon (8g) unsweetened cocoa powder
  • pinch of salt
  • 70g egg whites, from about 2 large eggs
  • 1/4 teaspoon cream of tartar
  • 40g (3 tablespoons) granulated sugar

For the chocolate ganache:

  • 1/4 cup heavy cream
  • 2 ounces semisweet chocolate, chopped
  • 1 tablespoon unsalted butter

For the milk chocolate buttercream (adapted from Epicurious):

  • 1/3 cup whole milk, or milk substitute (this worked with almond milk)
  • 2 whole egg yolks
  • 2 teaspoons all purpose flour
  • 3/4 cup powdered sugar, divided
  • 1/2 teaspoon vanilla extract
  • 1–1/2 sticks (3/4 cup) unsalted butter
  • 4 ounces milk chocolate, melted and cooled
  • 1 ounce unsweetened baking chocolate, melted and cooled

For the topping:

  • 1 ounce white chocolate
  • 1 cup mini marshmallows
  • 1 candy cane, crushed

Special Tools:

  • 3″ circle cookie cutter

Instructions

For the macarons:

  1. First sift the almond flour, powdered sugar, cocoa powder, and salt back and forth four times between two bowls using a mesh strainer. Alternatively you can also pulse in a food processor 7-8 times. Set aside.
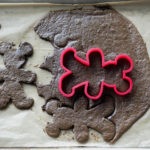
  2. Line a baking sheet with parchment. Using a pencil, trace six 3″ circles using the cutter as a guide leaving at least an 1″ between shapes. Flip parchment over so that you can still see outlines, but the graphite will not transfer to macarons. Alternatively,  place the free downloadable template (see notes above recipe for download) under the sheet of parchment. Set aside.
  3. In the bowl of a stand mixer fitted with the whisk attachment, add in the egg white and whisk on medium-low until slightly foamy, about 30 seconds. Add in the cream of tartar and whisk on medium until soft peaks appear. Then slowly pour in the sugar. Whisk on high until stiff peaks form, about 2-3 minutes.
  4. Remove the bowl from the mixer. Sift the entire dry mixture into the egg whites. Fold them until all the dry ingredients are incorporated and no egg whites remain. Egg whites will deflate and mixture should be the consistency of cake batter when they are ready. See notes below.
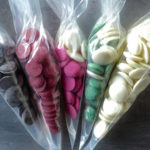
  5. Add batter into a piping bag. Cut the tip off about 1/2″, and pipe shapes onto the parchment lined baking sheet keeping the tip in the center and squeezing out until about 1/4″ before the outside of the circle. Then, pick up trays about 2″ from counter and let them fall down. Repeat. This helps to remove air bubbles from the batter. Let the batter sit about 45 minutes.
  6. Preheat your oven to 350°f about 15 minutes before the rest time is finished. Place cookies in oven to bake, and then lower the temperature to 300°f. Cook for 18-20 minutes.
  7. Let the macarons cool at least 20-30 minutes before decorating.

For the ganache:

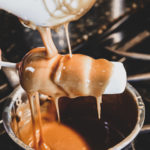
  1. In a small sauce pan, heat the heavy cream until hot (about 181°f). Turn off the heat and add in the chocolate and stir to combine.
  2. Next, add in the butter and continue to stir until everything is incorporated and smooth.
  3. Transfer to a heat proof bowl and let cool to room temperature. Then cover and refrigerate until firm (about 30 minutes).

For the milk chocolate buttercream:

  1. Heat milk in a small saucepan over moderate heat until hot. Whisk together yolks, flour, 1/4 cup confectioners sugar, and a pinch of salt in a bowl, then add hot milk in a stream, whisking. Transfer custard to saucepan and bring to a boil over moderate heat while continually whisking (about 30 seconds to one minute). Reduce heat and simmer, whisking, until mixture becomes very thick, about 30 seconds more, then transfer to a medium sized bowl. Cover surface of custard with plastic wrap and cool completely, about 45 minutes.
    Hot Cocoa Macaron // magicaltreatsathome.com
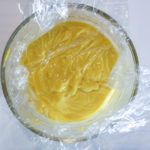
  2. Add vanilla and remaining confectioners sugar to custard and beat at medium speed until combined well, then increase speed to medium-high and beat in butter, 2 tablespoons at a time, until smooth. Buttercream will look broken when mixing in butter but keep mixing and it will come together eventually!
  3. Scrape down bowl. Add chocolates and beat until combined well.

Assembly:

  1. Using a #100 disher or melon baller, scoop out small circle of ganache and place in the center of the macron bottom. Repeat with remaining macarons. See notes below for storing leftover ganache.
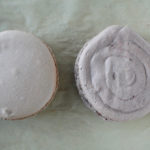
  2. Fill a piping bag 1/2 with frosting, cut about 1/2″ from the tip of the bag, and pipe circles of frosting around in a spiral until you hit the ganache center. Repeat with remaining macarons. See notes below for storing leftover frosting.
    Hot Cocoa Macaron // magicaltreatsathome.com
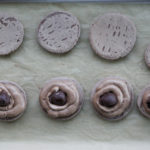
  3. Place macaron tops gently to form cookies sandwiches. Set aside.
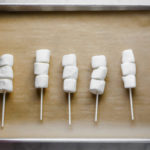
  4. Melt the white chocolate in the microwave inside a microwave safe bowl, like glass, for 30 seconds. Stir and microwave again for an additional 30 seconds. Keep stirring and microwaving in short bursts of 15-20 seconds until melted and smooth. Spoon a small mound in the center top of each macaron. Place the mini marshmallows on top to set. Drizzle a small amount of the white chocolate on top and then sprinkle crushed peppermint on the tops of each macaron.
  5. Wait about 10 minutes for the chocolate to set and then enjoy!

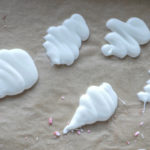
Bonus! Making the white flames:

  1. Any left over melted white chocolate can be thinly spread on a sheet of parchment in the shape of a flame. Refrigerate 5 to 10 minutes to set. Remove from refrigerator and gently remove from the parchment. These can be placed on top of the macarons to resemble the decorations at DCA.
    Hot Cocoa Macaron // magicaltreatsathome.com

Notes

  • Sifting the almond flour and powdered sugar together is necessary for the absorption of oils and to prevent clumping of batter.
  • When mixing the macaron batter, you want to push the batter against the side of the bowl to help mix and deflate the egg whites. The cocoa powder will dry out the mixture and you will want to keep mixing more than a normal batch of macarons.
  • Do not pipe all the way to the edge of the circle as the batter will spread a bit while resting.
  • If you want a smooth top to the macaron, besides dropping the sheet pan to get out air bubbles, how you pipe is also important. Position your piping bag over the center of the circle and continually squeeze out batter until you fill 3/4 of the circle. If you pipe in a spiral, you will have noticeable lines on the top. You can use a damp, not wet, finger to push down any batter that sticks up. See below.
    Hot Cocoa Macaron // magicaltreatsathome.com
  • Any additional air bubbles that are not removed from the drop onto the counter can be poked with a scribe or toothpick before resting.
  • Any left over macaron batter can be piped into smaller cookies and baked off for 15 minutes.
  • If you are having any technical issues still with your macarons, I highly suggest looking up some tutorial videos on YouTube (that is until we have some of our own up!).
  • Leftover buttercream can be stored in the fridge up to one week, brought to room temperature, and whipped before using. It can also be stored in the freezer up to 3 months.
  • Leftover ganache can be stored in an airtight container in the refrigerator up to 3 weeks.
  • Macarons can be stored in the refrigerator up to one week. Let them sit 10-15 minutes to come to room temp before enjoying.

Did you make this recipe?

Tag @magicaltreatsathome on Instagram and hashtag it #magicaltreatsathome

Share this:

  • Click to share on Facebook (Opens in new window) Facebook
  • Click to share on X (Opens in new window) X

Like this:

Like Loading...

Filed Under: Gluten Free, Recipes, Treats Tagged With: buttercream frosting, chocolate, christmastimetreats, DCA, Festival of Holidays, ganache, gluten free, holiday, macarons, peppermint, treat, white chocolate

Mickey Mouse Gingerbread Men

December 21, 2019 by Elana Lepkowski Leave a Comment

Mickey Mouse Gingerbread Man // magicaltreatsathome.com

Where can I find the original treat?

  • This holiday time treat can be found throughout the Disneyland resort.

Of all the treats this holiday season, the Mickey Mouse Gingerbread Man cookie was THE COOKIE to have. In fact, it was probably one of the most sought after TREATS in general at the parks. These last few weeks I’ve gone looking for the cookie inside the parks only to have it sell out before I could buy it by 11am (it may have even sold out sooner!). Of course, I could always wander into the Grand Californian and get it there too, but the premium price tag just meant I’d try again another day at the parks. Or, of course, make it at home! Which is what I did and now you can too!

Mickey Mouse Gingerbread Man // magicaltreatsathome.com

Let me preface this post with this one caveat, if you turned over the back of the packaging the gingerbread cookies came in, you would see that, well, there’s a lot of ingredients listed there, probably because they’re trying to preserve the cookies a bit before they can be sold (although, come on, I watched a guy buy all the cookies from the tray that were being brought to replenish the cookie cart—at the Grand Californian no less!). I don’t have a cabinet of preservatives; I have eggs, flour, sugar, and the like. So, this cookie will not taste exactly like THAT cookie—but I think it comes close!

The original cookie has some rather unique characteristics for a gingerbread cookie. For one, it’s thick and soft. Not the usual thin and crisp cookies you find for decorating houses. It is heavily spiced of cloves (clove is actually listed first before ginger), and the design work on it is done with chocolate, not the royal icing that you might get on any other holiday cookie. It’s also big, coming in around 7 inches.

Mickey Mouse Gingerbread Man // magicaltreatsathome.com

Now, you don’t need a Mickey Mouse gingerbread man cutter if you don’t already own one. If you have a gingerbread man cutter and a circle cutter, you could easily Frankenstein the design together once the shapes are on the sheet pan. However, this will work only if you’re pre-cutting the shapes and then baking them, which is definitely the more routine way to go, although, with this recipe, I found more luck in getting sharp outlines if I baked squares of the cookie dough first, and then used a cutter on the baked dough. And that’s because this dough is really soft.

With the pre-baking method you’re going to have more scraps (which you can keep in an airtight container and eat when all the gingerbread men are gone). However, a little pre-planning will mean less of them. I would suggest measuring out the shapes of your cutter and trying to roll out smaller sections of the dough so that you’re only going to have small sections around the cookies that will become scraps. If this seems like a lot of work just keep in mind you’ll be chilling dough with the pre-cut shapes several times. It’s the nature of these soft cookies!

Mickey Mouse Gingerbread Man // magicaltreatsathome.com

Once you have your cookies baked and cooled, the fun part of decorating can begin (and kids can help here!). The cookies at Disneyland had a sugar glaze over the center. Personally, I think that glaze helped keep this super soft cookies from falling apart (take a close look at anyone holding up a cookie on IG and you will probably see a few cracks from handling them). I also included a glaze here, but that can be optional for you. The colorful decorations here are done with candy melts, which you can get in the colors needed, so for convenience you won’t have to buy additional food coloring. Only melt one bag of the candy melts at a time for decorating! It hardens quickly so you only want to handle a single bag at a time. To smooth out bumps in the chocolate, or to round out and smooth shapes, a scribe or a toothpick will be handy. But even here you’ll want to move quickly as the small amount of the candy melts will start to harden upon contact with the cookie.

Mickey Mouse Gingerbread Man // magicaltreatsathome.com

Even though so far I may seem a bit cautious with this recipe, you should make this cookie. It’s soft, slightly chewy, with all the deliciously warm baking spices you want in a gingerbread cookie. And if you spend the time cutting these out and decorating them for a loved one, it really shows and makes a great present.

I’ve covered lots of tips in the post above today, but I’ve summed them all up in the notes below. Happy baking and happy holidays everyone!

Print
clock clock iconcutlery cutlery iconflag flag iconfolder folder iconinstagram instagram iconpinterest pinterest iconfacebook facebook iconprint print iconsquares squares iconheart heart iconheart solid heart solid icon
Mickey Mouse Gingerbread Man // magicaltreatsathome.com

Mickey Mouse Gingerbread Men

5 Stars 4 Stars 3 Stars 2 Stars 1 Star No reviews
  • Author: Elana Lepkowski
  • Yield: 10 5-1/2″ Mickey Mouse Gingerbread Men 1x
Print Recipe
Pin Recipe

Description

The holiday season isn’t complete without gingerbread cookies and these oversized, soft, generously spiced, Mickey Mouse Gingerbread Men are great to eat and to give for presents! A Disneyland-inspired treat.


Ingredients

Scale

For the cookies:

  • 4 cups (480 g) flour
  • ¾ cup packed (5 ¼ ounces, 160 g) light brown sugar
  • ¾ teaspoon baking soda
  • 1 tablespoon ground cinnamon
  • 1 tablespoon ground ginger
  • 2 teaspoon ground cloves
  • ½ teaspoon salt
  • 8 tablespoons butter, room temperature, cut into pieces
  • 2 eggs
  • 2/3 cup molasses
  • 1 teaspoon vanilla extract
  • 1/4 cup arrowroot powder (or corn starch)

Glaze:

  • 1/4 cup sugar
  • 2 tablespoons water

Decoration:

  • 1 cup white candy melts, separated
  • 1/4 cup each green, pink, red, and light cocoa candy melts

Specialty Tools:

  • Mickey Mouse Gingerbread Man cutter
  • pastry brush
  • plastic heat proof piping bags

Instructions

For the cookies:

  1. In the bowl of a stand mixer, combine the flour, brown sugar, baking soda, cinnamon, ginger, cloves, and salt. With the paddle attachment, mix on the lowest setting, adding in the butter pieces until the mixture resembles coarse sand.
  2. Next, mix in each egg until incorporated. Then pour in the molasses and vanilla extract. Mix on medium speed until well combined.
  3. Then, mix in arrowroot powder until incorporated.
  4. If baking sheets of dough first and then cutting, roll out dough into desired small sections about 1/4″ to 1/2″ thick, between two sheets of parchment. Chill for 30 minutes. If cutting and then baking, divide dough in half and roll out between two sheets of parchment. Transfer to baking sheets and chill in the freezer for 30 minutes. Then remove one pan at a time, peel the top layer of parchment off, cut out shapes, transfer to a new sheet of parchment and refrigerate for an additional 15-20 minutes.
  5. Preheat oven to 350°f, if baking whole sheets of dough: remove top sheet of parchment from the dough, and then bake sheets of dough for 14 minutes. If baking pre-cut shapes, place sheet pan directly from refrigerator to oven and bake 12-14 minutes.
  6. Let the dough rest for 5 minutes and then move the parchment off the cookie sheet and begin cutting out the shapes. Cool cookies to room temperature before beginning to decorate.
    Mickey Mouse Gingerbread Man // magicaltreatsathome.com

To decorate:

  1. Make the sugar glaze first by combining the sugar and water in a small saucepan over medium-high heat, stirring continually until all the sugar crystals have dissolved.
  2. Remove from heat, let cool slightly, and then apply a light coating of the liquid to the cookies using a pastry brush. Set aside cookies.
  3. Melt 2/3 cup of the white candy melts directly in the pastry bag for 30 seconds, knead the bag slightly and microwave in short bursts of 15-20 seconds until fully melted.
  4. Cut a small amount of the tip off the bag and make sure the candy melts is flowing freely by squeezing out a small amount first.
  5. Then, outline the cookies with the white candy melts, including hems (see photos).
    Mickey Mouse Gingerbread Man // magicaltreatsathome.com
  6. Continue with the other candy melts to complete the design.
    1. light cocoa for eyes, nose, and mouth
    2. pink plus 2 tablespoons (or more) of the white melts for the light pink cheeks
    3. red for the bow tie
    4. green plus a tablespoon of white candy melts for the buttons
  7. Decorations will fully harden in about an hour. Cookies can be kept in an airtight container for up to a week!

Notes

  • To create the Mickey shape without a cutter, combine a gingerbread man cutter and a small circle cutter proportionate to the head for the ears. Slightly overlap the ears and head to secure when baked.
  • The dough is very soft and will warm considerably while working with it. Always chill dough if it starts to feel warm so that it is easier to manipulate.
  • If cutting and then baking, freeze rolled out cookie dough for 30 minutes and then cut shapes out immediately, using a metal spatula or bench scraper to help gently lift dough up if needed. Refrigerate cookie shapes after cutting for an additional 15 minutes before baking.
  • The arrowroot powder helps keep the shape and reduces the cookies from spreading. It also reduces the puffiness of the cookie.
  • To reduce scraps if baking and then cutting, lay out cutter and trace shapes on parchment as close together as possible, leaving a small amount of space for spreading. Flip the parchment over and roll out dough to that shape. Dough should be around 1/4″. Thicker dough will need more baking time.
  • Sugar glaze will harden and become less tacky quicker if cookies are refrigerated after glazing.
  • Move quickly while using the candy melts as they harden fast.
  • To smooth out bumps in the chocolate, or to round out and smooth shapes, a scribe or a toothpick.
  • Extra melted candy melts can be left to harden and stored in a cool, dry place, and melted again for another use.

Did you make this recipe?

Tag @magicaltreatsathome on Instagram and hashtag it #magicaltreatsathome

Mickey Mouse Gingerbread Man // magicaltreatsathome.com

Share this:

  • Click to share on Facebook (Opens in new window) Facebook
  • Click to share on X (Opens in new window) X

Like this:

Like Loading...

Filed Under: Recipes, Treats Tagged With: christmastimetreats, cookies, gingerbread, holiday, Mickey Mouse, treat

5 Minute Treats: Peppermint Affogato

December 13, 2019 by Elana Lepkowski Leave a Comment

Peppermint Affogato // magicaltreatsathome.com

Where can I find the original treat?

  • This holiday time treat is available at Schmoozies! inside California Adventure.

What?! Another new series this week on the site?! YES! Today we’re launching what I hope will be a new series that will appear on here from time to time: 5 Minute Treats. And today we’re starting with this Peppermint Affogato.

Peppermint Affogato // magicaltreatsathome.com

What is an affogato? An affogato is an Italian dessert that consists of two delicious things: ice cream (or gelato) and espresso. And while it may be a simple recipe, the end result is anything but simple. Over at Schmoozies! in DCA, they regularly have the classic vanilla topped with a large pour of espresso, but this holiday season, they had both a peppermint ice cream and a cinnamon-sugar (churro!) ice cream option.

Peppermint Affogato // magicaltreatsathome.com

The peppermint ice cream affogato was just pure deliciousness, with the hot espresso slowly melting my peppermint candy specked pink ice cream, it came a whole other flavor once combined. The slightly bitter espresso was tamed by the sweetness of the ice cream and I found myself slurping up the whole thing unaware, or caring, who was watching me enjoy it.

Peppermint Affogato // magicaltreatsathome.com

But here’s why I’m giving you this “recipe” today. It’s holiday time, but that doesn’t mean you have to make complicated desserts. Especially when something simple like this tastes just so good. If you’re neck-deep in cookies and just want something easy to make, this is it. Bust this out after a meal and no one is going to ask you how long it took to make, or “is this it?”, because they’ll be too busy scarfing it down.

Peppermint Affogato // magicaltreatsathome.com

My hope with these “5 Minute Treats” is that you give yourself the space to not always feel like treats need to be complicated. They can be simple, but these recipes will always be good. I hope you enjoy one of these Peppermint Affogatos tonight or this weekend. Maybe treat yourself while you start wrapping presents and need an extra boost of caffeine (and that’s exactly what I did this week). Enjoy!

Print
clock clock iconcutlery cutlery iconflag flag iconfolder folder iconinstagram instagram iconpinterest pinterest iconfacebook facebook iconprint print iconsquares squares iconheart heart iconheart solid heart solid icon
Peppermint Affogato // magicaltreatsathome.com

5 Minute Treats: Peppermint Affogato

5 Stars 4 Stars 3 Stars 2 Stars 1 Star No reviews
  • Author: Elana Lepkowski
  • Total Time: 5 minutes
  • Yield: 1 Peppermint Affogato 1x
Print Recipe
Pin Recipe

Description

This two-ingredient creamy Peppermint Affogato comes together in just minutes! A Disneyland-inspired treat.


Ingredients

Scale
  • 1–2 scoops peppermint ice cream (with the candy pieces!)
  • 1 shot espresso, freshly made

Extra Tools

  • heat proof espresso glasses
  • demitasse spoons

Instructions

  1. Brew your espresso shot.
  2. Scoop out ice cream into a heat proof glass mug or small bowl.
  3. Pour espresso over the ice cream and enjoy!

Notes

  • We are Nespresso users at home, so I found that a regular shot was plenty. The lungo shot was a bit too much and melted the ice cream more than I desired creating a warm soup.
  • If you want to make a batch for a party, portion out ice cream into small cups and freeze ahead of time. When ready to serve, brew lungo shots in a large measuring glass with a spout. Then you can pour small amounts of espresso all at once into each cup.

Did you make this recipe?

Tag @magicaltreatsathome on Instagram and hashtag it #magicaltreatsathome

Peppermint Affogato // magicaltreatsathome.com

Share this:

  • Click to share on Facebook (Opens in new window) Facebook
  • Click to share on X (Opens in new window) X

Like this:

Like Loading...

Filed Under: 5 Minute Treats, Gluten Free, Recipes, Treats Tagged With: 5 Minute Treat, christmastimetreats, Disney's California Adventure, espresso, ice cream, peppermint, Schmoozies, treat

Christmas Tree Churro

December 9, 2019 by Elana Lepkowski Leave a Comment

Christmas Tree Churros // magicaltreatsathome.com

Where can I find the original treat?

  • This holiday treat is located in Critter Country.

I haven’t counted, but I would bet there are more holiday churros out there than candy apples or rice crispy treats this year. There are just SO many to choose from, and narrowing down which I was going to choose came down to two things: flavor and nostalgia. And that churro was the Christmas Tree Churro.

Christmas Tree Churros // magicaltreatsathome.com

Here’s the weird thing about this particular churro, it was made differently from the posted photo, and I’ve seen it look different even from other people’s photos of it. So, I have to approach this recipe with a caveat: it might be different from what you had, but one thing everyone had in common was that it came with the cherry dipping sauce.

Christmas Tree Churros // magicaltreatsathome.com

Now, it’s this cherry dipping sauce, with a very jelly-like consistency reminiscent of a doughnut or pie filling, that filled me with nostalgia. When I was younger, my Grandmother would make mini cheesecakes topped with jarred cherry jelly for every occasion. I’m talking birthdays, holidays, baby showers, pretty much any gathering we attended in the ’80’s and ’90’s always included a tray of these treats. And I loved them. Really, really loved them. I could probably eat 10 of these if no one was looking. I think I can pinpoint to these treats starting my obsession with cheesecake that still is going strong decades later.

Christmas Tree Churros // magicaltreatsathome.com

Anyways, these churros are the classic churro rolled in cookie crumbles and sprinkled with green (and apparently sometimes red) sanding sugar. The side comes with it (as opposed to costing extra), and altogether make for a classic looking holiday treat. I really love the buttery flavor the cookies impart here (similar to those Banana Pudding Churros from earlier in the year), and the tart cherry flavor cuts the sweetness back a bit, so combined it’s well balanced.

Christmas Tree Churros // magicaltreatsathome.com

After these are fried up, kids can lend a hand to help decorate. Rolling in cookies (even crushing the cookies), and sprinkling toppings are all kid friendly here.

So, find some holiday music, heat up the oil, and start frying these tasty holiday treats! Enjoy!

Christmas Tree Churros // magicaltreatsathome.com
Print
clock clock iconcutlery cutlery iconflag flag iconfolder folder iconinstagram instagram iconpinterest pinterest iconfacebook facebook iconprint print iconsquares squares iconheart heart iconheart solid heart solid icon
Christmas Tree Churros // magicaltreatsathome.com

Christmas Tree Churro

5 Stars 4 Stars 3 Stars 2 Stars 1 Star No reviews
  • Author: Elana Lepkowski
  • Yield: 10–16 churros (depending on tip size) 1x
Print Recipe
Pin Recipe

Description

This Christmas tree inspired holiday churro is decked out in red and green sanding sugar, edible stars, and rolled in buttery cookie pieces. A Disneyland-inspired treat.


Ingredients

Scale
  • 1 cup water
  • 1/2 cup butter
  • 1 tablespoon granulated sugar
  • big pinch of salt
  • 1 cup all purpose flour
  • 2 eggs
  • vegetable oil for frying
  • 1/2 cup granulated sugar
  • 1 teaspoon cinnamon
  • 1 package of Walker’s shortbread cookies (about 9 fingers), crushed
    Christmas Tree Churros // magicaltreatsathome.com
  • 2 tablespoons green sanding sugar
  • 2 tablespoons red sanding sugar
  • edible stars
  • cherry jam or pie filling

Specialty Tools

  • spider for frying
  • Wilton 1 M piping tip  or
  • Ateco 847 piping tip
  • pastry bag
  • candy thermometer

Instructions

  1. First, line two half sized sheet pans with parchment, set aside. Mix together 1/2 cup of granulated sugar and cinnamon in a long shallow bowl or loaf pan, set aside.
  2. Next, crush cookies in a ziplock bag with a rolling pin until finely ground. Alternatively, you can pulse in a food processor until a sand-like consistency forms. Set aside in a large, shallow bowl.
    Christmas Tree Churros // magicaltreatsathome.com
  3. In a medium sized saucepan over medium-high heat, combine water, butter, sugar and salt. Bring to a boil, or until butter has melted.
  4. Turn burner to low and pour in all the flour at once. Stir until there are no visible flour lumps and dough has begun to stick together in a ball and pulled away from the sides of the pan.
  5. Remove pan from heat and let sit 5 minutes. Then stir in each egg until incorporated. Dough will appear to break or become lumpy. Continue to stir until it forms a smooth, sticky dough.
  6. Fill a pastry bag fitted with a Wilton 1 M open star tip (for thinner churros) or with a Ateco 847 closed star tip (for thicker churros, shown in this post) half full with batter (see notes below on filling pastry bags).
  7. If not frying immediately, pipe 6-8″ long dough onto the sheet pan. Refrigerate dough at least 30 minutes and up to two days. Batter will stiffen the more it sits, so let the dough come to room temperature before frying.
  8. If frying immediately, fill a dutch oven or deep frying pan with vegetable oil at least 2″ up the side of the pan (I found a 1/2 gallon of avocado oil worked for me in my large dutch oven. See note below about reusing oil.). Heat oil to 340-350°f, using a candy thermometer to keep the temperature constant. You may need to adjust heat up or down during cooking a few degrees.
  9. Place (if piped earlier) or pipe churros 2-3 at a time into the cooking oil for 6 minutes, turning after 3 minutes with a spatula or spider. Wait until oil comes back to temperature before adding next batch. Thicker churros may need an additional 30 seconds to one minute to fully cook through.
    Christmas Tree Churros // magicaltreatsathome.com
  10. Using a spider or large spatula, remove churros from oil and drain on a cooling rack over parchment or on a paper towel. Wait at least a minute and then toss the churro in the cinnamon sugar, tapping off any excess. Then roll churro in the cookie crumbs, lightly pressing to adhere. Set churro aside. Repeat with all the churros.
    Christmas Tree Churros // magicaltreatsathome.com
  11. Next, sprinkle churros with red and green sanding sugar, and edible stars.
  12. Finally, serve churros with a small dipping bowl of the cherry filling.

Notes

  • Do not overfill your pastry bag! Fill in two to three batches. If there is too much dough, it will seep out the top and will be hard to pipe.
  • Slowly pipe out dough all of a consistent size, smaller spots on the churro can cause them to become more fragile while handling and can break in the oil or while coating in sugar.
  • Churro dough can be piped out onto parchment and covered in the fridge up to 48 hours.
  • If you want to make you churros immediately after making dough without the chilling time, once oil has reached temp, starting about one inch above the oil, pipe a small line of dough down into oil and either snip end with scissors, or break the dough off the pastry tip on the side of your pan. Follow directions above for frying.
  • Thicker churros will require a longer cooking time to fully cook through the center. Test one churro first to adjust your cooking time.
  • Cooking oil can be fine strained and stored again for another use. I strain back into the bottle it came from. Well strained oil can be stored in a cool, dry place and used up to several times.
  • Churros curling? That could be one of a few reasons. One is that it will naturally shrink and change shape as the dough hits the oil and puffs up. I found that the stiffer dough from sitting in the fridge resulted in straighter churros while fresher dough tending to curl more. Also, if you’re using a circular pot like a dutch oven, churros may rest against the inside edge of the pan while cooking causing them to take on the curved shape of the pan. To prevent this, nudge your churro with the spider or spatula immediately after placing in oil when it pops back up to the surface. Continue to nudge gently back and forth for about 20-40 seconds or until the dough has gotten stiff in the oil.

Did you make this recipe?

Tag @magicaltreatsathome on Instagram and hashtag it #magicaltreatsathome

Christmas Tree Churros // magicaltreatsathome.com

Share this:

  • Click to share on Facebook (Opens in new window) Facebook
  • Click to share on X (Opens in new window) X

Like this:

Like Loading...

Filed Under: Recipes, Treats Tagged With: cherry, Christmas, christmastimetreats, churro, cookies, Critter Country, disneyland, holiday, treat

Mickey Mouse Peppermint Beignets

December 2, 2019 by Elana Lepkowski Leave a Comment

Mickey Mouse Peppermint Beignets // magicaltreatsathome.com

Where can I find the original treat?

  • This holiday time treat can be found at the Mint Julep Bar at the Disneyland Resort.

Peppermint is a very holiday time flavor. From candy canes to chocolate bark to all manner of baked goods, you cannot escape this refreshing addition to treats this time of year. At Disneyland, there is an obvious peppermint theme going on… there are even Mickey Mouse peppermint candy shaped pillows this year. And they smell of peppermint, and yes, I’ve bought a couple for Christmas decorating. So of course I also had to try a batch of the holiday time favorite at the park, the Mickey Mouse shaped Peppermint Beignets.

Mickey Mouse Peppermint Beignets // magicaltreatsathome.com

What I love about these is that they don’t go overboard on the peppermint. It’s a nice balance between the sweet powdered sugar with enough of a “touch” of peppermint so that you can taste and see it (pink powdered sugar!), but your mouth isn’t overwhelmed by the bracing coolness that can accompany peppermint.

Making these at home you can adjust that up or down to your preference. I kept my peppermint addition close to what I feel you get at the parks but if you looooove some peppermint flavor, you’ll definitely want to up the candy canes here. And yes! We’re using ground up candy canes to flavor the powdered sugar!

Mickey Mouse Peppermint Beignets // magicaltreatsathome.com

These beignets follow the same recipe as the classic beignets, or any of the other flavored ones on this site. It’s the addition of the peppermint that gives these the unique holiday twist.

Mickey Mouse Peppermint Beignets // magicaltreatsathome.com

One question I got last time was about freezing the dough. The short answer is yes, you can do the 30 minute proof in the bowl, roll it out, cut the shapes, and then freeze in plastic wrap. You can keep it frozen up to a month. When ready to use, you can remove from the freezer, and let thaw overnight in the refrigerator. Then unwrap from plastic, move to your counter, cover with a towel, and let rise two hours. I found that they did not puff up as well in the oil, but I only did one test of these so there could have been other factors here I haven’t taken into consideration. If you’ve frozen and then fried, let me know how yours turned out!

Also, remember to read through all the notes after the recipe for some helpful tricks and notes! OK, now let’s get that oil hot and make some holiday beignets!

Mickey Mouse Peppermint Beignets // magicaltreatsathome.com
Print
clock clock iconcutlery cutlery iconflag flag iconfolder folder iconinstagram instagram iconpinterest pinterest iconfacebook facebook iconprint print iconsquares squares iconheart heart iconheart solid heart solid icon
Mickey Mouse Peppermint Beignets // magicaltreatsathome.com

Mickey Mouse Peppermint Beignets

5 Stars 4 Stars 3 Stars 2 Stars 1 Star No reviews
  • Author: Elana Lepkowski
  • Yield: 15 – 18 Mickey Mouse Peppermint Beignets 1x
Print Recipe
Pin Recipe

Description

Melt-in-your-mouth Mickey Mouse Peppermint Beignets are full of holiday spirit with a minty crushed candy canes and lots of powdered sugar! A Disneyland-inspired treat.


Ingredients

Scale
  • 1/2 teaspoon dry yeast
  • 1/4 cup warm water (105º)
  • 1/4 cup (50 g) sugar
  • 2 tablespoons vegetable shortening (I used refined coconut oil)
  • 1/2 teaspoon salt
  • 1/2 cup heavy cream
  • 1 egg
  • 4 cups all-purpose flour
  • 1/2 cup boiling water
  • Vegetable oil for frying, like avocado
  • 1 cup powdered sugar
  • 2–3 mini candy canes, crushed (I used a coffee grinder for fine and small chunks of candy)

Specialty Tools:

  • heavy bottomed dutch oven
  • candy thermometer
  • Mickey Mouse cutter

Instructions

  1. Sprinkle yeast over warm water in a small bowl, gently stirring to dissolve. Let stand for 5 minutes.
  2. Combine sugar, shortening, salt, heavy cream, egg, flour and boiling water in a large bowl. Mix until everything is just combined and then stir in yeast mixture. With the dough hook attachment of an electric mixer on medium speed, mix the dough just until combined and smooth. About 3-4 minutes. Let dough rest for 30 minutes in the bowl.
  3. Flour your surface and roll to 1/4-inch thickness. Using the Mickey Mouse cutter, cut dough pieces, twisting slightly, and carefully removing dough from around cutter before releasing. You may have to combine dough and roll out again to cut more shapes out. Cover with a towel and let dough rise until doubled in size in a warm, draft-free area, about 1-1/2 to 2 hours.
    Mickey Mouse Peppermint Beignets // magicaltreatsathome.com
  4. While dough is rising, mix together the powdered sugar and crushed candy canes in a large bowl. Set aside.
  5. Pour enough oil into a deep-sided, heavy bottomed pot until it reaches 2 inches up sides; heat oil over medium heat to 370°F.
  6. Add 2-3 beignets to oil; fry until golden brown on both sides, about a minute each, turning once.
  7. Remove from hot oil with a slotted spoon and place on a baking sheet lined with paper towels.
  8. Let rest at least five minutes, and then toss in the powdered sugar and candy cane mix. You can sift extra sugar over all the beignets before serving.
    Mickey Mouse Peppermint Beignets // magicaltreatsathome.com

Notes

  • Candy canes clumping when you crush them? Add a teaspoon of powdered sugar to the mix. It will absorb some of the excess oil the candy might give off.
  • If you are in a higher altitude, your dough may need less time to rise for the second proof.
  • Dough may have to be recombined and rolled a second time if you have a lot of scraps.
  • Wait for oil to come back to temperature before adding next batch of beignets to the pot.
  • No dough hook attachment? Knead dough until smooth and shiny, about 5-8 minutes and then proceed with the recipe.
  • Want to make these at night for the next morning? After cutting Mickey Mouse shapes out. Transfer to a baking sheet and let rest, covered with a towel, in the refrigerator overnight. Let come to room temperature before frying in the morning. Dough shapes can also be frozen and then left in refrigerator overnight and fried off.
  • If your dough gets a skin while rising, put the sticky side down first into the oil to avoid tearing while the beignet expands.
  • Strain your oil after it reaches room temperature. It can be used again!

Did you make this recipe?

Tag @magicaltreatsathome on Instagram and hashtag it #magicaltreatsathome

Mickey Mouse Peppermint Beignets // magicaltreatsathome.com

Share this:

  • Click to share on Facebook (Opens in new window) Facebook
  • Click to share on X (Opens in new window) X

Like this:

Like Loading...

Filed Under: Recipes, Treats Tagged With: beignet, christmastimetreats, doughnut, Mickey Mouse, Mint Julep Bar, peppermint, treat

Disneyland Holiday Cupcakes 2019

November 25, 2019 by Elana Lepkowski Leave a Comment

Disneyland Holiday Cupcakes 2019 // magicaltreatsathome.com

Where can I find the original treat?

  • This holiday time treat can be found at the Jolly Holiday Bakery Cafe at the Disneyland resort.

I’m having a pretty hard time this year trying to narrow down what to eat treat-wise every week at the park; the offerings this year are just so good! One of my stops is always the Jolly Holiday Bakery Cafe because the baked goods there almost never disappoint. Case in point, the Holiday Cupcake. Which is what we’re making this week!

Disneyland Holiday Cupcakes 2019 // magicaltreatsathome.com

With such a nondescript name, the “Holiday Cupcake” could be anything, and what it is, is a moist vanilla bean cupcake with a tight crumb, lightly sweetened two-tone frosting, delicate red and white sugar pearl decorations, edible silver stars, a peppermint-inspired white chocolate candy, and a surprise filling of red and green M&M’s candies. What a mouthful! What could easily be a treat too sweet to finish, is actually pretty balanced in that department and I think it has to do with the lightly sweetened frosting. Landing somewhere between an Italian buttecream and Ermine frosting, it’s light like whipped cream, but stable, and very lightly sweetened.

Disneyland Holiday Cupcakes 2019 // magicaltreatsathome.com

So, for this recipe I’m going with Ermine frosting, a boiled milk style frosting, which might not be a familiar name to some people, but it’s actually been around for some time. Ermine has a whipped cream like texture when made fresh, and was the original type of frosting for red velvet cakes before the ubiquitous cream cheese frosting took over. I love to use it on cakes as a filling and outer layer, and then decorate with American buttercream for decorations as I get the sharper edges I am looking for when I want stars and lines. I hope you try the combination, people I’ve served it to love the contrast in frostings!

The vanilla cupcake base utilizes vanilla bean paste so you get to see all the tiny vanilla bean seeds throughout the cake. It’s moist but holds up to cutting as you’ll need a bit of a tighter crumb for hollowing out the center to fill with candy.

Disneyland Holiday Cupcakes 2019 // magicaltreatsathome.com

And the decorations, well, here you can go as big and bold as you want. Or tone it down too. The sugar pearls and the edible stars can easily be purchased from Amazon or your local craft store like Michael’s. The peppermint inspired white chocolates can be made at home (I know these are definitely looking homemade!), but you could also sub in an actual peppermint here too, and I think that would look pretty.

Disneyland Holiday Cupcakes 2019 // magicaltreatsathome.com

Kids can help in a few ways here. My 2-1/2 year old helped me mix the cupcakes, fill them, and decorate. But I’d say maybe 5 and up could handle piping out the frosting too.

Decorating cupcakes in such a festive way has really gotten me into the holiday spirit this year. And I hope they bring a little magic into your home and kitchen too!

Print
clock clock iconcutlery cutlery iconflag flag iconfolder folder iconinstagram instagram iconpinterest pinterest iconfacebook facebook iconprint print iconsquares squares iconheart heart iconheart solid heart solid icon
Disneyland Holiday Cupcakes 2019 // magicaltreatsathome.com

Disneyland Holiday Cupcakes 2019

5 Stars 4 Stars 3 Stars 2 Stars 1 Star No reviews
  • Author: Elana Lepkowski
  • Yield: 12 Holiday Cupcakes 1x
Print Recipe
Pin Recipe

Description

The Holiday Cupcake is a festively decorated vanilla bean cupcake topped with two-toned, lightly sweetened ermine frosting, with a candy filled surprise center. A Disneyland-inspired treat.


Ingredients

Scale

For the cupcakes (adapted from Sally’s Baking Addiction):

  • 1 and 2/3 cup (210g) all-purpose flour
  • 1/2 teaspoon baking powder
  • 1/4 teaspoon baking soda
  • 1/2 teaspoon salt
  • 1 cup (200g) granulated sugar
  • 1/2 cup (115g) unsalted butter, melted and slightly cooled
  • 2 large egg whites
  • 1/4 cup (60g) Greek yogurt
  • 3/4 cup (180ml) milk (or non-dairy milk)
  • 2 teaspoons vanilla bean paste

For the frosting (adapted from Wilton):

  • 1 cup granulated sugar
  • 1/4 cup all-purpose flour
  • 1/4 teaspoon salt
  • 1 cup cream
  • 1 cup butter, softened (2 sticks)
  • 1 teaspoon vanilla extract

For the decoration:

  • green food coloring gel (Leaf green from Americolor used here)
  • red sugar pearls
  • white sugar pearls
  • silver edible stars
  • 1 cup white melting chocolate wafers
  • 1 ounce red candy melts
  • red and green M&M’s (~72)

Specialty Tools:

  • holiday cupcake liners
  • 3/4” round cutter (I use one from this set)
  • pastry bags
  • Wilton 2A pastry tip
  • hemisphere mold

Instructions

For the cupcakes:

  1. Preheat oven to 350°F (177°C). Line muffin pan with 12 cupcake liners. Set aside.
  2. In a medium bowl, mix together flour, baking powder, baking soda, and salt. Set aside. In a large microwave-safe bowl, melt butter in the microwave. Whisk in sugar – mixture will be gritty. Whisk in egg whites, yogurt, milk or milk substitute, and vanilla bean paste until combined.
  3. Slowly mix dry ingredients into the wet ingredients until no lumps remain. Batter will be thick.
  4. Divide batter among 12 cupcake liners and bake for 20 minutes or until a toothpick inserted in the center comes out clean. Allow to cool.

For the frosting:

  1. In medium saucepan, stir together sugar, flour and salt. Whisk in cream until smooth. Cook over medium heat, stirring constantly, until very thick, about 5-7 minutes. Remove from heat and pour into medium bowl; press plastic wrap over top of mixture and sides of bowl to seal completely and prevent a skin from forming. Let cool to room temperature, about 1 to 1-1/2 hours.
  2. In a stand mixer, beat butter at medium speed for 5 minutes until light and fluffy. Slowly drizzle cream mixture into whipped butter and beat until smooth, scraping down bottom and sides of bowl often. Add vanilla and beat 3 more minutes, or until frosting reaches the consistency of whipped cream.
  3. Remove 2/3 of the frosting and spread it into a large piping bag, fitted with a Wilton 2A tip, on one side of the bag. Set aside.
  4. To the remaining frosting, add one drop of the leaf green food coloring. Whip until all the frosting is green.
  5. To make the two tones frosting, you’ll need to spread the green frosting inside the pastry bag on top of the white cream, so that it is in two layers. Twist the bag and push the frosting towards the tip. Pipe some of the frosting out in a swirl until both colors have appeared. Set aside.

For the decorations:

  1. At least one hour before decorating the cupcakes, melt the white chocolate in the microwave inside a microwave safe bowl, like glass, for 30 seconds. Stir and microwave again for an additional 30 seconds. Keep stirring and microwaving in short bursts of 15-20 seconds until melted and smooth. Use can alternatively use a double boiler for melting. Repeat for the red candy melts and transfer them into a small pastry bag. Cut a small amount of the tip off the end.
  2. Pipe the red candy melts as lines mimicking peppermint candy swirls inside the round molds. Then pour the white chocolate over the red and, using a toothpick, swirl the two together. Refrigerate about 45 minutes to an hour. Then pop out the candies and set aside.
  3. Take the 3/4″ cutter and press firmly into the center of the cupcake. Twist and lift the cutter to remove the center. Repeat for all the cupcakes. Save the insides for cake pops, or eat them if you wish!
  4. Fill each center of the cupcake with 6 red and green M&M’s candy. Set aside and repeat with the other cupcakes.
  5. Next, pipe out a swirl of frosting on each cupcake, and then sprinkle the edible silver stars on top. Place red and white sugar pearls on the frosting.
    Disneyland Holiday Cupcakes 2019 // magicaltreatsathome.com
  6. Finally, place a peppermint inspired white chocolate (or real peppermint if you choose) on the cupcake. Enjoy!

Notes

  • If you cannot find vanilla bean paste, you can substitute vanilla extract 1:1 and scrape in some vanilla bean seeds from half a pod, or leave out the seeds entirely.
  • Store cupcakes in an airtight container at room temperature for up to 3 days and in the refrigerator up to 7.
  • The cream mixture can be refrigerated up to three days and brought to room temperature before mixing into the butter.
  • Ermine frosting can be refrigerated up to 3-4 days in an airtight container. It needs to be whipped again before using. If frosting is too cold when whipped it will appear to break. But don’t worry! Keep whipping for several minutes and it will combine and become smooth again like whipped cream.

Did you make this recipe?

Tag @magicaltreatsathome on Instagram and hashtag it #magicaltreatsathome

Disneyland Holiday Cupcakes 2019 // magicaltreatsathome.com

Share this:

  • Click to share on Facebook (Opens in new window) Facebook
  • Click to share on X (Opens in new window) X

Like this:

Like Loading...

Filed Under: Recipes, Treats Tagged With: christmastimetreats, cupcakes, ermine frosting, holiday, jolly holiday bakery cafe, M&Ms, treat, vanilla, white chocolate

Churro Marshmallow Wand

November 18, 2019 by Elana Lepkowski 5 Comments

Churro Marshmallow Wand // magicaltreatsathome.com

Where can I find the original treat?

  • This holiday time treat can be found at Trolley Treats and Marceline’s Confectionery at the Disneyland Resort.

One of the cult favorite treats at Disneyland, Churro Toffee, is getting a new twist this holiday season as the coating for a marshmallow wand! What might seem like ‘sugar on a stick’ is actually a pretty tasty treat that doesn’t leave your teeth singing. And we’re making some today!

Churro Marshmallow Wand // magicaltreatsathome.com

This treat was consistently selling out when they debuted it. When I tried one at Trolley Treats in DCA, the man behind the counter told me that just moments before a guy came in and bought 12 for his coworkers. WHAT A NICE COWORKER TO HAVE!!!

I’m sure they’ll stock more, but in the meantime, making these in your kitchen is definitely an option. There’s a lot of layers here, but if you get everything lined up and ready, it’s pretty quick to move through all the steps and get a handful ready and made.

Churro Marshmallow Wand // magicaltreatsathome.com

Now, the original treat has crushed pieces of the churro toffee dusted over the outside, i.e., very, very, tiny pieces of toffee. Here I opted not to crush mine too small, so that I get some nice crunchy pieces with the soft, pillow-y marshmallows. And if you’re not familiar with these wands, they layer them as such: 3 marshmallows on a lollipop stick, dipped in caramel, and then dipped again in white chocolate and rolled in cinnamon sugar and dusted with churro toffee. I love how the buttery caramel stands in for that thick layer of toffee you get with the Churro Toffee.

If kids are helping in the kitchen, I’d stay clear of having them dip in the caramel unless they are experienced with the stove and hot things like caramel. Otherwise, dip and set the wands with the caramel, and then they can dip into the white chocolate and roll them in the cinnamon sugar and churro toffee.

Churro Marshmallow Wand // magicaltreatsathome.com

Ok churro toffee fans, time to try something a little new. And if you’re looking for a recipe for just the churro toffee, we’ve got that too! And remember to check out all our notes at the end of the recipe!

Print
clock clock iconcutlery cutlery iconflag flag iconfolder folder iconinstagram instagram iconpinterest pinterest iconfacebook facebook iconprint print iconsquares squares iconheart heart iconheart solid heart solid icon
Churro Marshmallow Wand // magicaltreatsathome.com

Churro Marshmallow Wand

5 Stars 4 Stars 3 Stars 2 Stars 1 Star No reviews
  • Author: Elana Lepkowski
  • Yield: 6 Churro Toffee Marshmallow Wands 1x
Print Recipe
Pin Recipe

Description

Soft and fluffy marshmallow wands are enrobed in creamy caramel and dipped in white chocolate with a dusting a cinnamon-sugar and churro toffee. A holiday-time Disneyland-inspired treat.


Ingredients

Scale
  • 18 marshmallows
  • 9 ounces (~32 candies) individually wrapped caramels (like Kraft)
  • 1–3/4 tablespoons water
  • 1 cup granulated sugar
  • 2 teaspoons ground cinnamon
  • 1 teaspoon of coconut oil
  • 10 ounces of white candy melts
  • 1/4 cup of crushed churro toffee pieces (or if you don’t have any stashed away in your freezer like me, any English-style toffee will do)
  • 6 lollipop sticks

Instructions

  1. Place 3 marshmallows on each lollipop stick and set aside on a parchment lined sheet pan.
    Churro Marshmallow Wand // magicaltreatsathome.com
  2. Mix together the sugar and cinnamon in a large, shallow bowl that can accommodate the length of the marshmallow wand. Set aside.
  3. Unwrap all the caramels and add to a small saucepan. Pour water in and heat over medium-low heat.
  4. Stir constantly until everything has melted and caramels are smooth (about 7-8 minutes).
  5. Once melted (caramels should drip in a ribbon from a spoon back into the pan), dip each wand into the caramel, turning quickly to coat OR ladle the caramel over the wand, turning to coat. Let excess caramel drip off for at least 30 seconds, turning while it drips for even coating, tap the wand gently but firmly on the edge of the pan to remove any additional excess caramel, and then place back on the  parchment.
    Churro Marshmallow Wand // magicaltreatsathome.com
  6. When all the wands have been dipped, place the baking sheet in the refrigerator for 15-20 minutes so that the caramel will be set for dipping.
    Churro Marshmallow Wand // magicaltreatsathome.com
  7. While the caramels set, melt your white chocolate for coating. Combine the white candy melts and coconut oil in the microwave inside a microwave safe bowl, like glass, for 30 seconds. Stir and microwave again for an additional 30 seconds. Keep stirring and microwaving in short bursts of 15-20 seconds until melted and smooth. Use can alternatively use a double boiler for melting. Do not let the white chocolate get over 110°f as it can burn the chocolate (use a candy thermometer if you’re not sure about this).
  8. Remove the marshmallow wands from the refrigerator. You’ll know they are set when they lift easily off the parchment. If they still stick, keep them in 5 minutes longer.
  9. Set up the cinnamon sugar bowl next to your white chocolate, and set out the crushed churro toffee in a small bowl as well.
  10. Dip the marshmallow wand in the white chocolate, or ladle chocolate over, turning to coat. Tap the stick firmly on the side of your pan to remove any excess chocolate. Then sprinkle churro toffee over the white chocolate and immediately roll in the cinnamon sugar. You can also ladle the sugar over the wand, turning to coat. Whatever is easiest for you! Then place back on the parchment.
  11. Repeat with the remaining marshmallow wands.
  12. Let sit at least 30 minutes to firm up or in the refrigerator for quicker results. Enjoy!

Notes

  • Melted caramel is HOT! Use caution in the kitchen. Do not dip your fingers or hands into the caramel has it can adhere to skin and burn you. Keep away from children.
  • Use hot water to remove caramel from pans and utensils.
  • If the marshmallow wands start to stick to the parchment while you are dipping and coating, stick the pan with the uncoated wands back to chill in the refrigerator for a few minutes. If your kitchen is really hot, keep them in there the whole time, taking one at a time out to coat and decorate.
  • If you have extra melted caramel that has dried around your wand, use kitchen shears to remove it immediately after removing from the refrigerator.
  • Did your chocolate coating break when you first dipped your wand in? Wait for the chocolate to cool down more. It should drip freely from a spoon without it seizing when the spoon is shaken slightly (will cause crevices in the chocolate on the spoon). If it breaks on the wand, your wand also might be too cool, so let them warm up more. And don’t worry, once that chocolate starts to firm up, you can dip it AGAIN into the chocolate to get a more even, although slightly thicker, coating.

Did you make this recipe?

Tag @magicaltreatsathome on Instagram and hashtag it #magicaltreatsathome

Churro Marshmallow Wand // magicaltreatsathome.com

Share this:

  • Click to share on Facebook (Opens in new window) Facebook
  • Click to share on X (Opens in new window) X

Like this:

Like Loading...

Filed Under: Recipes, Treats Tagged With: caramel, christmastimetreats, churro toffee, cinnamon, Disney's California Adventure, marshmallow, marshmallow-wand, toffee, treat, Trolley Treats, wand

Layered Pumpkin Cheesecake

November 11, 2019 by Elana Lepkowski Leave a Comment

Layered Pumpkin Cheesecake // magicaltreatsathome.com

Where can I find the original treat?

  • This treat can be found at the Jolly Holiday Bakery Cafe at the Disneyland resort.
Layered Pumpkin Cheesecake // magicaltreatsathome.com

We’ve got our last of the pumpkin treats today as we say goodbye to all the fall decorations at Disneyland and head straight into Christmas. But wait! Yes, there is another holiday before then, and we’re not talking about National Peanut Butter Fudge Day (although that lands on November 20 this year). We’ve still got Thanksgiving coming this month, and that means PIE! Pumpkin pie! But if making a whole pie from scratch is just not doable, try these mini Layered Pumpkin Cheesecake jars instead!

Last year at Disneyland I tried one of these and I inhaled it in seconds; it was just so good. Admittedly I am a lover of pumpkin flavored treats and I live for cheesecake, so this layered individual dessert cup was calling my name. I was so happy they brought it back this year, but on November 8th, *poof*, it’s gone, and who knows if it will come back next year. So let’s make our own now!

Layered Pumpkin Cheesecake // magicaltreatsathome.com

These are a really great option if you’re thinking about desserts for the holidays and want to do all the prep ahead of time, even a whole day or two ahead of time. These jars are quick to put together because there’s NO COOKING! Just dirty some bowls, store everything into little jars in the fridge, and then take them out when it’s time to serve to guests (or let’s be real, yourself, 4 times).

This recipe makes just 4 individual desserts, but this can be easily scaled up (the recipe box below has a handy tool to do that with too!). You may want to increase or decrease the sugar as you scale, so remember to do a taste test when adjusting!

Layered Pumpkin Cheesecake // magicaltreatsathome.com

This might not be the most “fun” dessert for kids to make, but they can definitely help with assembly, and older kids can do the piping work. My kids always feel proud to eat anything they’ve helped make too, even if it doesn’t include sprinkles.

A note here on the jars used. In the photos I am using a Weck tulip jam jar that holds about 7.4 ounces. These are a great size for individual portions, and cute looking too. However, I find these very fragile and I do not suggest them for use with kids. Tempered glass jars, like Wean Green, or plastic lidded containers would work best if you are making these for younger guests, or hey, for those holiday guests that have a designated driver.

Layered Pumpkin Cheesecake // magicaltreatsathome.com
Print
clock clock iconcutlery cutlery iconflag flag iconfolder folder iconinstagram instagram iconpinterest pinterest iconfacebook facebook iconprint print iconsquares squares iconheart heart iconheart solid heart solid icon
Layered Pumpkin Cheesecake // magicaltreatsathome.com

Layered Pumpkin Cheesecake

5 Stars 4 Stars 3 Stars 2 Stars 1 Star No reviews
  • Author: Elana Lepkowski
  • Yield: 4 servings 1x
Print Recipe
Pin Recipe

Description

Layers of pumpkin pie filling and creamy, no bake cheesecake are topped with cinnamon spiced cream cheese swirls in individual portions. A Disneyland-inspired treat.


Ingredients

Scale

Whipped Cinnamon Cream Cheese Frosting:

  • 4 ounces (half a block) cream cheese
  • 1/4 cup (55 g) unsalted butter
  • 1–1/2 cups (188 g) powdered sugar
  • 1/2 teaspoon vanilla extract
  • 1/2 teaspoon ground cinnamon
  • pinch salt

Pumpkin Pie Filling:

  • 1/4 cup (65 g) heavy cream
  • 2/3 cup (180 g) pumpkin purée
  • 1/4 tsp cinnamon
  • 1/2 tsp pumpkin pie spice
  • 2–1/2 tbsp brown sugar (47 g)
  • pinch salt

Cheesecake Layer (adapted from Sally’s Baking Addiction):

  • 1/2 cup (4 oz) heavy cream
  • 4 ounces cream cheese (half a block)
  • 3 tablespoons (45 g) light brown sugar
  • 1 tablespoon (15 g) sour cream or Greek yogurt
  • 1 teaspoon lemon juice
  • 1/4 teaspoon pure vanilla extract

Topping:

  • crystallized ginger (see notes below)
  • brown sugar

Specialty Tools:

  • Ateco #843 closed star pastry tip
  • pastry bag
  • Weck tulip jam jars

Instructions

Whipped Cinnamon Cream Cheese Frosting:

  1. In a stand mixer fitted with the paddle attachment, on high speed for several minutes, cream together the cream cheese and the butter until light and fluffy, and fully combined.
  2. Next, add in the powdered sugar, vanilla extract, cinnamon, and salt. Slowly mix together until all the powdered sugar has been incorporated, and then bring the mixer to high speed until fully mixed, and frosting is light and fluffy.
  3. Add the frosting to a pastry bag fitted with a small closed star (like Ateco #843). Set aside.

Pumpkin Pie Filling Layer:

  1. In the bowl of a stand mixer fitted with the whisk attachment, pour in the heavy cream and whip until very soft peaks form. You want the cream to still slip off a spoon, but not be liquid-y.
  2. Then remove the whisk and add the paddle attachment.
  3. Add in pumpkin purée, cinnamon, pumpkin pie spice, brown sugar, and salt. Gently mix until combined.
  4. Set aside.

Cheesecake Layer:

  1. In a stand mixer fitted with a whisk attachment, whip the cold heavy cream into stiff peaks on medium-high speed, about 3-4 minutes. Gently remove into a separate bowl. Set aside.
  2. Next, switch to a paddle attachment and in the same empty bowl you whipped the cream in, add in the cream cheese, sour cream, lemon juice, and vanilla extract together on medium-high speed until smooth and no more lumps.
  3. Gently fold in the whipped cream into the cream cheese mixture by using a rubber spatula to cut down through the center of the mix, scooping through the bottom left, giving the bowl a quarter turn, and then repeating until the whipped cream is just barely incorporated. Set aside.

Assembly:

  1. In a clean jar, add about 1/4 cup (2 ounce #16 disher) of the cheesecake mixture to each jar.
  2. Next add in the same amount of the pumpkin filling.
  3. Finally, dot the top of the pumpkin filling with small stars made of the cinnamon cream cheese frosting. Dust with finely chopped crystallized ginger or brown sugar. Enjoy!

Notes

  • Components can be refrigerated up to 5 days beforehand separately and then assembled to serve, or assembled into jars, sealed and kept refrigerated for 5 days.
  • Granulated ginger can also be used and mixed with brown sugar as a topping.
  • The dessert can also be assembled into a trifle dish for one larger serving.
  • Tempered glass jars, like Wean Green, or plastic lidded containers would work best if you are making these for younger guests as the Weck jars are fragile and can break easily.

Did you make this recipe?

Tag @magicaltreatsathome on Instagram and hashtag it #magicaltreatsathome

Layered Pumpkin Cheesecake // magicaltreatsathome.com

Share this:

  • Click to share on Facebook (Opens in new window) Facebook
  • Click to share on X (Opens in new window) X

Like this:

Like Loading...

Filed Under: Recipes, Treats Tagged With: cheesecake, cinnamon, cream cheese, disneyland, fall, fall-halloween, individual dessert, jolly holiday bakery cafe, Pumpkin, pumpkin spice, treat

Pumpkin Cake Pops

November 4, 2019 by Elana Lepkowski 1 Comment

Pumpkin Spice Cake Pops // magicaltreatsathome.com

Where can I find the original treat?

  • These treats can be found all over the Disneyland resort.

Santa was out riding around Disneyland on Halloween, which was kinda weird, what with jack-o-lanterns still hung up everywhere. It’s that narrow time frame of transition at the parks where everyone is itching for Christmas, but we still had to get through Halloween first. And now that trick or treating is behind us, I’m still here for the pumpkins. That’s why this week’s treat recipe is Pumpkin Cake Pops!

Pumpkin Spice Cake Pops // magicaltreatsathome.com

These pumpkin spice, pumpkin shaped cake pops have a wonderful punch of baking spices that will have you longing for a piece of pumpkin pie. They’re coated with orange and green chocolate, and a caramel stem, and the bakers did a great job of adding in a hint of molding so that these cake pops really do resemble little pumpkins. And now you get to have them at home too!

Pumpkin Spice Cake Pops // magicaltreatsathome.com

Cake pops are one of those treats that look easy to make, but actually require a little finesse to get it right, but don’t let that stop you! I’ve got some tips and tricks in the notes section below the recipe to help you out. These cake pops can be made all from scratch, a combo of pre-made items, or all store bought! The recipe I use from scratch makes for a moist cake that holds its shape well after forming a ball, and has a balanced amount of spices with real pumpkin in the mix. I use a cream cheese frosting that is super creamy and makes a great “glue” here. You can also choose to color white chocolate, or use pre-colored candy melts too.

Now, while all kids can definitely help roll the cake into balls and attach to the sticks, older kids might be better suited to coating the chocolate, as there is some technique involved there. However, you know your own kids, and if it comes down to it, you can just throw all the cake balls into the chocolate and have cake bon bons instead of pops. And then everyone can help decorate. That actually sounds pretty fun.

Pumpkin Spice Cake Pops // magicaltreatsathome.com

So let’s enjoy pumpkin season while it lasts, because we might not make it to Thanksgiving when all the peppermint treats that are about to drop at Disneyland. Have a magical day everyone!

Pumpkin Spice Cake Pops // magicaltreatsathome.com
Print
clock clock iconcutlery cutlery iconflag flag iconfolder folder iconinstagram instagram iconpinterest pinterest iconfacebook facebook iconprint print iconsquares squares iconheart heart iconheart solid heart solid icon
Pumpkin Spice Cake Pops // magicaltreatsathome.com

Pumpkin Cake Pops

5 Stars 4 Stars 3 Stars 2 Stars 1 Star No reviews
  • Author: Elana Lepkowski
  • Yield: 7 cake pops 1x
Print Recipe
Pin Recipe

Description

Moist, perfectly spiced pumpkin cake pops are coated in orange and green chocolate to resemble tiny pumpkins. A Disneyland-inspired treat.


Ingredients

Scale

For the cake balls:

  • 2 cups (~210 g) loosely packed crumbled pumpkin spice cake crumbs
  • 1/4 cup (32 g) cream cheese frosting
  • ***Both recipes can be found here if making from scratch (recipe makes more than you’ll need here. see notes below about freezing extra components)

For the decoration:

  • 6–1/2 ounces (3/4 cup) orange candy melts
  • 1–1/2 ounces red candy melts
  • 1/2 ounce (~1 tablespoon) green candy melts
  • 1/2 ounce (~1 tablespoon) dark cocoa candy melts OR 2 caramel squares

Special Tools:

  • 1 ounce disher
  • lollipop sticks
  • pastry bags
  • cake pop holder OR shoe box base for drying cake pops
  • scribe

Instructions

For the cake balls:

  • If baking from scratch, follow directions for cake, cool completely and crumble half for recipe. Eat or freeze the rest of the recipe for another time.
  • If making frosting from scratch, make and set 1/4 cup aside. Use or freeze the rest for another recipe.
  • Combine cake crumbles and frosting in the bowl of a stand mixer with paddle attachment until fully incorporated. You can also mix well in a bowl with a rubber spatula. If too wet, add more cake crumbles. If too dry, add more frosting a small bit at a time.
  • Using a 1 ounce disher, scoop out cake mixture and form a tight ball. Push a lollipop stick halfway into the ball. Set aside in the cake pop stand, or make holes in the bottom of a shoe box and stick the cake pops in there. Repeat until all the mixture is gone.
  • Refrigerate at least one hour to firm up, or up to two days.

For the decoration:

  • Take out the cake pops and let warm up slightly at least 10 minutes.
  • Melt the orange and red candy melts in the microwave inside a microwave safe bowl, like glass, for 30 seconds. Stir and microwave again for an additional 30 seconds. Keep stirring and microwaving in short bursts of 15-20 seconds until melted and smooth. Use can alternatively use a double boiler for melting.
  • Next, holding the cake ball over the melted chocolate, use a spoon to ladle the chocolate over it, turning and pouring to get an even coat. Tap gently so excess chocolate drips off and air bubbles get released. Use a scribe to pop any bubbles that do not break.
  • Set them back in the cake pop holder and continue until all of the cake pops are coated.
  • Next, melt green and dark cocoa chocolates using the same method from above.
  • Transfer the green and dark cocoa candy melts to separate piping bags and cut a small tip off each bag.
  • Use the green to decorate green vines on each cake pop.
  • Then use the dark cocoa to pipe small stems on each pop. If making the caramel stems (similar in style to the cake pops found at Disneyland), melt caramel squares in the microwave in short bursts at half power until soft but not melted. Cool slightly and take small chunks of the caramel out with a toothpick and attach to the top of the cake pops, using wet fingers to mold the caramel into a stem.
  • Refrigerate at least an hour to set. Then enjoy!

Notes

  • Cake balls should not be too wet or too dry to hold their shape properly. If too wet, add more cake crumbles. If too dry, add more frosting a small bit at a time.
  • If cake balls are slipping off the sticks, dip lollipop stick tip in the melted chocolate and insert into cake ball. Refrigerate a few minutes to set.
  • If you do not pop the air bubbles, then moisture from the cake will seep out as the chocolate dries. If this happens, gently wipe away anything that has seeped out, and coat a second time in the melted chocolate.
  • Don’t let the green or chocolate candy melts get too hot or they will run when trying to pipe out decorations. Allow to cool a bit after melting for more set lines.

Did you make this recipe?

Tag @magicaltreatsathome on Instagram and hashtag it #magicaltreatsathome

Pumpkin Spice Cake Pops // magicaltreatsathome.com

Share this:

  • Click to share on Facebook (Opens in new window) Facebook
  • Click to share on X (Opens in new window) X

Like this:

Like Loading...

Filed Under: Recipes, Treats Tagged With: cake, cake pop, chocolate, disneyland, fall, fall-halloween, Pumpkin, pumpkin spice, treat

Haul-O-Ween Churros

October 28, 2019 by Elana Lepkowski Leave a Comment

Haul-o-ween Churros // magicaltreatsathome.com

Where can I find the original treat?

  • These treats can be found at the Cozy Cone Motel in DCA during Halloween Time.

One treat Disneyland is (mostly) good at transforming each season are their churros. When a new foodie guide is out, expect to see several variations and themes. For this Halloween season, there were a number of delicious options, but for today, I chose to recreate the Haul-O-Ween churro.

Haul-o-ween Churros // magicaltreatsathome.com

Now, it might look like a crazy concoction some child cooked up in their Fisher-Price kitchen, but believe me, this was surprisingly good. Even with its edible green slime, and cookie and candy decorations, this churro treat was not too sweet. The cookie crumb coating worked really well with the classic cinnamon-sugar churro flavor; just adding a hint of cocoa.

Haul-o-ween Churros // magicaltreatsathome.com

Now, with this post I’ve gone and updated the piping tip that I usually use to a larger, closed star style. This resulted in a thicker, wider churro that was able to hold on to more cookie crumbs. Despite the size, it fried up light and crisp and this might be my new favorite churro style. I’m going to write up a quick kitchen tip post soon comparing the two types of pastry tips so you can decide which way you’d like your churros. Expect that excerpt here when that drops.

Also, let’s discuss the edible green slime for a minute. The description for the treat lists it as icing but it didn’t really, well, taste like icing. In fact, it didn’t have too much of a taste except kinda sweet, but not too sweet, and so I just made the executive decision here to make a thin style pudding and use that to decorate, and also dip my churros in for a sauce. It worked just fine. (Maybe next time at the park I’ll just ask for a side of sauce and take it home when it’s a little mysterious like this…)

Haul-o-ween Churros // magicaltreatsathome.com

Once the churros have cooled slightly, kids can take over coating and decorating the treats. Give kids edible green slime and they are gonna have some fun. But don’t worry adults, you’ll have fun with this too.

As usual, we’ve got plenty of notes and tips following the recipe, so please check those out. Now let’s get ready to churrrrroooooooooo!

Haul-o-ween Churros // magicaltreatsathome.com
Print
clock clock iconcutlery cutlery iconflag flag iconfolder folder iconinstagram instagram iconpinterest pinterest iconfacebook facebook iconprint print iconsquares squares iconheart heart iconheart solid heart solid icon
Haul-o-ween Churros // magicaltreatsathome.com

Haul-O-Ween Churros

5 Stars 4 Stars 3 Stars 2 Stars 1 Star No reviews
  • Author: Elana Lepkowski
  • Yield: 10–16 churros (depending on tip size) 1x
Print Recipe
Pin Recipe

Description

These delightfully fun classic cinnamon-sugar churros get the Oogie-Boogie treatment for Halloween with a cookie crumb coating, edible green slime, creme filled cookies, and candy toppings. A Disneyland-inspired treat.


Ingredients

Scale

Edible Green Slime:

  • 1 package of vanilla instant pudding
  • milk or milk alternative per instructions on the box, plus 1/4 cup (see notes below)
  • 1–2 drops of green food coloring (Americolor “Leaf Green” used here)

Churro:

  • 1 cup water
  • 1/2 cup butter
  • 1 tablespoon granulated sugar
  • big pinch of salt
  • 1 cup all purpose flour
  • 2 eggs
  • vegetable oil for frying
  • 12 creme filled cookies, like Oreos
  • 1/2 cup granulated sugar
  • 1 teaspoon cinnamon

Additional Toppings:

  • candy corn
  • gummy worms
  • Oreo cookies, slightly crushed

Specialty Tools

  • spider for frying
  • Wilton 1 M piping tip
  • Ateco 847 piping tip
  • pastry bag
  • candy thermometer

Instructions

For the green slime:

  1. Make vanilla pudding according to instructions, adding in any additional milk to thin it out (see notes below).
  2. Add in 1-2 drops of food coloring and stir well.
  3. Chill, covered, in the refrigerator until ready to use.

For the churros:

  1. First, line two half sized sheet pans with parchment, set aside. Mix together 1/2 cup of granulated sugar and cinnamon in a long shallow bowl or loaf pan, set aside.
  2. Next, crush cookies in a ziplock bag with a rolling pin until finely ground. Alternatively, you can pulse in a food processor until a sand-like consistency forms. Set aside in a large, shallow bowl.
  3. In a medium sized saucepan over medium-high heat, combine water, butter, sugar and salt. Bring to a boil, or until butter has melted.
  4. Turn burner to low and pour in all the flour at once. Stir until there are no visible flour lumps and dough has begun to stick together in a ball and pulled away from the sides of the pan.
  5. Remove pan from heat and let sit 5 minutes. Then stir in each egg until incorporated. Dough will appear to break or become lumpy. Continue to stir until it forms a smooth, sticky dough.
  6. Fill a pastry bag fitted with a Wilton 1 M open star tip (for thinner churros) or with a Ateco 847 closed star tip (for thicker churros) half full with batter (see notes below on filling pastry bags) and pipe 6-8″ long dough onto the sheet pan. I was able to fill two sheet pans with all the batter.
  7. Refrigerate dough at least 30 minutes and up to two days. Batter will stiffen the more it sits, so let the dough come to room temperature before frying. (Note below for frying immediately after making dough)
  8. Fill a dutch oven or deep frying pan with vegetable oil at least 2″ up the side of the pan (I found a 1/2 gallon of avocado oil worked for me in my large dutch oven. See note below about reusing oil.). Heat oil to 340-350°f, using a candy thermometer to keep the temperature constant. You may need to adjust heat up or down during cooking.
  9. Place churros 2-3 at a time in the cooking oil for 6 minutes, turning after 3 minutes with a spatula or spider. Wait until oil comes back to temperature before adding next batch. Thicker churros may need an additional minute to fully cook through.
  10. Using a spider or large spatula, remove churros from oil and drain on a cooling rack over parchment or on a paper towel. Wait at least a minute and then toss the churro in the cinnamon sugar, tapping off any excess. Then roll churro in the cookie crumbs, lightly pressing to adhere. Set churro aside. Repeat with all the churros.
    Haul-o-ween Churros // magicaltreatsathome.com

Decoration:

  • Plate churros and top with edible green slime, candy corn, crushed Oreo pieces, and gummy worms.
  • Enjoy!

Notes

  • To make a thinner style pudding, add in about a 1/4 to 1/3 cup extra of milk or milk alternative to the pudding. This will make a more liquid sauce for the churro. Keep measurements the same if you want it thicker.
  • Do not overfill your pastry bag! Fill in two to three batches. If there is too much dough, it will seep out the top and will be hard to pipe.
  • Slowly pipe out dough all of a consistent size, smaller spots on the churro can cause them to become more fragile while handling and can break in the oil or while coating in sugar.
  • Churro dough can be piped out onto parchment and covered in the fridge up to 48 hours.
  • If you want to make you churros immediately after making dough without the chilling time, once oil has reached temp, starting about one inch above the oil, pipe a small line of dough down into oil and either snip end with scissors, or break the dough off the pastry tip on the side of your pan. Follow directions above for frying.
  • Thicker churros will require a longer cooking time to fully cook through the center. Test one churro first to adjust your cooking time.
  • Cooking oil can be fine strained and stored again for another use. I strain back into the bottle it came from. Well strained oil can be stored in a cool, dry place and used up to several times.
  • Churros curling? That could be one of a few reasons. One is that it will naturally shrink and change shape as the dough hits the oil and puffs up. I found that the stiffer dough from sitting in the fridge resulted in straighter churros while fresher dough tending to curl more. Also, if you’re using a circular pot like a dutch oven, churros may rest against the inside edge of the pan while cooking causing them to take on the curved shape of the pan. To prevent this, nudge your churro with the spider or spatula immediately after placing in oil when it pops back up to the surface. Continue to nudge gently back and forth for about 20-40 seconds or until the dough has gotten stiff in the oil.

Did you make this recipe?

Tag @magicaltreatsathome on Instagram and hashtag it #magicaltreatsathome

Haul-o-ween Churros // magicaltreatsathome.com

Share this:

  • Click to share on Facebook (Opens in new window) Facebook
  • Click to share on X (Opens in new window) X

Like this:

Like Loading...

Filed Under: Recipes, Treats Tagged With: candy, Carsland, chocolate, churro, cinnamon, Cozy Cone Motel, DCA, fall-halloween, Oreos, pudding, treat

  • « Go to Previous Page
  • Go to page 1
  • Interim pages omitted …
  • Go to page 3
  • Go to page 4
  • Go to page 5
  • Go to page 6
  • Go to page 7
  • Go to page 8
  • Go to Next Page »

Primary Sidebar

Follow Us

  • Instagram
  • Facebook
  • X
  • Pinterest
  • Email
  • YouTube

Hi! My name is Elana, and that’s me shoving a Mickey Mouse shaped treat in my face. I love the treats at Disneyland. A lot. So much so I’ve dedicated an entire website to making all my favorites, and hopefully yours too, out of my home kitchen. My aim is to create Disneyland-inspired treats, with easy to follow directions, and many recipes geared towards getting the kids in the kitchen to help too! Because putting sprinkles on things is F-U-N.

Top With Sprinkles

Get Recipes in Your Inbox!

* indicates required

Look for this icon in posts to find Kid Friendly recipes!

Recent Posts

  • Matterhorn Macaroon
  • Caramel Gingerbread Cookie Sandwiches
  • Colorful Fruit Hand Pies
  • Classic Mickey Shaped Beignets
  • Carrot Cake Cookies

Archives

  • February 2023
  • December 2022
  • August 2022
  • January 2022
  • December 2021
  • November 2021
  • December 2020
  • November 2020
  • October 2020
  • September 2020
  • August 2020
  • July 2020
  • June 2020
  • May 2020
  • April 2020
  • March 2020
  • February 2020
  • January 2020
  • December 2019
  • November 2019
  • October 2019
  • September 2019
  • August 2019
  • July 2019
  • June 2019
  • May 2019

Copyright © 2025 Magical Treats at Home on the Foodie Pro Theme

%d