• Skip to primary navigation
  • Skip to main content
  • Skip to primary sidebar

Magical Treats at Home

  • About
  • Treats
  • Drinks
  • Savory
  • Favorite Tools
  • Etsy Shop

Disney's California Adventure

5 Minute Treats: Peppermint Affogato

December 13, 2019 by Elana Lepkowski Leave a Comment

Peppermint Affogato // magicaltreatsathome.com

Where can I find the original treat?

  • This holiday time treat is available at Schmoozies! inside California Adventure.

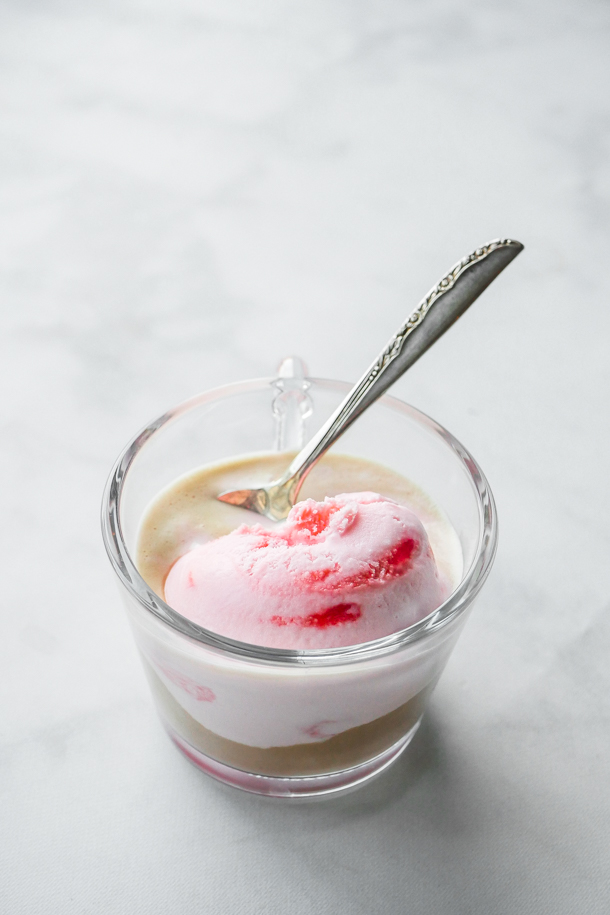
What?! Another new series this week on the site?! YES! Today we’re launching what I hope will be a new series that will appear on here from time to time: 5 Minute Treats. And today we’re starting with this Peppermint Affogato.

Peppermint Affogato // magicaltreatsathome.com

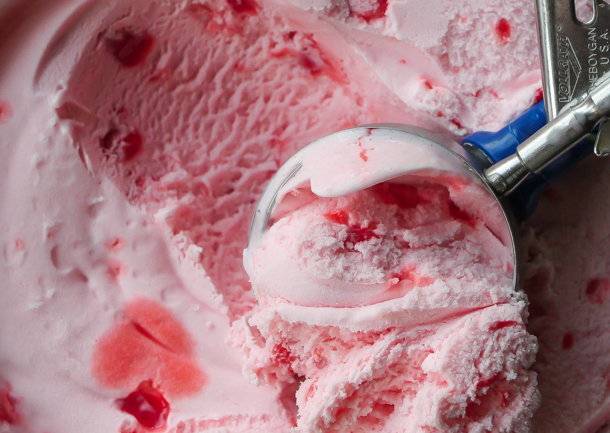
What is an affogato? An affogato is an Italian dessert that consists of two delicious things: ice cream (or gelato) and espresso. And while it may be a simple recipe, the end result is anything but simple. Over at Schmoozies! in DCA, they regularly have the classic vanilla topped with a large pour of espresso, but this holiday season, they had both a peppermint ice cream and a cinnamon-sugar (churro!) ice cream option.

Peppermint Affogato // magicaltreatsathome.com

The peppermint ice cream affogato was just pure deliciousness, with the hot espresso slowly melting my peppermint candy specked pink ice cream, it came a whole other flavor once combined. The slightly bitter espresso was tamed by the sweetness of the ice cream and I found myself slurping up the whole thing unaware, or caring, who was watching me enjoy it.

Peppermint Affogato // magicaltreatsathome.com

But here’s why I’m giving you this “recipe” today. It’s holiday time, but that doesn’t mean you have to make complicated desserts. Especially when something simple like this tastes just so good. If you’re neck-deep in cookies and just want something easy to make, this is it. Bust this out after a meal and no one is going to ask you how long it took to make, or “is this it?”, because they’ll be too busy scarfing it down.

Peppermint Affogato // magicaltreatsathome.com

My hope with these “5 Minute Treats” is that you give yourself the space to not always feel like treats need to be complicated. They can be simple, but these recipes will always be good. I hope you enjoy one of these Peppermint Affogatos tonight or this weekend. Maybe treat yourself while you start wrapping presents and need an extra boost of caffeine (and that’s exactly what I did this week). Enjoy!

Print
clock clock iconcutlery cutlery iconflag flag iconfolder folder iconinstagram instagram iconpinterest pinterest iconfacebook facebook iconprint print iconsquares squares iconheart heart iconheart solid heart solid icon
Peppermint Affogato // magicaltreatsathome.com

5 Minute Treats: Peppermint Affogato

5 Stars 4 Stars 3 Stars 2 Stars 1 Star No reviews
  • Author: Elana Lepkowski
  • Total Time: 5 minutes
  • Yield: 1 Peppermint Affogato 1x
Print Recipe
Pin Recipe

Description

This two-ingredient creamy Peppermint Affogato comes together in just minutes! A Disneyland-inspired treat.


Ingredients

Scale
  • 1–2 scoops peppermint ice cream (with the candy pieces!)
  • 1 shot espresso, freshly made

Extra Tools

  • heat proof espresso glasses
  • demitasse spoons

Instructions

  1. Brew your espresso shot.
  2. Scoop out ice cream into a heat proof glass mug or small bowl.
  3. Pour espresso over the ice cream and enjoy!

Notes

  • We are Nespresso users at home, so I found that a regular shot was plenty. The lungo shot was a bit too much and melted the ice cream more than I desired creating a warm soup.
  • If you want to make a batch for a party, portion out ice cream into small cups and freeze ahead of time. When ready to serve, brew lungo shots in a large measuring glass with a spout. Then you can pour small amounts of espresso all at once into each cup.

Did you make this recipe?

Tag @magicaltreatsathome on Instagram and hashtag it #magicaltreatsathome

Peppermint Affogato // magicaltreatsathome.com

Share this:

  • Click to share on Facebook (Opens in new window) Facebook
  • Click to share on X (Opens in new window) X

Like this:

Like Loading...

Filed Under: 5 Minute Treats, Gluten Free, Recipes, Treats Tagged With: 5 Minute Treat, christmastimetreats, Disney's California Adventure, espresso, ice cream, peppermint, Schmoozies, treat

Churro Marshmallow Wand

November 18, 2019 by Elana Lepkowski 5 Comments

Churro Marshmallow Wand // magicaltreatsathome.com

Where can I find the original treat?

  • This holiday time treat can be found at Trolley Treats and Marceline’s Confectionery at the Disneyland Resort.

One of the cult favorite treats at Disneyland, Churro Toffee, is getting a new twist this holiday season as the coating for a marshmallow wand! What might seem like ‘sugar on a stick’ is actually a pretty tasty treat that doesn’t leave your teeth singing. And we’re making some today!

Churro Marshmallow Wand // magicaltreatsathome.com

This treat was consistently selling out when they debuted it. When I tried one at Trolley Treats in DCA, the man behind the counter told me that just moments before a guy came in and bought 12 for his coworkers. WHAT A NICE COWORKER TO HAVE!!!

I’m sure they’ll stock more, but in the meantime, making these in your kitchen is definitely an option. There’s a lot of layers here, but if you get everything lined up and ready, it’s pretty quick to move through all the steps and get a handful ready and made.

Churro Marshmallow Wand // magicaltreatsathome.com

Now, the original treat has crushed pieces of the churro toffee dusted over the outside, i.e., very, very, tiny pieces of toffee. Here I opted not to crush mine too small, so that I get some nice crunchy pieces with the soft, pillow-y marshmallows. And if you’re not familiar with these wands, they layer them as such: 3 marshmallows on a lollipop stick, dipped in caramel, and then dipped again in white chocolate and rolled in cinnamon sugar and dusted with churro toffee. I love how the buttery caramel stands in for that thick layer of toffee you get with the Churro Toffee.

If kids are helping in the kitchen, I’d stay clear of having them dip in the caramel unless they are experienced with the stove and hot things like caramel. Otherwise, dip and set the wands with the caramel, and then they can dip into the white chocolate and roll them in the cinnamon sugar and churro toffee.

Churro Marshmallow Wand // magicaltreatsathome.com

Ok churro toffee fans, time to try something a little new. And if you’re looking for a recipe for just the churro toffee, we’ve got that too! And remember to check out all our notes at the end of the recipe!

Print
clock clock iconcutlery cutlery iconflag flag iconfolder folder iconinstagram instagram iconpinterest pinterest iconfacebook facebook iconprint print iconsquares squares iconheart heart iconheart solid heart solid icon
Churro Marshmallow Wand // magicaltreatsathome.com

Churro Marshmallow Wand

5 Stars 4 Stars 3 Stars 2 Stars 1 Star No reviews
  • Author: Elana Lepkowski
  • Yield: 6 Churro Toffee Marshmallow Wands 1x
Print Recipe
Pin Recipe

Description

Soft and fluffy marshmallow wands are enrobed in creamy caramel and dipped in white chocolate with a dusting a cinnamon-sugar and churro toffee. A holiday-time Disneyland-inspired treat.


Ingredients

Scale
  • 18 marshmallows
  • 9 ounces (~32 candies) individually wrapped caramels (like Kraft)
  • 1–3/4 tablespoons water
  • 1 cup granulated sugar
  • 2 teaspoons ground cinnamon
  • 1 teaspoon of coconut oil
  • 10 ounces of white candy melts
  • 1/4 cup of crushed churro toffee pieces (or if you don’t have any stashed away in your freezer like me, any English-style toffee will do)
  • 6 lollipop sticks

Instructions

  1. Place 3 marshmallows on each lollipop stick and set aside on a parchment lined sheet pan.
    Churro Marshmallow Wand // magicaltreatsathome.com
  2. Mix together the sugar and cinnamon in a large, shallow bowl that can accommodate the length of the marshmallow wand. Set aside.
  3. Unwrap all the caramels and add to a small saucepan. Pour water in and heat over medium-low heat.
  4. Stir constantly until everything has melted and caramels are smooth (about 7-8 minutes).
  5. Once melted (caramels should drip in a ribbon from a spoon back into the pan), dip each wand into the caramel, turning quickly to coat OR ladle the caramel over the wand, turning to coat. Let excess caramel drip off for at least 30 seconds, turning while it drips for even coating, tap the wand gently but firmly on the edge of the pan to remove any additional excess caramel, and then place back on the  parchment.
    Churro Marshmallow Wand // magicaltreatsathome.com
  6. When all the wands have been dipped, place the baking sheet in the refrigerator for 15-20 minutes so that the caramel will be set for dipping.
    Churro Marshmallow Wand // magicaltreatsathome.com
  7. While the caramels set, melt your white chocolate for coating. Combine the white candy melts and coconut oil in the microwave inside a microwave safe bowl, like glass, for 30 seconds. Stir and microwave again for an additional 30 seconds. Keep stirring and microwaving in short bursts of 15-20 seconds until melted and smooth. Use can alternatively use a double boiler for melting. Do not let the white chocolate get over 110°f as it can burn the chocolate (use a candy thermometer if you’re not sure about this).
  8. Remove the marshmallow wands from the refrigerator. You’ll know they are set when they lift easily off the parchment. If they still stick, keep them in 5 minutes longer.
  9. Set up the cinnamon sugar bowl next to your white chocolate, and set out the crushed churro toffee in a small bowl as well.
  10. Dip the marshmallow wand in the white chocolate, or ladle chocolate over, turning to coat. Tap the stick firmly on the side of your pan to remove any excess chocolate. Then sprinkle churro toffee over the white chocolate and immediately roll in the cinnamon sugar. You can also ladle the sugar over the wand, turning to coat. Whatever is easiest for you! Then place back on the parchment.
  11. Repeat with the remaining marshmallow wands.
  12. Let sit at least 30 minutes to firm up or in the refrigerator for quicker results. Enjoy!

Notes

  • Melted caramel is HOT! Use caution in the kitchen. Do not dip your fingers or hands into the caramel has it can adhere to skin and burn you. Keep away from children.
  • Use hot water to remove caramel from pans and utensils.
  • If the marshmallow wands start to stick to the parchment while you are dipping and coating, stick the pan with the uncoated wands back to chill in the refrigerator for a few minutes. If your kitchen is really hot, keep them in there the whole time, taking one at a time out to coat and decorate.
  • If you have extra melted caramel that has dried around your wand, use kitchen shears to remove it immediately after removing from the refrigerator.
  • Did your chocolate coating break when you first dipped your wand in? Wait for the chocolate to cool down more. It should drip freely from a spoon without it seizing when the spoon is shaken slightly (will cause crevices in the chocolate on the spoon). If it breaks on the wand, your wand also might be too cool, so let them warm up more. And don’t worry, once that chocolate starts to firm up, you can dip it AGAIN into the chocolate to get a more even, although slightly thicker, coating.

Did you make this recipe?

Tag @magicaltreatsathome on Instagram and hashtag it #magicaltreatsathome

Churro Marshmallow Wand // magicaltreatsathome.com

Share this:

  • Click to share on Facebook (Opens in new window) Facebook
  • Click to share on X (Opens in new window) X

Like this:

Like Loading...

Filed Under: Recipes, Treats Tagged With: caramel, christmastimetreats, churro toffee, cinnamon, Disney's California Adventure, marshmallow, marshmallow-wand, toffee, treat, Trolley Treats, wand

Minnie Witch Shake

October 14, 2019 by Elana Lepkowski Leave a Comment

Minnie Witch Shake // magicaltreatsathome.com

Where can I find the original treat?

  • The Minnie Witch Shake can be found at Schmoozies! in Disney’s California Adventure Park.

A shake in October?! YES when you live in SoCal! One thing people don’t realize is that here in Southern California, it’s still hot in October, like, 85° hot. And so a spooky Minnie Mouse Witch Shake is definitely in order!

Minnie Witch Shake // magicaltreatsathome.com

Mint chocolate chip is my favorite old school ice cream flavor (peanut butter cup is my favorite “new school” flavor in case you were interested), but we never have it at home since 1. My husband detests the combination of mint and chocolate together and 2. Mint oil now gives him a migraine. So I just don’t keep it around, but when I see it out I most definitely order it.

Minnie Witch Shake // magicaltreatsathome.com

And this shake delivered! So, I had to sneak a pint of mint chocolate ice cream home to recreate this recipe for all of you. But first, let me explain a bit about the ingredients. First, as someone pointed out on IG, Disney calls this a mint chocolate chip shake, but the chocolate in mine was not snappy, like chips of chocolate, but rather soft, like cookies. So, for this recipe I’ve blended up mint chocolate chip ice cream and Oreos for that softer, chocolate cookie piece texture. Second, the whipped cream. Now, I don’t know if it’s the stabilizers in the whipped cream or what, but the whipped cream on the shake in the park had a marshmallow-like texture and wasn’t super soft like regular whipped cream. Maybe like cool whip? Maybe, except it’s been so long since I’ve had it I can’t remember exactly what it’s like. Anyways, I have a whip cream dispenser at home that I use so I’m making fresh whipped cream for my shake. However, whatever way you like your whipped cream you should use that!

Minnie Witch Shake // magicaltreatsathome.com

This recipe is for a single serve shake, but can very easily be expanded to as many shakes as you’d like to make (or made into a few tiny shakes for the kiddos!). I think the glass looks super cute with the orange sanding sugar and the green polka dots, but if you want to make this with less steps, I think you could leave out this part and be fine.

Minnie Witch Shake // magicaltreatsathome.com

Also, if you are making this with/for kids, I’d use plastic cups and forgo the glass like I’m using in the photos. Kids can dip their cups in warm, not hot, melted chocolate and decorate with the sanding sugar and chocolate candies. I’d even let them pour their shakes and top with whipped cream and sprinkles. Adults can make the chocolate bows beforehand as you’re handling hot chocolate and there’s a risk of burns.

As usual, a few notes below the recipe, so please read through the whole thing first before making. Ok?! Let’s start those blenders!!!

Minnie Witch Shake // magicaltreatsathome.com
Print
clock clock iconcutlery cutlery iconflag flag iconfolder folder iconinstagram instagram iconpinterest pinterest iconfacebook facebook iconprint print iconsquares squares iconheart heart iconheart solid heart solid icon
Minnie Witch Shake // magicaltreatsathome.com

Minnie Witch Shake

5 Stars 4 Stars 3 Stars 2 Stars 1 Star No reviews
  • Author: Elana Lepkowski
  • Yield: 1 Minnie Witch Shake 1x
Print Recipe
Pin Recipe

Description

Cool off this Halloween with a minty Minnie Witch Shake! A Disneyland-inspired treat.


Ingredients

Scale

Mint Chip Cookies and Cream Shake:

  • 3, 2 ounce scoops mint chocolate chip ice cream
  • 3 Oreo cookies, crushed
  • 1/4 cup milk, more or less to taste

Toppings and Decorations:

  • 4 ounces orange candy melts
  • 1/2 cup orange sanding sugar
  • 5 green M&Ms candies
  • orange, green, and purple sanding sugar mix (this can be pre-packaged if you find it, or mix together yourself)
  • whipped cream (or 1 cup heavy cream, 1 teaspoon each vanilla extract and simple syrup or liquid sweetener of your choice with directions below for making from scratch)
  • purple food coloring
  • 2 Oreo cookies

Special Tools:

  • Minnie Mouse bow mold
  • whipped cream canister
  • N2O chargers
  • soda fountain pint glasses
  • striped straws

Instructions

For the shake:

  1. In a blender, combine the mint ice cream, crushed cookies, and milk. Blend until smooth. Set aside.

For the glass decoration and chocolate bow:

  1. Pour the orange sanding sugar into a wide, shallow bowl. Set aside.
  2. Melt the orange candy melts in a microwave safe bowl, like glass. Microwave for 30 seconds. Stir and microwave again for an additional 30 seconds. Keep stirring and microwaving in short bursts of 15-20 seconds until melted and smooth. Use can alternatively use a double boiler for melting.
  3. Dip and coat the outer rim of a glass with the melted candy melts. Then dip in the orange sanding sugar, turning to coat the entire outside rim.
  4. Then, pour some of the melted orange candy melts in your bow mold(s). Let set at least 10 minutes in the refrigerator.
  5. Remove the bow from the mold when hardened and set aside. Repeat molding for additional bows.

To make the purple whipped cream:

  1. If using ready made whipped cream: Spray whipped cream into a small bowl and using a toothpick, add a drop of purple food coloring. Mix and set aside.
  2. If using a whipped cream canister: Add heavy cream, vanilla extract, simple syrup, and one drop of purple food coloring to a chilled whipped cream canister. Add N2O cartridge and twist to activate. Shake the container for a few seconds and set aside.
  3. If making whipped cream with a mixer: Add heavy cream and one drop of purple food coloring to a chilled mixing bowl. Mix until medium peaks form. Set aside.

Assembly:

  1. In the prepared glass, pour in the mint shake mixture. (Any extra set aside to top off later!)
  2. Spoon or spray prepared whipped cream on top.
  3. Sprinkle with orange, green, and purple sanding sugar mix.
  4. Place the bow and the Oreo “ears” on top of whipped cream. Enjoy with a fun straw!

Notes

  • Glasses can be prepared up to a week ahead and stored in the refrigerator.
  • Bows can be prepared up to three days and stored in refrigerator.
  • If dairy is not your thing, try a dairy alternative ice cream and “milk”! You can also make the whipped cream with cream of coconut but be prepared for a less stiff cream on top.
  • If your ice cream is too soft, use less milk, and alternatively, if your ice cream is pretty hard, use a splash more milk.
  • You can pre-mix your own sprinkles for future baking projects. There are a lot of bulk options on Amazon for sprinkles and sanding sugars (check out our Favorite Supplies list for some examples!).

Did you make this recipe?

Tag @magicaltreatsathome on Instagram and hashtag it #magicaltreatsathome

Minnie Witch Shake // magicaltreatsathome.com

Share this:

  • Click to share on Facebook (Opens in new window) Facebook
  • Click to share on X (Opens in new window) X

Like this:

Like Loading...

Filed Under: Drinks, Recipes, Treats Tagged With: character treat, chocolate, cookies, Disney's California Adventure, fall-halloween, Minnie Mouse, mint, Oreos, Schmoozies, sprinkles, treat, whipped cream

Churro Toffee

August 26, 2019 by Elana Lepkowski 3 Comments

Churro Toffee // magicaltreatsathome.com

Where can I find the original treat?

  • These treats can be found all over the Disneyland Resort.

I heard about Churro Toffee long before I ever tried it. Several Disney food accounts I follow on Instagram would frequently sing the praises of this spiced, sweet treat reminiscent of the classic Disneyland churro with lots of drooling emojis and exclamation points; I was intrigued. I had to make it.

Churro Toffee // magicaltreatsathome.com

But first I had to try it! The Disneyland resort has a few places you can pick this up from. I dropped in to Marceline’s in Downtown Disneyland to get mine. Sometimes, if you’re lucky, you can watch the candy makers make Churro Toffee in the window there (but mostly they’re making candy apples).

Churro Toffee // magicaltreatsathome.com

The trickiest part of this recipe is getting the toffee just right. You’d think with what is really just two, sometimes three, ingredients, this would be an easy recipe to make… but it can go very wrong if you’re not paying attention to temperature. Here, both the temperature of the stove, and the temperature of the mixture are very important. If the heat on your stove is too high, the mixture can “break” or separate and you’ll end up with an oily mess headed straight for the garbage. Also, if you let your mixture get too hot, it will burn, and nothing is going to save it. Nothing. So, if you’re new to toffee making, please go get yourself a candy thermometer. But if this isn’t your first time at the toffee rodeo, proceed as usual.

Churro Toffee // magicaltreatsathome.com

After you’ve got a solid toffee base, you’re in the clear and this treat comes together fairly easily. Once the toffee is set, it gets a quick dip in melted white chocolate and then takes a cinnamon sugar bath. Kids can help with this part! You’ll need to wait a little while before eating because the white chocolate needs to harden (but even when it’s still a little soft you can sneak a bite. I sure did!).

Churro Toffee // magicaltreatsathome.com

So now that we’ve talked up this sweet treat, let’s get to making some! Read through all the tips at the end of this recipe too and drop a comment below if you’ve got a question!

Print
clock clock iconcutlery cutlery iconflag flag iconfolder folder iconinstagram instagram iconpinterest pinterest iconfacebook facebook iconprint print iconsquares squares iconheart heart iconheart solid heart solid icon
Churro Toffee // magicaltreatsathome.com

Churro Toffee

5 Stars 4 Stars 3 Stars 2 Stars 1 Star No reviews
  • Author: Elana Lepkowski
  • Yield: 4 large squares 1x
Print Recipe
Pin Recipe

Description

Buttery english toffee is covered in white chocolate and dusted with a layer of cinnamon-sugar, reminiscent of the classic churro! A Disneyland-inspired treat.


Ingredients

Scale

For the Churro Toffee:

  • 1 cup salted butter (if using unsalted add 1/4 teaspoon)
  • 1 cup granulated sugar
  • 2 tablespoons water
  • 2 tablespoons chopped roasted peanuts (see notes on home roasting below)
  • white chocolate melting wafers
  • 1 cup granulated sugar
  • 1 tablespoon cinnamon

Special Tools:

  • candy thermometer
  • dough cutter/scraper

Instructions

For the toffee base:

  1. First, spray or grease an 8×8″ baking pan and then line with parchment.
  2. Sprinkle chopped peanuts over the parchment and set aside.
  3. In a medium saucepan over medium heat, melt the sugar, butter, and water together. Stir occasionally until butter is melted. Attach a candy thermometer to the side of the pan, careful not to let it touch the very bottom of the pan.
  4. Let the mixture come to a boil, stirring occasionally until it turns an amber brown (this could read 290-305 F on a candy thermometer). The mixture can burn very quickly at this point so as soon as it gets brown, remove from the stove and pour into the prepared pan.
  5. The mixture will start to set up pretty quickly, but move to the refrigerator for about 15 minutes to firm up more. After this point, use a dough scrapper to divide the toffee into 4 large squares (you can always do smaller too if you’d like). Then place back into the refrigerator to completely firm up, about one hour.

For the churro coating:

  1. About 15 minutes before the hour is up, set up your dipping station.
  2. In a medium sized work bowl large enough to fit a square of toffee, mix together 1 cup of sugar and the cinnamon. Set aside.
  3. In a microwave safe bowl, like glass, pour in the white chocolate melting wafers. Microwave for 30 seconds. Stir and microwave again for an additional 30 seconds. Keep stirring and microwaving in short bursts of 15-20 seconds until melted and smooth. Use can alternatively use a double boiler for melting. Set aside.
  4. Remove toffee from the refrigerator and let sit for 5 minutes to come to room temperature. Then dip one square into the white chocolate, letting excess drip off (you can also use a popsicle stick to remove any excess from the edge). Then immediately dip into the cinnamon sugar mixture, turning around the square so that it is evenly covered. Set aside on a baking sheet lined with parchment.
  5. Repeat above dipping steps for next three pieces.
  6. Let the squares sit about an hour at room temperature to fully harden and then enjoy!

Notes

  • Toffee can reach temperatures of over 300°F so please use caution in the kitchen! Wear gloves, an apron, closed toe shoes, and use a candy thermometer. Keep children away when handling hot sugar.
  • If the butter separates it could be for a few reasons. One could be that your stove heat is too hot. Keep it around medium for the whole time. Another could be that your butter has a high fat ratio (like European style butters). Also, don’t stir too much after it has reached a boil, just every few minutes should be ok.
  • I tried this with half the amount of the butter and sugar and found it kept burning easily so I’d keep this as the smallest amount to make and then you can double or triple your batch from there.
  • If chocolate starts to cool after it is melted, microwave for 5-10 seconds and give it a stir.
  • Use very hot water to remove stubborn toffee from pans and utensils.
  • If you cannot find roasted peanuts in the store, you can roast raw peanuts at home by laying them on a baking sheet and baking at 350°F for about 20-25 minutes. giving them a turn about halfway through.

Did you make this recipe?

Tag @magicaltreatsathome on Instagram and hashtag it #magicaltreatsathome

Churro Toffee // magicaltreatsathome.com

Share this:

  • Click to share on Facebook (Opens in new window) Facebook
  • Click to share on X (Opens in new window) X

Like this:

Like Loading...

Filed Under: Recipes, Treats Tagged With: churro toffee, cinnamon, Disney's California Adventure, disneyland, Downtown Disneyland, toffee, treat, Trolley Treats, white chocolate

Maple-Bacon Churro

July 15, 2019 by Elana Lepkowski Leave a Comment

Maple-Bacon Churros // magicaltreatsathome.com

Where can I find the original treat?

  • This specialty churro was part of the “Get Your Ears On” celebration found in Grizzly Peak in California Adventure at the Disneyland resort.

We’re back today with another of our favorite churro recipes for #ChurroMonth here on the site. We just love anything with maple but when you add some salty bits of bacon… WOW! And we weren’t the only ones who were big fans of this treat. Many followers let us know that this churro was also a hit for them. So maybe we should start a #bringbackthemaplebaconchurro hashtag??

Maple-Bacon Churros // magicaltreatsathome.com

Anyway, this churro takes the classic cinnamon sugar recipe and dresses it up with a maple glaze and salty bacon bits. If you’re a fan of sweet and savory treats, this is definitely for you.

Maple-Bacon Churros // magicaltreatsathome.com

If you’re new to making churros, or any fried foods, please read through the notes below. I’ve tried to cover many issues that might arise while making these, but if you don’t see your question answered, leave us a comment below and we’ll get back to you (and you might even help another reader out!).

Maple-Bacon Churros // magicaltreatsathome.com

Ok, enough chatting for now… let’s make some churros!

Maple-Bacon Churros // magicaltreatsathome.com
Print
clock clock iconcutlery cutlery iconflag flag iconfolder folder iconinstagram instagram iconpinterest pinterest iconfacebook facebook iconprint print iconsquares squares iconheart heart iconheart solid heart solid icon
Maple-Bacon Churros // magicaltreatsathome.com

Maple-Bacon Churro

5 Stars 4 Stars 3 Stars 2 Stars 1 Star No reviews
  • Author: Elana Lepkowski
  • Yield: 14–16 churros 1x
  • Category: Treats
Print Recipe
Pin Recipe

Description

A sweet maple glaze and salty bacon bits top this classic cinnamon sugar churro found at Grizzly Peak in Disney’s California Adventure Park from the “Get Your Ears On” celebration. A Disneyland-inspired treat.


Ingredients

Scale

Toppings

  • 1/2 cup granulated sugar
  • 1 teaspoon cinnamon
  • 3–4 pieces of bacon
  • 1/2 cup maple syrup
  • 2 tablespoons butter
  • 1 tablespoon milk
  • 1 cup powdered sugar

Churro:

  • 1 cup water
  • 1/2 cup butter
  • 1 tablespoon granulated sugar
  • big pinch of salt
  • 1 cup all purpose flour
  • 2 eggs
  • vegetable oil for frying

Tools:

  • spider for frying
  • Wilton 1 M piping tip
  • pastry bag
  • candy thermometer

Instructions

For the toppings:

  1. Line two half sized sheet pans with parchment, set aside. Mix together 1/2 cup of granulated sugar and cinnamon in a long shallow bowl or loaf pan, set aside.
  2. Cook the bacon until crispy. Depending on the type of bacon you have, this can take about 8-10 minutes on medium high, flipping halfway through cooking. Drain on paper towels, cool, chop into small pieces and set aside.
  3. Make the maple glaze by combining maple syrup, butter, and milk in a medium sized saucepan. Bring to a boil and whisk for two minutes. Remove from heat. Slowly pour in powdered sugar, whisking continuously until combined and smooth. Set aside until ready to use or funnel into a squeeze bottle. (This will make more maple glaze than you need for just drizzling on your churros! This will keep refrigerated up to two weeks. Warm before using.)

For the churros:

  1. In a medium sized saucepan over medium-high heat, combine water, butter, sugar and salt. Bring to a boil, or until butter has melted.
  2. Turn burner to low and pour in all the flour at once. Stir until there are no visible flour lumps and dough has begun to stick together in a ball and pulled away from the sides of the pan.
  3. Remove pan from heat and let sit 5 minutes. Then stir in each egg until incorporated. Dough will appear to break or become lumpy. Continue to stir until it forms a smooth, sticky dough.
  4. Fill a pastry bag fitted with a Wilton 1 M open star tip half full with batter (see notes below on filling pastry bags) and pipe 8″ long dough onto the sheet pan. I was able to fill two sheet pans with all the batter.
  5. Refrigerate dough at least 30 minutes and up to two days. Batter will stiffen the more it sits, so let the dough come to room temperature before frying. (Note below for frying immediately after making dough)
  6. Fill a dutch oven or deep frying pan with vegetable oil at least 2″ up the side of the pan (I found a 1/2 gallon of avocado oil worked for me in my large dutch oven. See note below about reusing oil.). Heat oil to 340-350°f, using a candy thermometer to keep the temperature constant. You may need to adjust heat up or down during cooking.
  7. Place churros 2-3 at a time in the cooking oil for 6 minutes, turning after 3 minutes with a spatula or spider. Wait until oil comes back to temperature before adding next batch.
  8. Using a spider or large spatula, remove churros from oil and drain on a cooling rack over parchment or on a paper towel. Wait at least a minute and then toss the churro in the cinnamon sugar, tapping off any excess.
  9. Place sugared churros on a cooling rack with parchment or a sheet pan underneath to catch drips and then drizzle maple glaze onto each churro. Immediately sprinkle with bacon bits so they adhere to glaze.
  10. Allow to cool slightly and enjoy!

Notes

  • Do not overfill your pastry bag! Fill in two to three batches. If there is too much dough, it will seep out the top and will be hard to pipe.
  • Slowly pipe out dough all of a consistent size, smaller spots on the churro can cause them to become more fragile while handling and can break in the oil or while coating in sugar.
  • Churro dough can be piped out onto parchment and covered in the fridge up to 48 hours.
  • If you want to make you churros immediately after making dough without the chilling time, once oil has reached temp, starting about one inch above the oil, pipe a small line of dough down into oil and either snip end with scissors, or break the dough off the pastry tip on the side of your pan. Follow directions above for frying.
  • Thicker churros will require a longer cooking time to fully cook through the center. Test one churro first to adjust your cooking time.
  • Cooking oil can be fine strained and stored again for another use. I strain back into the bottle it came from. Well strained oil can be stored in a cool, dry place and used up to several times.
  • Churros curling? That could be one of a few reasons. One is that it will naturally shrink and change shape as the dough hits the oil and puffs up. I found that the stiffer dough from sitting in the fridge resulted in straighter churros while fresher dough tending to curl more. Also, if you’re using a circular pot like a dutch oven, churros may rest against the inside edge of the pan while cooking causing them to take on the curved shape of the pan. To prevent this, nudge your churro with the spider or spatula immediately after placing in oil when it pops back up to the surface. Continue to nudge gently back and forth for about 20-40 seconds or until the dough has gotten stiff in the oil.

Did you make this recipe?

Tag @magicaltreatsathome on Instagram and hashtag it #magicaltreatsathome

Maple-Bacon Churros // magicaltreatsathome.com

Share this:

  • Click to share on Facebook (Opens in new window) Facebook
  • Click to share on X (Opens in new window) X

Like this:

Like Loading...

Filed Under: Recipes, Treats Tagged With: bacon, churro, DCA, Disney's California Adventure, Get Your Ears On, maple, treat

Primary Sidebar

Follow Us

  • Instagram
  • Facebook
  • X
  • Pinterest
  • Email
  • YouTube

Hi! My name is Elana, and that’s me shoving a Mickey Mouse shaped treat in my face. I love the treats at Disneyland. A lot. So much so I’ve dedicated an entire website to making all my favorites, and hopefully yours too, out of my home kitchen. My aim is to create Disneyland-inspired treats, with easy to follow directions, and many recipes geared towards getting the kids in the kitchen to help too! Because putting sprinkles on things is F-U-N.

Top With Sprinkles

Get Recipes in Your Inbox!

* indicates required

Look for this icon in posts to find Kid Friendly recipes!

Recent Posts

  • Matterhorn Macaroon
  • Caramel Gingerbread Cookie Sandwiches
  • Colorful Fruit Hand Pies
  • Classic Mickey Shaped Beignets
  • Carrot Cake Cookies

Archives

  • February 2023
  • December 2022
  • August 2022
  • January 2022
  • December 2021
  • November 2021
  • December 2020
  • November 2020
  • October 2020
  • September 2020
  • August 2020
  • July 2020
  • June 2020
  • May 2020
  • April 2020
  • March 2020
  • February 2020
  • January 2020
  • December 2019
  • November 2019
  • October 2019
  • September 2019
  • August 2019
  • July 2019
  • June 2019
  • May 2019

Copyright © 2025 Magical Treats at Home on the Foodie Pro Theme

%d