• Skip to primary navigation
  • Skip to main content
  • Skip to primary sidebar

Magical Treats at Home

  • About
  • Treats
  • Drinks
  • Savory
  • Favorite Tools
  • Etsy Shop

Minnie Mouse

Minnie Witch Shake

October 14, 2019 by Elana Lepkowski Leave a Comment

Minnie Witch Shake // magicaltreatsathome.com

Where can I find the original treat?

  • The Minnie Witch Shake can be found at Schmoozies! in Disney’s California Adventure Park.

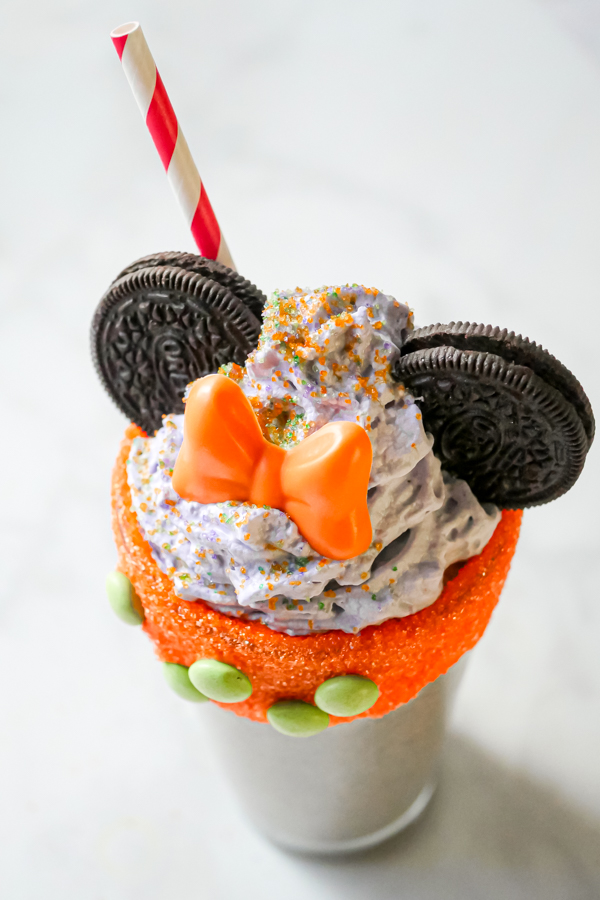
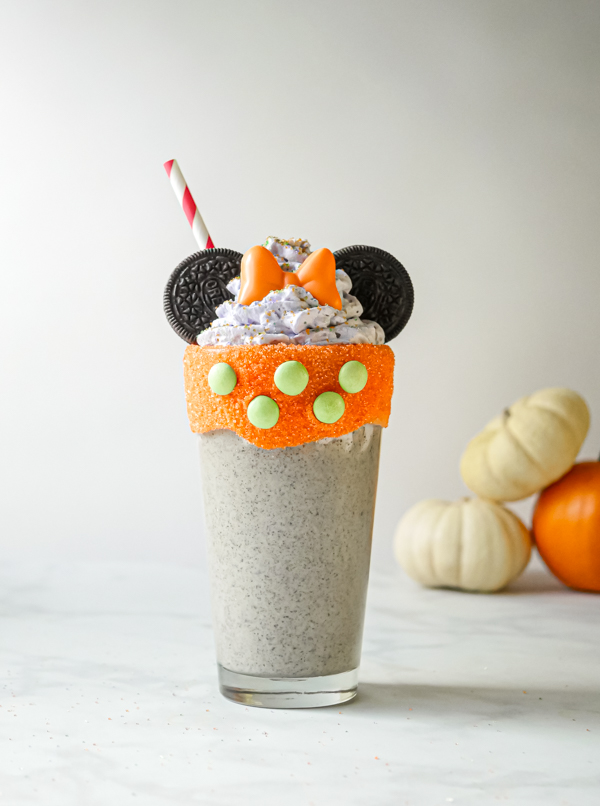
A shake in October?! YES when you live in SoCal! One thing people don’t realize is that here in Southern California, it’s still hot in October, like, 85° hot. And so a spooky Minnie Mouse Witch Shake is definitely in order!

Minnie Witch Shake // magicaltreatsathome.com

Mint chocolate chip is my favorite old school ice cream flavor (peanut butter cup is my favorite “new school” flavor in case you were interested), but we never have it at home since 1. My husband detests the combination of mint and chocolate together and 2. Mint oil now gives him a migraine. So I just don’t keep it around, but when I see it out I most definitely order it.

Minnie Witch Shake // magicaltreatsathome.com

And this shake delivered! So, I had to sneak a pint of mint chocolate ice cream home to recreate this recipe for all of you. But first, let me explain a bit about the ingredients. First, as someone pointed out on IG, Disney calls this a mint chocolate chip shake, but the chocolate in mine was not snappy, like chips of chocolate, but rather soft, like cookies. So, for this recipe I’ve blended up mint chocolate chip ice cream and Oreos for that softer, chocolate cookie piece texture. Second, the whipped cream. Now, I don’t know if it’s the stabilizers in the whipped cream or what, but the whipped cream on the shake in the park had a marshmallow-like texture and wasn’t super soft like regular whipped cream. Maybe like cool whip? Maybe, except it’s been so long since I’ve had it I can’t remember exactly what it’s like. Anyways, I have a whip cream dispenser at home that I use so I’m making fresh whipped cream for my shake. However, whatever way you like your whipped cream you should use that!

Minnie Witch Shake // magicaltreatsathome.com

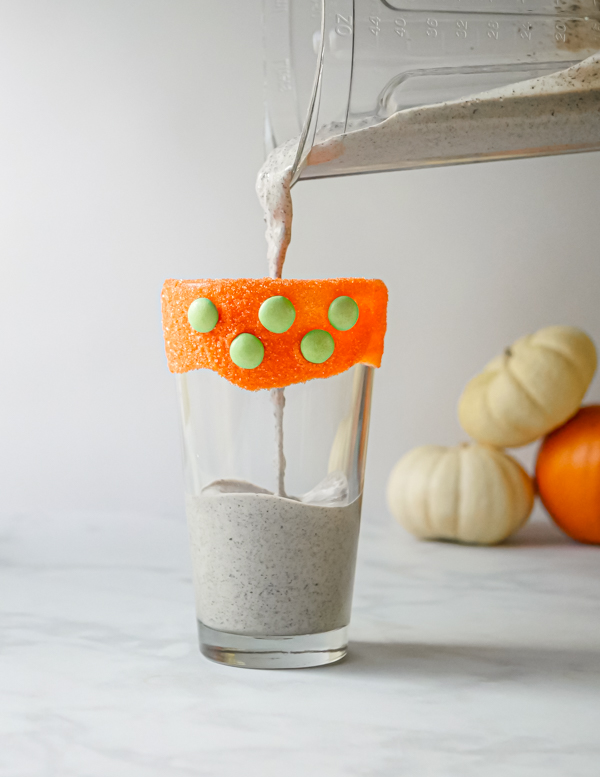
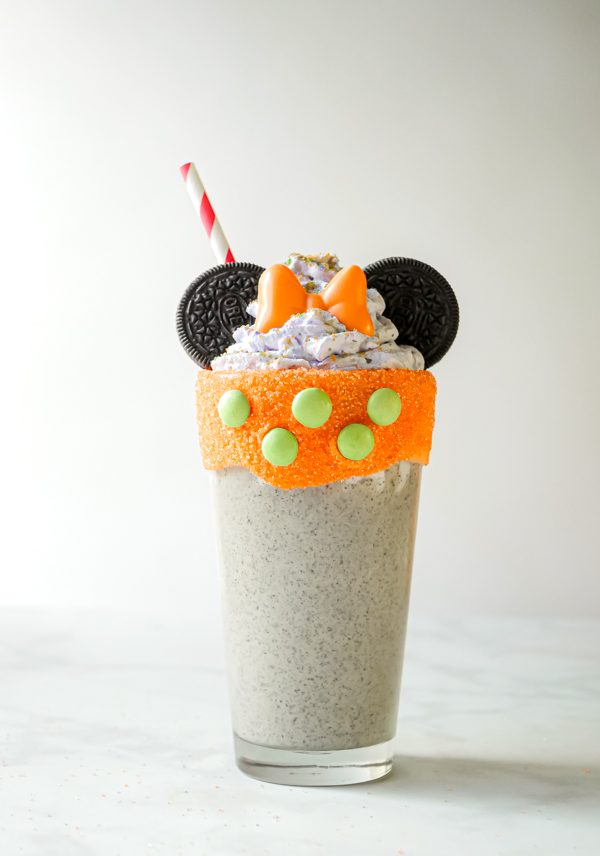
This recipe is for a single serve shake, but can very easily be expanded to as many shakes as you’d like to make (or made into a few tiny shakes for the kiddos!). I think the glass looks super cute with the orange sanding sugar and the green polka dots, but if you want to make this with less steps, I think you could leave out this part and be fine.

Minnie Witch Shake // magicaltreatsathome.com

Also, if you are making this with/for kids, I’d use plastic cups and forgo the glass like I’m using in the photos. Kids can dip their cups in warm, not hot, melted chocolate and decorate with the sanding sugar and chocolate candies. I’d even let them pour their shakes and top with whipped cream and sprinkles. Adults can make the chocolate bows beforehand as you’re handling hot chocolate and there’s a risk of burns.

As usual, a few notes below the recipe, so please read through the whole thing first before making. Ok?! Let’s start those blenders!!!

Minnie Witch Shake // magicaltreatsathome.com
Print
clock clock iconcutlery cutlery iconflag flag iconfolder folder iconinstagram instagram iconpinterest pinterest iconfacebook facebook iconprint print iconsquares squares iconheart heart iconheart solid heart solid icon
Minnie Witch Shake // magicaltreatsathome.com

Minnie Witch Shake

5 Stars 4 Stars 3 Stars 2 Stars 1 Star No reviews
  • Author: Elana Lepkowski
  • Yield: 1 Minnie Witch Shake 1x
Print Recipe
Pin Recipe

Description

Cool off this Halloween with a minty Minnie Witch Shake! A Disneyland-inspired treat.


Ingredients

Scale

Mint Chip Cookies and Cream Shake:

  • 3, 2 ounce scoops mint chocolate chip ice cream
  • 3 Oreo cookies, crushed
  • 1/4 cup milk, more or less to taste

Toppings and Decorations:

  • 4 ounces orange candy melts
  • 1/2 cup orange sanding sugar
  • 5 green M&Ms candies
  • orange, green, and purple sanding sugar mix (this can be pre-packaged if you find it, or mix together yourself)
  • whipped cream (or 1 cup heavy cream, 1 teaspoon each vanilla extract and simple syrup or liquid sweetener of your choice with directions below for making from scratch)
  • purple food coloring
  • 2 Oreo cookies

Special Tools:

  • Minnie Mouse bow mold
  • whipped cream canister
  • N2O chargers
  • soda fountain pint glasses
  • striped straws

Instructions

For the shake:

  1. In a blender, combine the mint ice cream, crushed cookies, and milk. Blend until smooth. Set aside.

For the glass decoration and chocolate bow:

  1. Pour the orange sanding sugar into a wide, shallow bowl. Set aside.
  2. Melt the orange candy melts in a microwave safe bowl, like glass. Microwave for 30 seconds. Stir and microwave again for an additional 30 seconds. Keep stirring and microwaving in short bursts of 15-20 seconds until melted and smooth. Use can alternatively use a double boiler for melting.
  3. Dip and coat the outer rim of a glass with the melted candy melts. Then dip in the orange sanding sugar, turning to coat the entire outside rim.
  4. Then, pour some of the melted orange candy melts in your bow mold(s). Let set at least 10 minutes in the refrigerator.
  5. Remove the bow from the mold when hardened and set aside. Repeat molding for additional bows.

To make the purple whipped cream:

  1. If using ready made whipped cream: Spray whipped cream into a small bowl and using a toothpick, add a drop of purple food coloring. Mix and set aside.
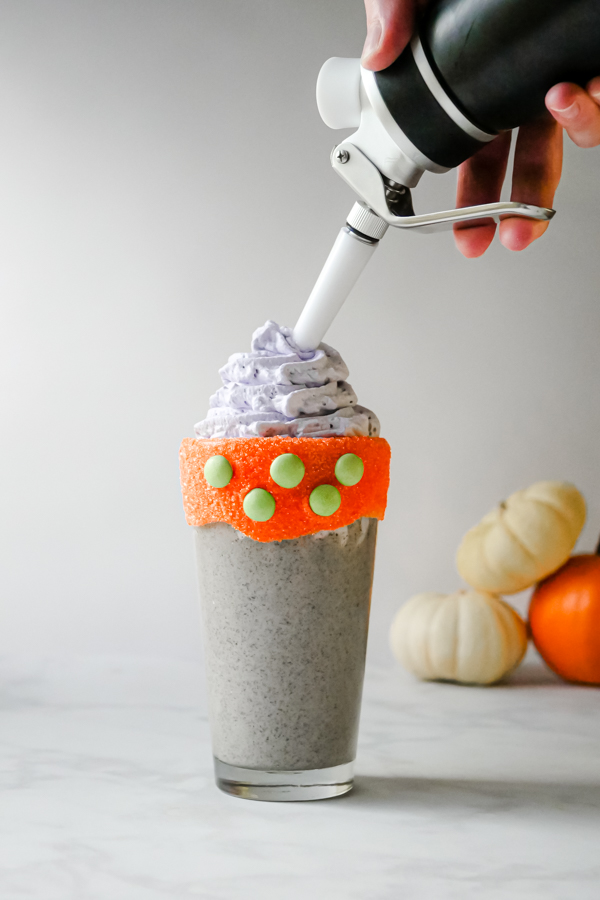
  2. If using a whipped cream canister: Add heavy cream, vanilla extract, simple syrup, and one drop of purple food coloring to a chilled whipped cream canister. Add N2O cartridge and twist to activate. Shake the container for a few seconds and set aside.
  3. If making whipped cream with a mixer: Add heavy cream and one drop of purple food coloring to a chilled mixing bowl. Mix until medium peaks form. Set aside.

Assembly:

  1. In the prepared glass, pour in the mint shake mixture. (Any extra set aside to top off later!)
  2. Spoon or spray prepared whipped cream on top.
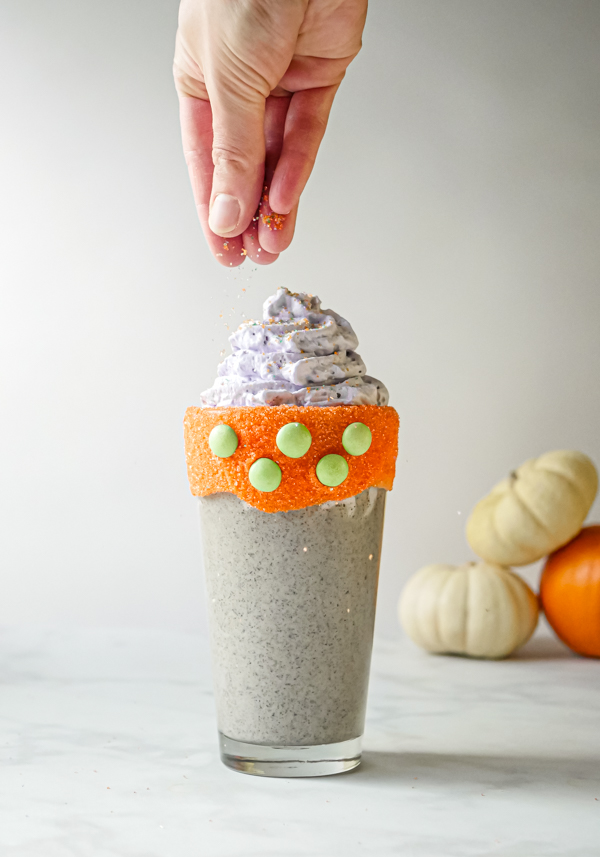
  3. Sprinkle with orange, green, and purple sanding sugar mix.
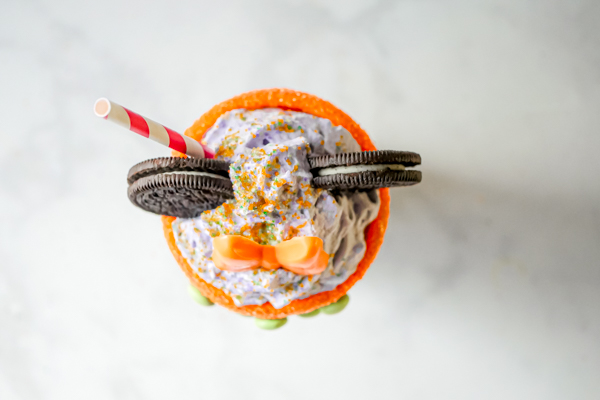
  4. Place the bow and the Oreo “ears” on top of whipped cream. Enjoy with a fun straw!

Notes

  • Glasses can be prepared up to a week ahead and stored in the refrigerator.
  • Bows can be prepared up to three days and stored in refrigerator.
  • If dairy is not your thing, try a dairy alternative ice cream and “milk”! You can also make the whipped cream with cream of coconut but be prepared for a less stiff cream on top.
  • If your ice cream is too soft, use less milk, and alternatively, if your ice cream is pretty hard, use a splash more milk.
  • You can pre-mix your own sprinkles for future baking projects. There are a lot of bulk options on Amazon for sprinkles and sanding sugars (check out our Favorite Supplies list for some examples!).

Did you make this recipe?

Tag @magicaltreatsathome on Instagram and hashtag it #magicaltreatsathome

Minnie Witch Shake // magicaltreatsathome.com

Share this:

  • Click to share on Facebook (Opens in new window) Facebook
  • Click to share on X (Opens in new window) X

Like this:

Like Loading...

Filed Under: Drinks, Recipes, Treats Tagged With: character treat, chocolate, cookies, Disney's California Adventure, fall-halloween, Minnie Mouse, mint, Oreos, Schmoozies, sprinkles, treat, whipped cream

Minnie Mouse Chocolate Covered Caramel Apple

September 2, 2019 by Elana Lepkowski 1 Comment

Minnie Mouse Chocolate Covered Caramel Apple // magicaltreatsathome.com

Where can I find the original treat?

  • These treats can be found all over the Disneyland Resort.

I jokingly declared it fall over on last week’s Instagram announcement due to both Starbucks and Disneyland bringing out all their seasonal products…. in August. But now that it’s September 1st, somehow that doesn’t feel so strange. So, today we’re making caramel apples. Minnie Mouse Chocolate Covered Caramel Apples!

Minnie Mouse Chocolate Covered Caramel Apple // magicaltreatsathome.com

These caramel apples are easy to find at the parks, and you can grab one at Candy Palace, Pooh Corner, Trolley Treats, and Marceline’s in Downtown Disneyland. The treat consists of an extra large apple (I’ve gotten Granny Smith apples but I’ve also seen Fuji) dipped in caramel, with marshmallow ears, which then get dipped in semisweet chocolate, and then half dipped in white chocolate. The apple then gets decorated with the classic Minnie Mouse bow, and gets a layer of white M&M’s buttons and a red sanding sugar bottom. The apples also seemed to be treated with a citric acid bath probably to stop the apples from browning and to keep them fresh while sitting, albeit briefly, in the candy case. We’re going to skip that step here, but if you’re making a bunch, say for favors, or for a class treat, drop me a line and I’ll let you know how to do that.

Minnie Mouse Chocolate Covered Caramel Apple // magicaltreatsathome.com

These chocolate covered caramel apples are sweet, crunchy, and big enough to share. I find these treats best if eaten at room temp, straight out of the refrigerator they’re too hard, and the flavors too muted. So, if you make these and then store them for awhile, let them sit out on the counter at least 15 minutes before digging in.

Minnie Mouse Chocolate Covered Caramel Apple // magicaltreatsathome.com

This recipe has a few steps, and a bit of a waiting time to make, but once you have all your ingredients prepped, you can double and even triple this recipe to suit your needs. Also, once you’ve covered your apples in caramel and done the first chocolate dip, I would say from here on out the apples are kid ready for decorating. An adult should melt the white chocolate, but kids can dip apples in there, and then decorate the bottom themselves.

We’ve got a few notes on chocolate tempering and how to get candies and sugars to stick to each other below in the notes, so please read all the way through the recipe. Also! Hot caramel can be dangerous, so keep kids away during that part. Hope you enjoy this sweet treat!

Minnie Mouse Chocolate Covered Caramel Apple // magicaltreatsathome.com
Print
clock clock iconcutlery cutlery iconflag flag iconfolder folder iconinstagram instagram iconpinterest pinterest iconfacebook facebook iconprint print iconsquares squares iconheart heart iconheart solid heart solid icon
Minnie Mouse Chocolate Covered Caramel Apple // magicaltreatsathome.com

Minnie Mouse Chocolate Covered Caramel Apple

5 Stars 4 Stars 3 Stars 2 Stars 1 Star No reviews
  • Author: Elana Lepkowski
  • Yield: 3 caramel apples 1x
Print Recipe
Pin Recipe

Description

A sweet, crunchy, Minnie Mouse themed chocolate covered caramel apple. A Disneyland-inspired treat.


Ingredients

Scale
  • 3 Granny Smith apples
  • 14 ounces individually wrapped caramels (like Kraft)
  • 2–1/4 tablespoons water
  • 6 regular sized marshmallows
  • 2 ounces red candy melts
  • 16 ounces semisweet chocolate wafers, divided
  • 8 ounces white chocolate melting wafers
  • 18 white M&Ms candies
  • 1–2 cups red sanding sugar

Special Tools

  • 3 wooden sticks or candy apple stick
  • Minnie Mouse bow mold

Instructions

  1. First, rinse apples in very hot water to move any wax that they might be covered with. Dry well, and using a sharp pairing knife, remove bottom and top stems. Insert a wooden stick into the bottom of the apple. They are easier to stand if you keep them bottoms up. Place them on a sheet pan covered with parchment.
  2. Next, combine caramels and water in a medium sized saucepan over medium-low heat.
  3. Stir constantly until everything has melted and caramels are smooth (about 7-8 minutes).
  4. Slightly tip the pan towards you with one hand and dip the apple in the caramel, turning it around to coat the entire surface. Let the excess caramel drip off and scrape any remaining on the bottom off on the side of the pan. Place back on parchment and repeat with next two apples. Let caramel cool slightly but still tacky. Place two marshmallows on each apple towards the top (as caramel cools more, the marshmallows will settle out and downwards a bit). Refrigerate at least 1 hour to let caramel harden and set.
  5. While caramel sets, make the Minnie Mouse bows by melting the red candy melts in the microwave inside a microwave safe bowl, like glass, for 30 seconds. Stir and microwave again for an additional 30 seconds. Keep stirring and microwaving in short bursts of 15 seconds until melted and smooth. Use can alternatively use a double boiler for melting. If you’d like to also create white polka dots here as well, melt about 1 ounce of white candy melts in the same way and then transfer to a piping bag. Pipe small, round dots in the mold first, and then proceed below.
  6. Pour red candy melts into bow molds and let set for 15-20 minutes (you can speed this up by sticking the molds in the refrigerator). Remove from the molds and set aside until ready to use.
  7. Next, temper the semisweet chocolate. You can do this in a double boiler on the stove or in the microwave. Place 2/3 of the semisweet chocolate in a glass bowl. On the stove, over a double boiler, stir until temperature reaches about 110°f. In the microwave, heat for 30 seconds, stir, and keep heating in short 15-20 bursts, stirring between, until temperature reaches about 110°f. Next, start adding in the rest of the semisweet chocolate in small amounts, stirring until melted between batches, until chocolate temperature cools to around 84-90°f. The chocolate is tempered at this point and ready to use.
  8. Remove caramel covered apples from the refrigerator. Dip each apple in, shaking off any excess and letting it drip back into the pan. Scrape any extra off on the side of the bowl. Place back on parchment and attach red bow. Allow chocolate to firm up, about half an hour in the refrigerator.
  9. Fill a shallow bowl with the red sanding sugar, set aside.
  10. Then, melt white chocolate over a double boiler over medium heat, or in the microwave, stirring until smooth.
  11. Dip half the apple in the white chocolate, allowing any excess to drip off, and scraping any extra off on the side of the bowl.
  12. Attach white M&M’s “buttons” around the base and then immediately roll the apple in the red sanding sugar. Set aside and repeat with last two apples.

Notes

  • Melted caramel is HOT! Use caution in the kitchen. Do not dip your fingers or hands into the caramel has it can adhere to skin and burn you. Keep away from children.
  • Use hot water to remove caramel from pans and utensils.
  • Extra melted caramel can be poured into a container and reheated at a later time. Store in an airtight container in refrigerator.
  • If you are having trouble keeping your marshmallows on during chocolate dipping, insert a small toothpick in each, dip, and immediately remove the toothpick.
  • If you have extra melted caramel that has pooled at the bottom of the apple, use kitchen shears to remove it immediately after removing from the refrigerator.
  • You can also pour the red sanding sugar over the apple into a bowl to catch excess and then press lightly with your hand to secure the sugar.
  • Any extra red sanding sugar that has attached itself to the apple can be swept away with a pastry brush once the white chocolate has set.

Did you make this recipe?

Tag @magicaltreatsathome on Instagram and hashtag it #magicaltreatsathome

Minnie Mouse Chocolate Covered Caramel Apple // magicaltreatsathome.com

Share this:

  • Click to share on Facebook (Opens in new window) Facebook
  • Click to share on X (Opens in new window) X

Like this:

Like Loading...

Filed Under: Recipes, Treats Tagged With: apple, caramel, caramel apples, character treat, chocolate, marshmallow, Minnie Mouse, treat, white chocolate

Minnie Mouse Rice Krispie Treat Pops

May 20, 2019 by Elana Lepkowski 1 Comment

Minnie Mouse Rice Crispie Pops // magicaltreatsathome.com

Where can I find the original treat?

  • These treats can be found at the Candy Palace on Main Street in Disneyland.

Since we covered Mickey Mouse doughnuts last week, I figured it was definitely time to give Minnie Mouse a turn. If you’re looking for a nostalgic treat, these Minnie Mouse Rice Krispie Treat Pops fit the bill!

Minnie Mouse Rice Crispie Pops // magicaltreatsathome.com

Chewy, Minnie Mouse shaped rice krispie pops are dipped into red and light cocoa candy melts and decorated with red sprinkles, white buttons, and Minnie’s signature red bow. The trick to getting that chewiness is with the butter; don’t skimp on it or the rice krispie treats will turn rock hard. Still edible, but rock hard.

Minnie Mouse Rice Crispie Pops // magicaltreatsathome.com

Also, try not to use too large of a sauce pan to melt the marshmallows in. If there’s too much space once you add in the cereal, what happens is the marshmallows have too much space to move around in, and will start to dry out and form strings, making it harder to mix together. I used the red candy melts to also make the bows in addition to the dipped lower half. If you are more advanced with your chocolate, go ahead and use high quality white chocolate here with red food dye and temper.

Minnie Mouse Rice Crispie Pops // magicaltreatsathome.com

There are lots of variations of these rice krispie treats throughout the parks. If you have a favorite one, let us know in the comments below, or shoot us an email at hello@magicaltreatsathome.com and we’ll add it to our list of treats to make.

With this post, I’ve also started to note which recipes kids can participate. A big reason for starting this site, apart from having Disneyland treats whenever I want them, was to get my kids more involved with baking and cooking projects at home. I started helping in the kitchen at an early age (maybe four?), and that helped cement a life long love of creating with food. Many people find baking intimidating because they did not do it at home, or had parents who didn’t do it or let them help, and because baking is, well, more specific, it can seem daunting. So, if you’re a little uneasy with the idea of baking, these kid friendly recipes are a great place to start!

Minnie Mouse Rice Crispie Pops // magicaltreatsathome.com

Kid Friendly tips:

  • Older kids can complete this recipe from start to finish. Have an adult supervise when using the stove.
  • Elementary age kids can help cut out shapes, dip in chocolate, and put on the sprinkles and decorations.
  • Very young kids can help sprinkle on the sanding sugar. Sprinkling on decorations is always a good task for the very little ones! (If the sanding sugar on these looks a bit uneven that’s because my two year old helped me with that!)
Print
clock clock iconcutlery cutlery iconflag flag iconfolder folder iconinstagram instagram iconpinterest pinterest iconfacebook facebook iconprint print iconsquares squares iconheart heart iconheart solid heart solid icon
Minnie Mouse Rice Crispie Pops // magicaltreatsathome.com

Minnie Mouse Rice Krispie Treat Pops

5 Stars 4 Stars 3 Stars 2 Stars 1 Star No reviews
  • Author: Elana Lepkowski
  • Yield: 3 Minnie Mouse Pops
Print Recipe
Pin Recipe

Description

Crispy, chewy, chocolatey Minnie Mouse shaped rice krispie treat pops. A Disneyland-inspired treat.


Ingredients

For the rice krispie treat:
2 tablespoons butter, unsalted
157 g ( 2 cups) mini marshmallows or 10 jumbo marshmallows, ripped apart
1-1/2 cups crisped rice cereal

For the chocolate dips:
2 ounces light cocoa candy melts
2 ounces red candy melts

For the bow:
8 red candy melts
1/2 ounce white candy melts

Decorations:
red sanding sugar
white M&Ms

Tools:
Minnie Mouse cutter
parchment
9″ bread loaf pan
Minnie Mouse bow mold
lollipop sticks


Instructions

For the rice krispie treat:

  1. Before beginning, line a 9″ bread loaf pan with parchment.
  2. Combine the butter and marshmallows in a small sauce pan over medium heat. Stir constantly until marshmallows have melted and mixture is smooth.
  3. Immediately dump in the crisped rice cereal and mix to combine.
  4. Pour into the prepared loaf pan and gently press mixture into place with a rubber spatula. Set aside for at least an hour in the refrigerator so that the mixture can firm up enough to cut shapes.
  5. Once firm, use parchment to lift out rice krispie treats. Use a Minnie Mouse shaped cutter to cut out shapes and set aside.

To decorate:

  1. First, melt the light cocoa candy melts in the microwave inside a microwave safe bowl, like glass, for 30 seconds. Stir and microwave again for an additional 30 seconds. Keep stirring and microwaving in short bursts of 15-20 seconds until melted and smooth. Use can alternatively use a double boiler for melting.
  2. Once melted, dip top half of Minnie ears into the light cocoa. Set aside on parchment. Repeat for all treats.
  3. Using the method above, melt the red candy melts. Dip the lower half of the Minnie Mouse treat, letting any excess drip off. Immediately sprinkle with red sanding sugar and press 5 white M&Ms into the sanding sugar. Set aside.
  4. Make the bows by melting the remaining red candy melts using the method above. Pour into bow molds and set aside for 15 minutes.
  5. Melt the white candy melts in a microwave safe piping bag using the method above but kneading instead of stirring.
  6. Gently pop out bows and pipe small white polkadots on them. Set aside.
  7. Pipe a small amount of the white candy melts onto the center head part of the rice krispie and press the bow to “glue” on.
  8. Let everything stand for about 30 minutes and then enjoy!

Notes

The chocolate will be smoother if you use the flat side as opposed to the bumpy rice krispie side.

You can combine some extra rice krispie treat scraps into the mold to shape a third Minnie Mouse if you could not cleanly cut out 3 from your batch.

Treats can be kept in an air-tight container for up to 3 days.

Did you make this recipe?

Tag @magicaltreatsathome on Instagram and hashtag it #magicaltreatsathome

Share this:

  • Click to share on Facebook (Opens in new window) Facebook
  • Click to share on X (Opens in new window) X

Like this:

Like Loading...

Filed Under: Recipes, Treats Tagged With: candy melts, character treat, chocolate, Minnie Mouse, rice krispie treat, treat

Primary Sidebar

Follow Us

  • Instagram
  • Facebook
  • X
  • Pinterest
  • Email
  • YouTube

Hi! My name is Elana, and that’s me shoving a Mickey Mouse shaped treat in my face. I love the treats at Disneyland. A lot. So much so I’ve dedicated an entire website to making all my favorites, and hopefully yours too, out of my home kitchen. My aim is to create Disneyland-inspired treats, with easy to follow directions, and many recipes geared towards getting the kids in the kitchen to help too! Because putting sprinkles on things is F-U-N.

Top With Sprinkles

Get Recipes in Your Inbox!

* indicates required

Look for this icon in posts to find Kid Friendly recipes!

Recent Posts

  • Matterhorn Macaroon
  • Caramel Gingerbread Cookie Sandwiches
  • Colorful Fruit Hand Pies
  • Classic Mickey Shaped Beignets
  • Carrot Cake Cookies

Archives

  • February 2023
  • December 2022
  • August 2022
  • January 2022
  • December 2021
  • November 2021
  • December 2020
  • November 2020
  • October 2020
  • September 2020
  • August 2020
  • July 2020
  • June 2020
  • May 2020
  • April 2020
  • March 2020
  • February 2020
  • January 2020
  • December 2019
  • November 2019
  • October 2019
  • September 2019
  • August 2019
  • July 2019
  • June 2019
  • May 2019

Copyright © 2025 Magical Treats at Home on the Foodie Pro Theme

%d