• Skip to primary navigation
  • Skip to main content
  • Skip to primary sidebar

Magical Treats at Home

  • About
  • Treats
  • Drinks
  • Savory
  • Favorite Tools
  • Etsy Shop

Downtown Disneyland

Mickey Mouse Spider Web Rice Krispie Treats

September 30, 2019 by Elana Lepkowski Leave a Comment

Mickey Mouse Spider Web Rice Krispie Treat // magicaltreatsathome.com

Where can I find the original treat?

  • These treats can be found all over the Disneyland resort.

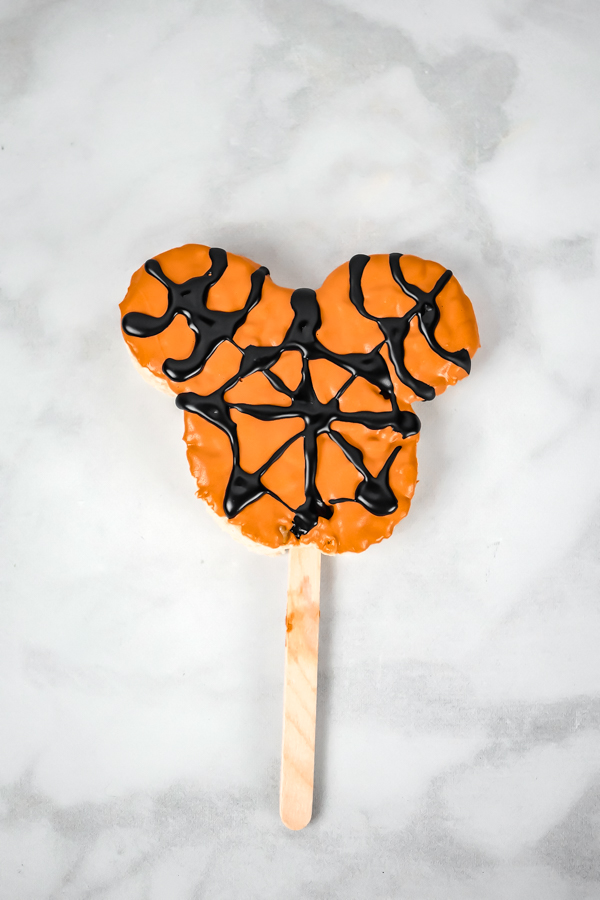
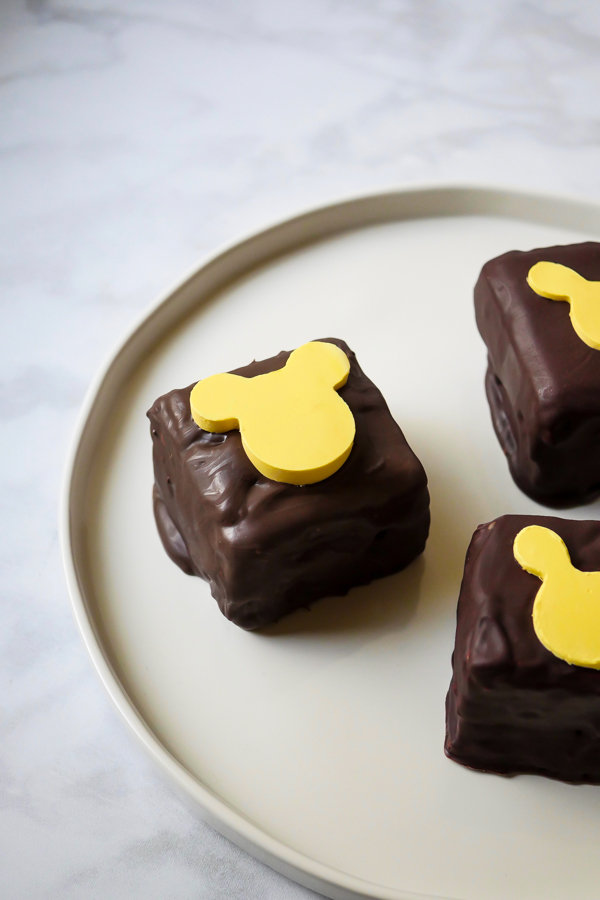
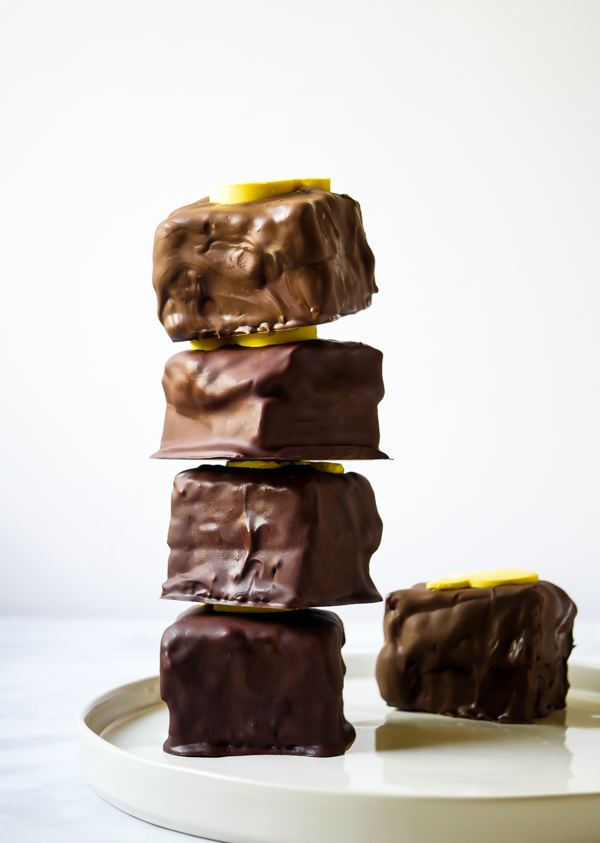
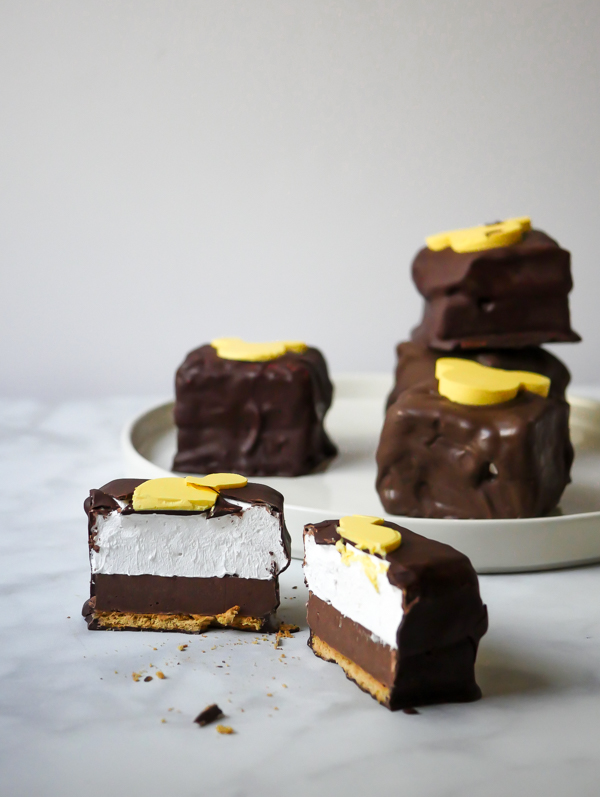
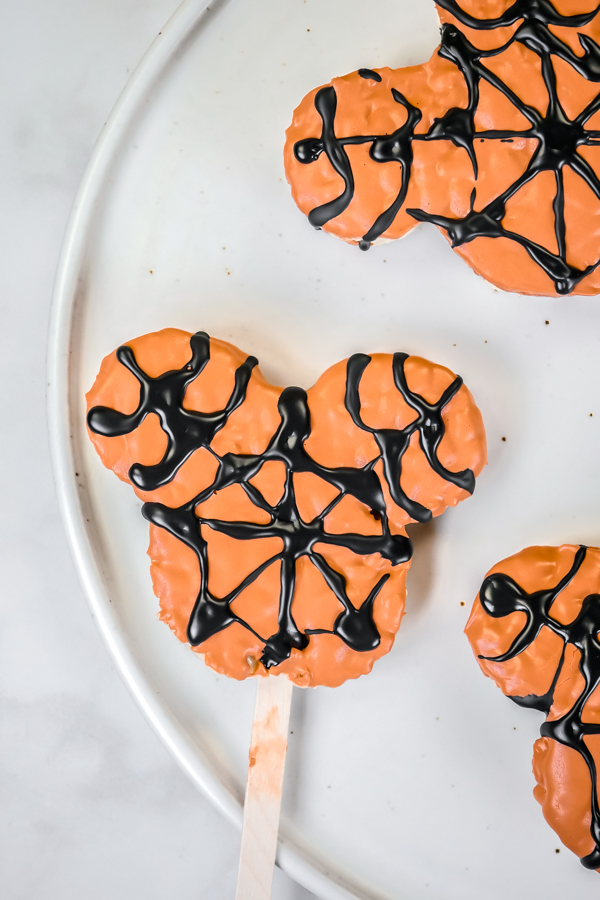
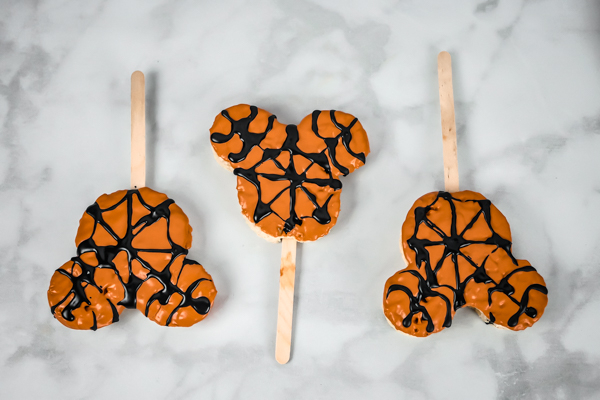
There are so many tasty Halloween treats at Disneyland right now that it was a bit hard to narrow down what I wanted my first spooky treat of the season to be. But I had to go with a rice crispy (crispie… krispie… krispy…) treat. A Mickey Mouse Spider Web Rice Krispie treat that is!

Mickey Mouse Spider Web Rice Krispie Treat // magicaltreatsathome.com

Sometimes simple is best and these treats are SO simple to make. They’re also great at sizing up, in case you want to give these out as Halloween treats at home, or to a class, or to friends. (Our recipe below has a handy button to increase the recipe yield, please use it for this if you want a large amount!)
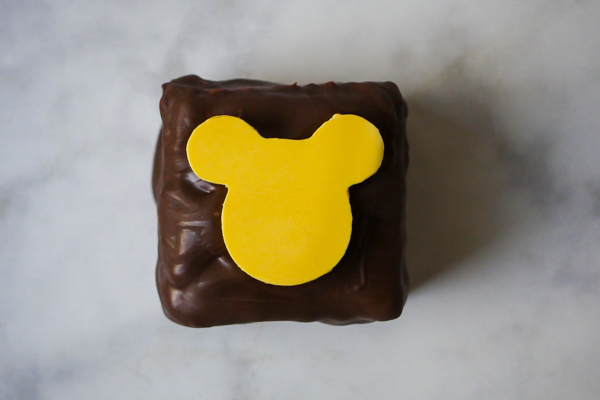
After the initial rice crispy treat is made and cooled, kids can help cut and decorate. I also tried out a new-to-me product from Wilton which is pretty much a prepackaged squeeze bottle of black icing. So that’s an option if you don’t want to melt two batches of chocolate and color them. I found it convenient, however, I would have liked a smaller opening for the icing. All of these pictured I used the bottle icing but I think I’ll also try with my own chocolate next time just to compare.

Mickey Mouse Spider Web Rice Krispie Treat // magicaltreatsathome.com

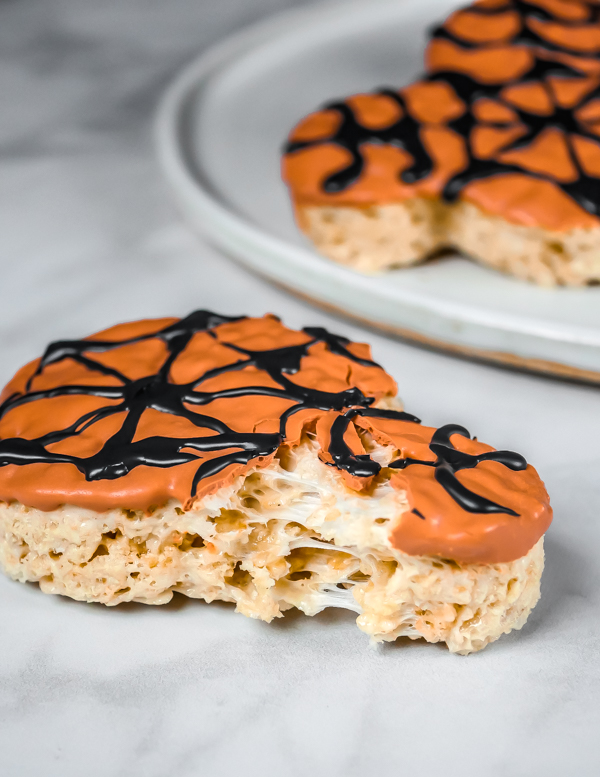
As per usual, there are some notes following the recipe so please read all the way through. One big tip though is that when you’re working with marshmallows, you’ll never scrape everything out of the pan you make them in so make peace with that now. Also, damp fingers/hands are best since the marshmallow won’t stick to you!

I hope you get in the kitchen this week and make these sweet, classic treats, with this Halloween spin!

Print
clock clock iconcutlery cutlery iconflag flag iconfolder folder iconinstagram instagram iconpinterest pinterest iconfacebook facebook iconprint print iconsquares squares iconheart heart iconheart solid heart solid icon
Mickey Mouse Spider Web Rice Krispie Treat // magicaltreatsathome.com

Mickey Mouse Spider Web Rice Krispie Treats

5 Stars 4 Stars 3 Stars 2 Stars 1 Star No reviews
  • Author: Elana Lepkowski
  • Yield: 3 Mickey Mouse Spider Web Rice Krispie treats 1x
Print Recipe
Pin Recipe

Description

Chewy, crispy, Mickey Mouse-shaped rice krispie treats get the Halloween treatment with a bright orange and black spider web design on the iconic treat. A Disneyland-inspired recipe.


Ingredients

Scale

For the rice krispie treat:

  • 2 tablespoons butter, unsalted
  • 157 g ( 2 cups) mini marshmallows or 20 regular sized marshmallows
  • 2 cups crisped rice cereal

For the topping:

  • 3–1/2 ounces white chocolate
  • 6–8 drops orange, oil based food coloring for chocolate
  • 2 ounces (100 g) light cocoa candy melts
  • 3–4 drops black, oil based food coloring for chocolate
  • OR, Wilton Black Cookie Icing (instead of light cocoa melts and black food coloring)

Tools:

  • Mickey Mouse cutter
  • 3 Popsicle sticks

Instructions

For the rice krispie treat:

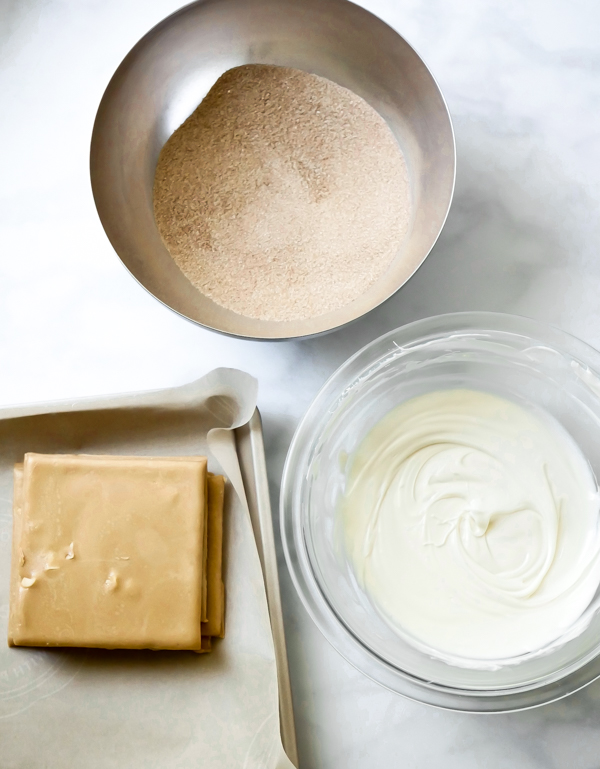
  1. Before beginning, line a 8×8″ baking pan with parchment.
  2. Combine the butter and marshmallows in a medium sauce pan over medium-low heat. Stir constantly until marshmallows have melted and mixture is smooth.
  3. Immediately dump in the crisped rice cereal and mix to combine.
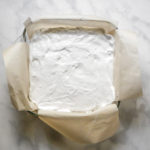
  4. Pour into the prepared pan and gently press mixture into place with a rubber spatula (or damp fingers). Set aside for at least an hour in the refrigerator so that the mixture can firm up enough to cut shapes.
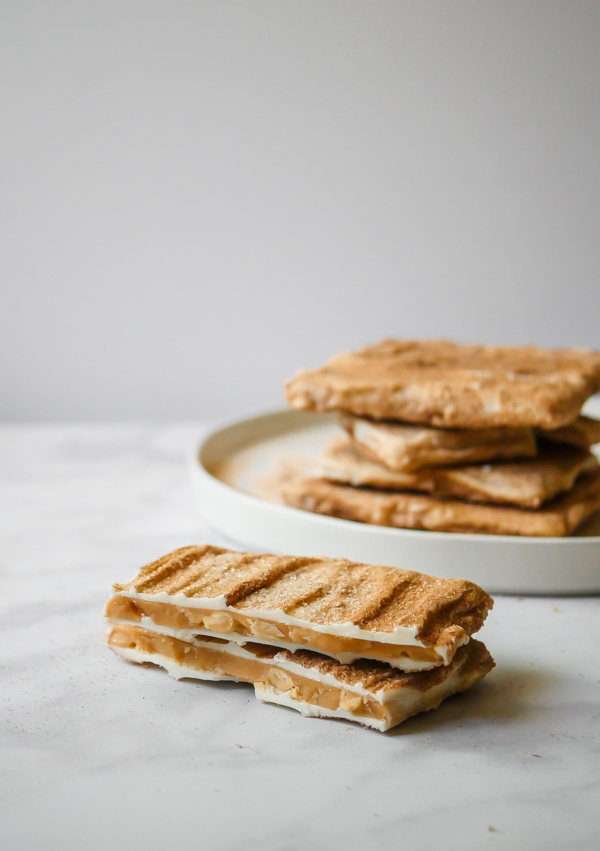
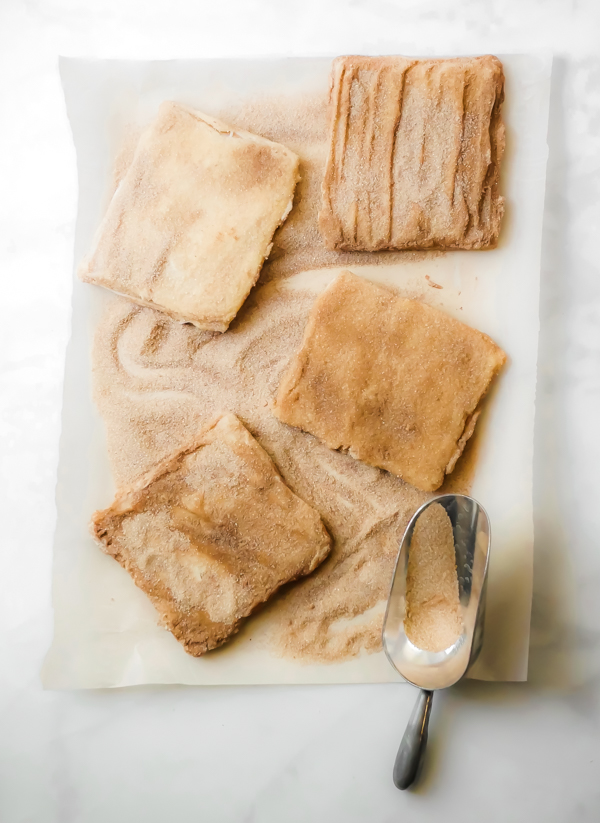
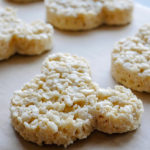
  5. Once firm, use parchment to lift out rice krispie treats. Use a Mickey Mouse shaped cutter to cut out shapes and set aside.
    Mickey Mouse Spider Web Rice Krispie Treat // magicaltreatsathome.com

For the decorating:

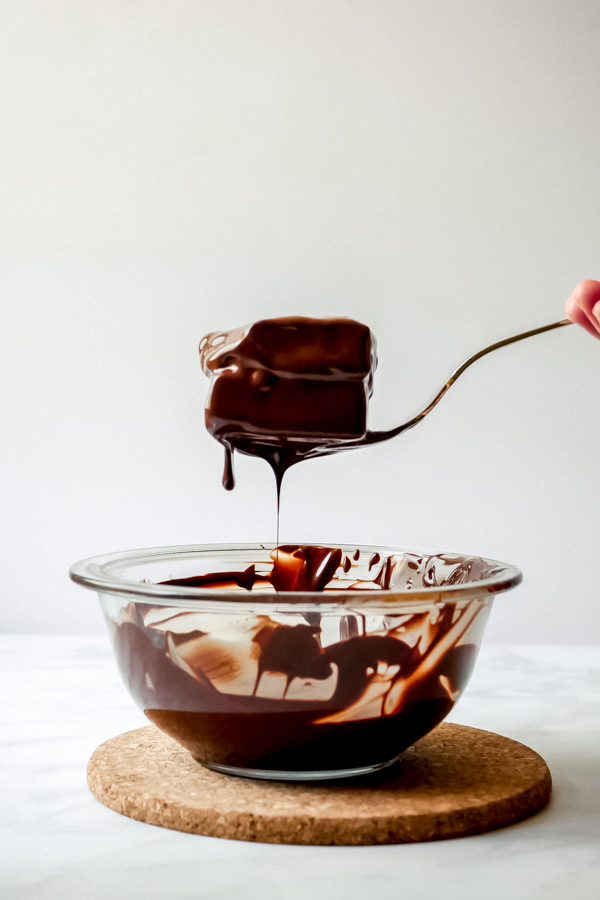
  1. First, melt the white chocolate and orange food coloring in the microwave inside a microwave safe bowl, like glass, for 30 seconds. Stir and microwave again for an additional 30 seconds. Keep stirring and microwaving in short bursts of 15-20 seconds until melted and smooth. Use can alternatively use a double boiler for melting.
  2. Insert a popsicle stick into each treat.
  3. Dip a treat into the melted chocolate, letting any excess drip off back into the bowl. Repeat for other treats.
  4. Next, melt the light cocoa candy melts and black food coloring in the microwave inside a microwave safe bowl, like glass, for 30 seconds. Stir and microwave again for an additional 30 seconds. Keep stirring and microwaving in short bursts of 15-20 seconds until melted and smooth. Use can alternatively use a double boiler for melting. Or you can skip and use the tube icing here.
  5. Transfer black melted chocolate to a squeeze bottle or a piping bag with a small portion of the tip cut off. Then decorate a spider web design over the orange chocolate. Repeat until all treats are decorated.
  6. Let the chocolate firm up, at least an hour in the refrigerator before serving. Enjoy!

Notes

  • Use a smaller pan than you think you’ll need for this. As the marshmallows melt into the butter, if there’s too much space in the pan they will start to dry out and form strings. Keeping the marshmallows closer together in the pan will ensure they melt more evenly, creating a better mixture to add the cereal into.
  • When mixing crisped rice cereal into the melted marshmallows, keep the mixture on the flame so that marshmallows stay liquid. Removing to mix in can seize up the liquid before the cereal is fully mixed.
  • You can combine some extra rice krispie treat scraps into the mold to shape additional Mickey Mouse treats.
  • You can also use orange candy melts instead of the white chocolate and orange food coloring.
  • Treats can be kept in an air-tight container for up to 3 days.

Did you make this recipe?

Tag @magicaltreatsathome on Instagram and hashtag it #magicaltreatsathome

Mickey Mouse Spider Web Rice Krispie Treat // magicaltreatsathome.com

Share this:

  • Click to share on Facebook (Opens in new window) Facebook
  • Click to share on X (Opens in new window) X

Like this:

Like Loading...

Filed Under: Recipes, Treats Tagged With: character treat, DCA, disneyland, Downtown Disneyland, fall-halloween, Halloween, rice krispie treat, treat

Churro Toffee

August 26, 2019 by Elana Lepkowski 3 Comments

Churro Toffee // magicaltreatsathome.com

Where can I find the original treat?

  • These treats can be found all over the Disneyland Resort.

I heard about Churro Toffee long before I ever tried it. Several Disney food accounts I follow on Instagram would frequently sing the praises of this spiced, sweet treat reminiscent of the classic Disneyland churro with lots of drooling emojis and exclamation points; I was intrigued. I had to make it.

Churro Toffee // magicaltreatsathome.com

But first I had to try it! The Disneyland resort has a few places you can pick this up from. I dropped in to Marceline’s in Downtown Disneyland to get mine. Sometimes, if you’re lucky, you can watch the candy makers make Churro Toffee in the window there (but mostly they’re making candy apples).

Churro Toffee // magicaltreatsathome.com

The trickiest part of this recipe is getting the toffee just right. You’d think with what is really just two, sometimes three, ingredients, this would be an easy recipe to make… but it can go very wrong if you’re not paying attention to temperature. Here, both the temperature of the stove, and the temperature of the mixture are very important. If the heat on your stove is too high, the mixture can “break” or separate and you’ll end up with an oily mess headed straight for the garbage. Also, if you let your mixture get too hot, it will burn, and nothing is going to save it. Nothing. So, if you’re new to toffee making, please go get yourself a candy thermometer. But if this isn’t your first time at the toffee rodeo, proceed as usual.

Churro Toffee // magicaltreatsathome.com

After you’ve got a solid toffee base, you’re in the clear and this treat comes together fairly easily. Once the toffee is set, it gets a quick dip in melted white chocolate and then takes a cinnamon sugar bath. Kids can help with this part! You’ll need to wait a little while before eating because the white chocolate needs to harden (but even when it’s still a little soft you can sneak a bite. I sure did!).

Churro Toffee // magicaltreatsathome.com

So now that we’ve talked up this sweet treat, let’s get to making some! Read through all the tips at the end of this recipe too and drop a comment below if you’ve got a question!

Print
clock clock iconcutlery cutlery iconflag flag iconfolder folder iconinstagram instagram iconpinterest pinterest iconfacebook facebook iconprint print iconsquares squares iconheart heart iconheart solid heart solid icon
Churro Toffee // magicaltreatsathome.com

Churro Toffee

5 Stars 4 Stars 3 Stars 2 Stars 1 Star No reviews
  • Author: Elana Lepkowski
  • Yield: 4 large squares 1x
Print Recipe
Pin Recipe

Description

Buttery english toffee is covered in white chocolate and dusted with a layer of cinnamon-sugar, reminiscent of the classic churro! A Disneyland-inspired treat.


Ingredients

Scale

For the Churro Toffee:

  • 1 cup salted butter (if using unsalted add 1/4 teaspoon)
  • 1 cup granulated sugar
  • 2 tablespoons water
  • 2 tablespoons chopped roasted peanuts (see notes on home roasting below)
  • white chocolate melting wafers
  • 1 cup granulated sugar
  • 1 tablespoon cinnamon

Special Tools:

  • candy thermometer
  • dough cutter/scraper

Instructions

For the toffee base:

  1. First, spray or grease an 8×8″ baking pan and then line with parchment.
  2. Sprinkle chopped peanuts over the parchment and set aside.
  3. In a medium saucepan over medium heat, melt the sugar, butter, and water together. Stir occasionally until butter is melted. Attach a candy thermometer to the side of the pan, careful not to let it touch the very bottom of the pan.
  4. Let the mixture come to a boil, stirring occasionally until it turns an amber brown (this could read 290-305 F on a candy thermometer). The mixture can burn very quickly at this point so as soon as it gets brown, remove from the stove and pour into the prepared pan.
  5. The mixture will start to set up pretty quickly, but move to the refrigerator for about 15 minutes to firm up more. After this point, use a dough scrapper to divide the toffee into 4 large squares (you can always do smaller too if you’d like). Then place back into the refrigerator to completely firm up, about one hour.

For the churro coating:

  1. About 15 minutes before the hour is up, set up your dipping station.
  2. In a medium sized work bowl large enough to fit a square of toffee, mix together 1 cup of sugar and the cinnamon. Set aside.
  3. In a microwave safe bowl, like glass, pour in the white chocolate melting wafers. Microwave for 30 seconds. Stir and microwave again for an additional 30 seconds. Keep stirring and microwaving in short bursts of 15-20 seconds until melted and smooth. Use can alternatively use a double boiler for melting. Set aside.
  4. Remove toffee from the refrigerator and let sit for 5 minutes to come to room temperature. Then dip one square into the white chocolate, letting excess drip off (you can also use a popsicle stick to remove any excess from the edge). Then immediately dip into the cinnamon sugar mixture, turning around the square so that it is evenly covered. Set aside on a baking sheet lined with parchment.
  5. Repeat above dipping steps for next three pieces.
  6. Let the squares sit about an hour at room temperature to fully harden and then enjoy!

Notes

  • Toffee can reach temperatures of over 300°F so please use caution in the kitchen! Wear gloves, an apron, closed toe shoes, and use a candy thermometer. Keep children away when handling hot sugar.
  • If the butter separates it could be for a few reasons. One could be that your stove heat is too hot. Keep it around medium for the whole time. Another could be that your butter has a high fat ratio (like European style butters). Also, don’t stir too much after it has reached a boil, just every few minutes should be ok.
  • I tried this with half the amount of the butter and sugar and found it kept burning easily so I’d keep this as the smallest amount to make and then you can double or triple your batch from there.
  • If chocolate starts to cool after it is melted, microwave for 5-10 seconds and give it a stir.
  • Use very hot water to remove stubborn toffee from pans and utensils.
  • If you cannot find roasted peanuts in the store, you can roast raw peanuts at home by laying them on a baking sheet and baking at 350°F for about 20-25 minutes. giving them a turn about halfway through.

Did you make this recipe?

Tag @magicaltreatsathome on Instagram and hashtag it #magicaltreatsathome

Churro Toffee // magicaltreatsathome.com

Share this:

  • Click to share on Facebook (Opens in new window) Facebook
  • Click to share on X (Opens in new window) X

Like this:

Like Loading...

Filed Under: Recipes, Treats Tagged With: churro toffee, cinnamon, Disney's California Adventure, disneyland, Downtown Disneyland, toffee, treat, Trolley Treats, white chocolate

Mickey S’more Square

August 12, 2019 by Elana Lepkowski Leave a Comment

Mickey S'more Square // magicaltreatsathome.com

Where can I find the original treat?

  • These treats can be found all over the Disneyland Resort.

Did you know that Saturday was National S’mores Day? Don’t worry, you won’t find it marked on the calendar, and there isn’t an elf that sneaks into your house at night and leaves s’mores in your shoes. It’s just an excuse to enjoy one of the BEST treats for summer. And Disneyland has you covered… with no fire required!

Mickey S'more Square // magicaltreatsathome.com

One of the year-round favorites at the resort, you can usually find this square at Candy Palace, Pooh Corner, Marceline’s in Downtown Disney, and Trolley Treats at DCA. And now you can have it at home too!

Mickey S'more Square // magicaltreatsathome.com

The Mickey S’more square is made up of a crisp graham cracker base, a layer of rich milk chocolate fudge, a layer of thick marshmallow, and it’s all covered in a semi-sweet chocolate topped with a yellow chocolate Mickey Mouse. Our recipe below has a few steps, but it all comes together fairly easily once you’re ready to assemble. There’s just the added wait time for the fudge to set up, and the chocolate to set. You WILL NOT need to make graham crackers for this recipe, however, if you do have a homemade recipe you love, by all means use it! We’re using store bought here for consistency and time. For your final square, the Mickey chocolate on top is definitely optional, but we do give an easy way to make one below too, just in case you want a few to snack on!

Mickey S'more Square // magicaltreatsathome.com

We won’t be making any campfires for this recipe, and the only fire you’ll see is on a gas stove, but you’ll definitely know you’re eating a S’more when you take a bite of this yummy treat.

Print
clock clock iconcutlery cutlery iconflag flag iconfolder folder iconinstagram instagram iconpinterest pinterest iconfacebook facebook iconprint print iconsquares squares iconheart heart iconheart solid heart solid icon
Mickey S'more Square // magicaltreatsathome.com

Mickey S’more Square

5 Stars 4 Stars 3 Stars 2 Stars 1 Star No reviews
  • Author: Elana Lepkowski
  • Yield: 6 S’mores Squares 1x
Print Recipe
Pin Recipe

Description

Layers of crisp graham crackers, rich milk chocolate fudge, and gooey marshmallow are covered in semi-sweet chocolate and topped with a yellow Mickey Mouse chocolate in this dessert reminiscent of the classic s’mores. A Disneyland-inspired treat!


Ingredients

Scale

For the Milk Chocolate Fudge:

  • 8 ounces (227 g) milk chocolate, finely chopped
  • 2 tablespoons unsalted butter
  • 7 ounces sweetened condensed milk
  • pinch teaspoon salt

For the Marshmallows:

  • 1–1/2 cups granulated sugar
  • 3/4 corn light corn syrup
  • pinch salt
  • 1 teaspoon vanilla extract
  • 2 packets of gelatine
  • 2/3 cups of water, divided

For assembly:

  • 6 graham cracker squares (3 large sheets broken in half)
  • 12 ounces (340 g) semi-sweet chocolate, finely chopped and divided
  • 2–1/2 ounces white chocolate (71 g), chopped, optional
  • yellow oil-based chocolate covering, optional

Special Tools:

  • Candy Thermometer
  • Mickey Mouse mold

Instructions

For the Milk Chocolate Fudge:

  1. Line a loaf pan with parchment paper or wax paper.
  2. In a double boiler, combine milk chocolate, butter, sweetened condensed milk, and salt. Stir occasionally, until smooth.
  3. Pour into loaf pan and chill, uncovered, until firm, about 4 hours. Set aside.

For the Marshmallows:

  1. Grease a loaf pan and line with parchment paper or wax paper. Grease top of paper as well. Set aside.
  2. In a medium saucepan over high heat, combine sugar, corn syrup, salt, and 1/3 cup of water. Stir to dissolve sugar. Once mixture reaches a boil, do not disturb. Let the mixture reach “soft ball” stage, approximately 238°F (use a candy thermometer or probe thermometer to get an accurate temperature).
  3. While syrup is boiling, in the bowl of a stand mixer, pour in the other 1/3 cup of water and sprinkle gelatine over it. Let sit for five minutes so water can absorb the gelatine. Not all of it will absorb and that’s ok.
  4. Then, attach the whisk attachment and turn mixer on slowest speed. Wearing oven mitts in case of splashing, slowly pour in the syrup mixture into the mixer. Whisk two minutes and then raise speed to medium. Whisk another two minutes and then gradually move speed to highest. Whisk another 3-5 minutes until mixture is stiff. Beat in vanilla extract for 30 seconds and then pour everything into the prepared pan. Mixture will be very sticky and you might not be able to get everything out of the bowl. See notes below. Mickey S'more Square // magicaltreatsathome.com
  5. Use wet fingers to smooth out the marshmallow top and let sit out, uncovered, until firm. About 3 hours.

Mickey Mouse chocolate toppers (optional)

  1. In a microwave safe bowl, combine chopped white chocolate and a few drops of the oil-based yellow food coloring.
  2. Heat in microwave for 30 seconds, stir, and continue to microwave in short 15 -20 second bursts, stirring between, until chocolate is melted and smooth.
  3. Pour into molds and let sit in the refrigerator about 30 minutes to harden. Remove from molds and set aside.

Assembly:

  1. First, temper the semi-sweet chocolate for coating: In a microwave safe bowl, add 2/3 of the chocolate. Microwave for 30 seconds, stir, microwave for another 30 seconds. Stir again and microwave in short bursts of 15-20 seconds until chocolate has uniformly melted and has reached between 114° – 118°F. Then add in some of the remaining chocolate, stir to completely melt and then add more (I did three batches). Continue to stir the chocolate until it has cooled to 88° – 89°F (this can take several minutes of stirring). The chocolate is now tempered and ready to use. Set aside.
  2. Un-mold the fudge from the pan and using a graham cracker as a guide, divide and cut the fudge to fit on the base of cracker. You may need to combine some pieces of fudge if your graham crackers are larger.
  3. Next, remove the marshmallow from the pan keeping it on the parchment. To square off ends of marshmallows, use a long, sharp knife to trim sides. Clean knife with hot water between cuts.
  4. Then, using a graham cracker as a guide, divide the pan into roughly 9 squares, using the same, long, sharp knife to make cuts. You will only need six of the marshmallows for this recipe. See notes below for storing extra marshmallows. Use damp fingers to remove marshmallows from each other if they get stuck together.
  5. Create each stack by starting with the graham cracker base, a piece of fudge, and then top with the marshmallow. Set aside on a sheet pan lined with parchment.
    Mickey S'more Square // magicaltreatsathome.com
  6. Dip each stack into the tempered chocolate, using a spoon to pour chocolate on top and let drip down sides. Use a chocolate fork or slotted spatula to remove the stack from the chocolate. Allow the chocolate to drip from the stack for a minute or two (or you’ll end up with lots of pooled chocolate) and then place on sheet pan. Repeat until all stacks have been dipped.
  7. If you are using the yellow chocolate Mickey Mouse topper, place one on each stack after you have dipped it.
  8. Allow everything to set at least 4 hours or overnight. Enjoy!

Notes

  • Making marshmallows is a sticky, hot mess. You will need to wear an apron, close toed shoes, and make sure you have a candy thermometer and the clear space to work.
  • Be OK with the fact that you were going to lose some of the marshmallow in the mixing bowl, on your spoon, and probably on your hands. It’s OK! You’ll have plenty left over.
  • Any leftover marshmallows in the pan can be cut and tossed in powdered sugar. Keep in an airtight container up to a week.
  • When tempering chocolate, keep all moisture and liquids away from the chocolate.
  • If chocolate starts to cool after it is tempered, microwave for 5-10 seconds.
  • A note on pan sizes. I mention that the fudge is made in a loaf pan and the marshmallows are made in an 8″ square pan. Both hold around 8 cups capacity so you would be able to make both in the 8″ square pan. I was able to get 6 squares of fudge from the loaf pan, I just had to smoosh a few pieces together as noted in the recipe above. Force of habit of making fudge in a loaf pan automatically had me write the recipe this way!

Did you make this recipe?

Tag @magicaltreatsathome on Instagram and hashtag it #magicaltreatsathome

Mickey S'more Square // magicaltreatsathome.com

Share this:

  • Click to share on Facebook (Opens in new window) Facebook
  • Click to share on X (Opens in new window) X

Like this:

Like Loading...

Filed Under: Recipes, Treats Tagged With: chocolate, DCA, disneyland, Downtown Disneyland, fudge, graham cracker, marshmallow, Mickey Mouse, treat

Primary Sidebar

Follow Us

  • Instagram
  • Facebook
  • X
  • Pinterest
  • Email
  • YouTube

Hi! My name is Elana, and that’s me shoving a Mickey Mouse shaped treat in my face. I love the treats at Disneyland. A lot. So much so I’ve dedicated an entire website to making all my favorites, and hopefully yours too, out of my home kitchen. My aim is to create Disneyland-inspired treats, with easy to follow directions, and many recipes geared towards getting the kids in the kitchen to help too! Because putting sprinkles on things is F-U-N.

Top With Sprinkles

Get Recipes in Your Inbox!

* indicates required

Look for this icon in posts to find Kid Friendly recipes!

Recent Posts

  • Matterhorn Macaroon
  • Caramel Gingerbread Cookie Sandwiches
  • Colorful Fruit Hand Pies
  • Classic Mickey Shaped Beignets
  • Carrot Cake Cookies

Archives

  • February 2023
  • December 2022
  • August 2022
  • January 2022
  • December 2021
  • November 2021
  • December 2020
  • November 2020
  • October 2020
  • September 2020
  • August 2020
  • July 2020
  • June 2020
  • May 2020
  • April 2020
  • March 2020
  • February 2020
  • January 2020
  • December 2019
  • November 2019
  • October 2019
  • September 2019
  • August 2019
  • July 2019
  • June 2019
  • May 2019

Copyright © 2025 Magical Treats at Home on the Foodie Pro Theme

%d