• Skip to primary navigation
  • Skip to main content
  • Skip to primary sidebar

Magical Treats at Home

  • About
  • Treats
  • Drinks
  • Savory
  • Favorite Tools
  • Etsy Shop

Recipes

Mike Wazowski Cake Balls

March 21, 2020 by Elana Lepkowski Leave a Comment

Disney Inspired: Mike Wazowski Cake Balls // magicaltreatsathome.com
  • These were inspired by Disney Family and the Monsters, Inc. movie.

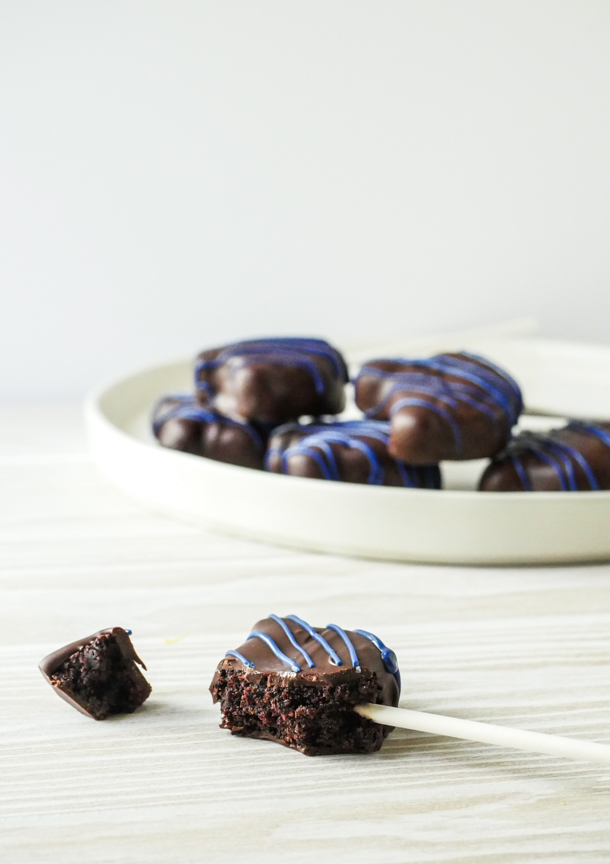
While bunkered down here at the house I discovered a bag of frozen cake balls I had made from a project months ago. To say I was happy does not quite convey the sheer joy this ziplock bag brought me today. Not only would I have a fun project to make, but I also got to eat some cake, and that’s a good day.

Disney Inspired: Mike Wazowski Cake Balls // magicaltreatsathome.com

Days ago I had caught a post from the Disney Family Instagram where they had Studio DIY making a Monsters, Inc. family movie theme night with crafts and food projects. The food project was cupcakes with Mike Wazowski cake balls on top. Now, while one might say putting cake on top of cake is like a hat on a hat, I would say, NO YOU’RE WRONG IT’S ALWAYS A GOOD IDEA TO PUT MORE CAKE ON TOP OF CAKE.

Disney Inspired: Mike Wazowski Cake Balls // magicaltreatsathome.com

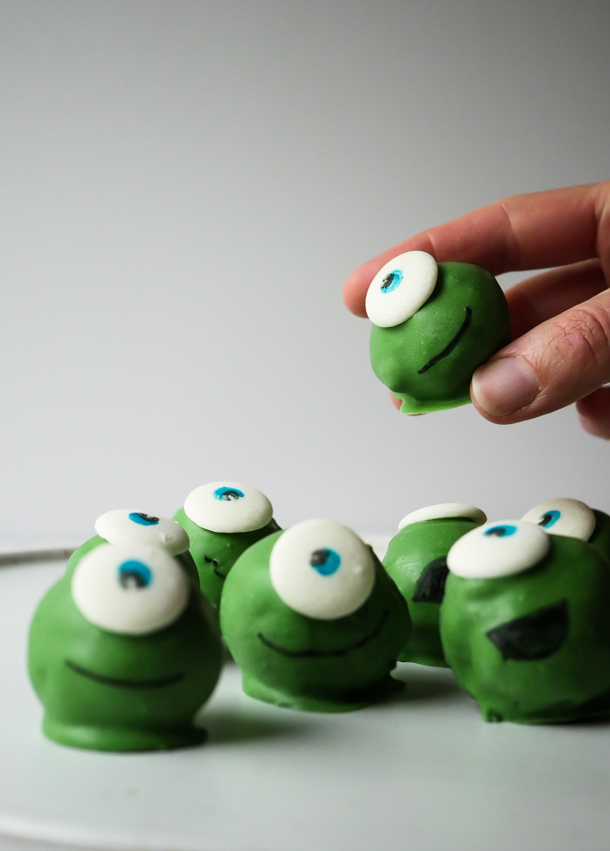
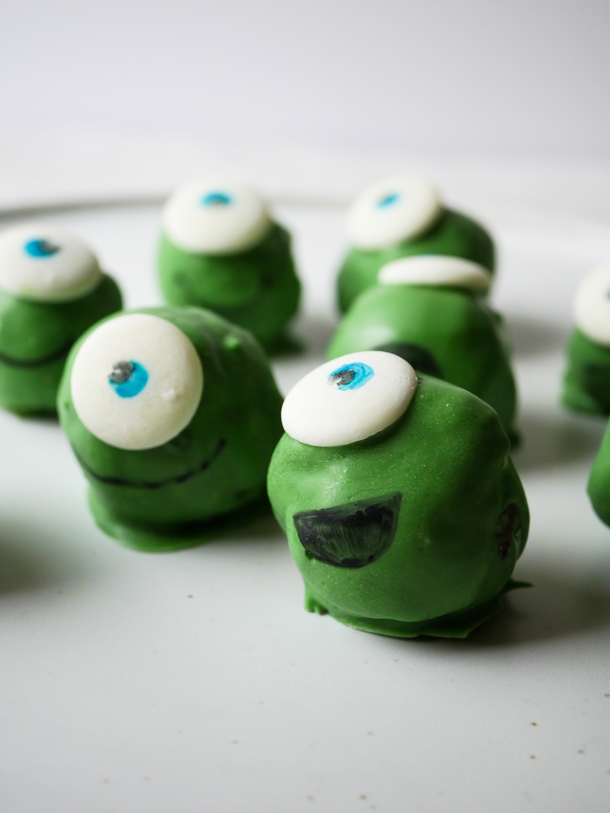
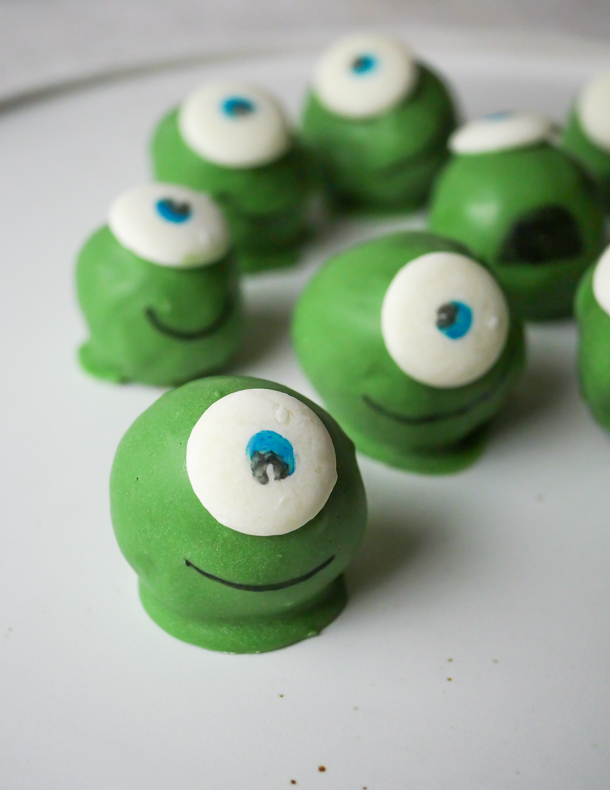
However, since we are in a bit of a food shortage, and I already had the pre-made cake balls, today I decided to skip the cupcake part and just make Mike. And a cake ball seems like the perfect vehicle to create that green, one-eyed monster.

I’m linking to my cake pop recipe below that covers the vanilla, chocolate, and red velvet cake pops found in Disneyland. (And if you want to make a pumpkin spice version, we’ve got that too!) As this is more of a tutorial post, I wanted to keep it short with just the decorating tips. You can always use box cake too and canned frosting if that’s what you got on hand!
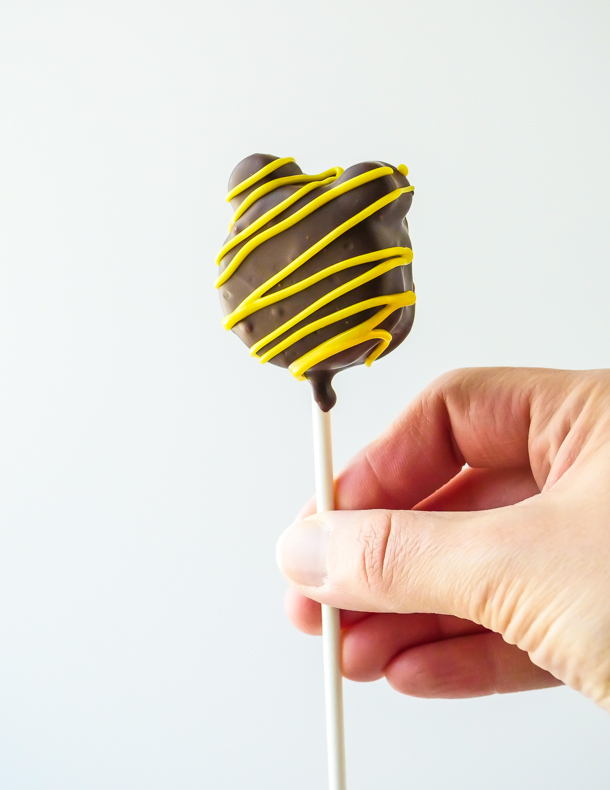
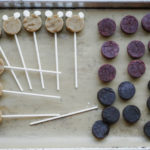
Disney Inspired: Mike Wazowski Cake Balls // magicaltreatsathome.com

Other than melting the candy melts, kids can definitely be hands on here. Let them decorate the eye balls, dip the cake balls, and draw on mouths. If you’re in the homeschooling boat unexpectedly right now, you can call this art, science, and a team building workshop all rolled in one. At least that’s what I called it.

Disney Inspired: Mike Wazowski Cake Balls // magicaltreatsathome.com

If you’re baking at home right now and you make one of our recipes from here, please tag us so we can check out what you’ve made! It’s been SO awesome to see your projects.

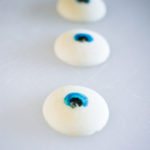
Ok, let’s draw some eye balls!

Print
clock clock iconcutlery cutlery iconflag flag iconfolder folder iconinstagram instagram iconpinterest pinterest iconfacebook facebook iconprint print iconsquares squares iconheart heart iconheart solid heart solid icon
Disney Inspired: Mike Wazowski Cake Balls // magicaltreatsathome.com

Mike Wazowski Cake Balls

5 Stars 4 Stars 3 Stars 2 Stars 1 Star No reviews
  • Author: Elana Lepkowski
  • Yield: 8–10 Mike Wazowski Cake Balls 1x
Print Recipe
Pin Recipe

Description

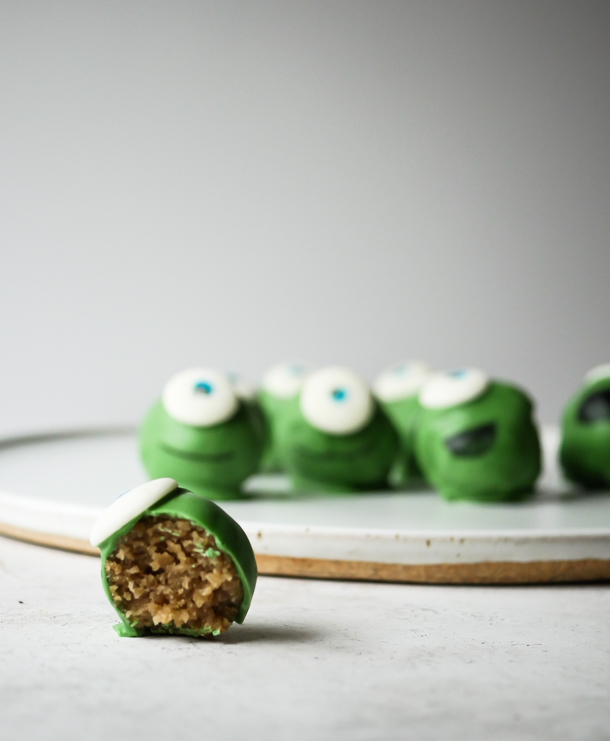
Turn your cake balls (or cake pops) into the lovable Mike Wazowski from Monsters, Inc. with just a few ingredients! A sweet Disney Family and Studio DIY inspired recipe.


Ingredients

Scale
  • 8–10 cake balls (find our recipe here for the Disneyland-inspired vanilla, chocolate, and red velvet cake pops)
  • 8–10 white chocolate discs (like Merckens)
  • edible ink markers
  • 1 cup green candy melts
  • 1/2 cup yellow candy melts

Specialty Tools:

  • chocolate forks
  • toothpicks

Instructions

  1. First, draw eyes on the white chocolate discs using the edible ink markers. Set aside.
    Disney Inspired: Mike Wazowski Cake Balls // magicaltreatsathome.com
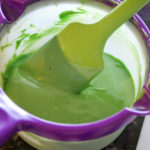
  2. Next, melt the green and yellow candy melts together. You can do this one of several ways:
    1. Melt in a candy pot until smooth (Wilton makes this one for their candy melts I use for dipping projects like this). This can take up to 20 minutes to get fully smooth candy melts. Follow the directions for your particular pot!
    2. Melt in the microwave in a microwave safe bowl, like glass, for 30 seconds. Stir and microwave again for an additional 30 seconds. Keep stirring and microwaving in short bursts of 15-20 seconds until melted and smooth.
    3. Melt in a double boiler on the stove. In a medium saucepan, bring about an inch of water to a simmer. Place a glass bowl on top and add candy melts. Stir until melted and smooth.
      Disney Inspired: Mike Wazowski Cake Balls // magicaltreatsathome.com
  3. Place your cake ball in the candy melts and toss with a spoon to coat.
  4. Lift out with a candy fork or large serving fork, tapping any excess candy melts off and gently scraping off any hanging bits.
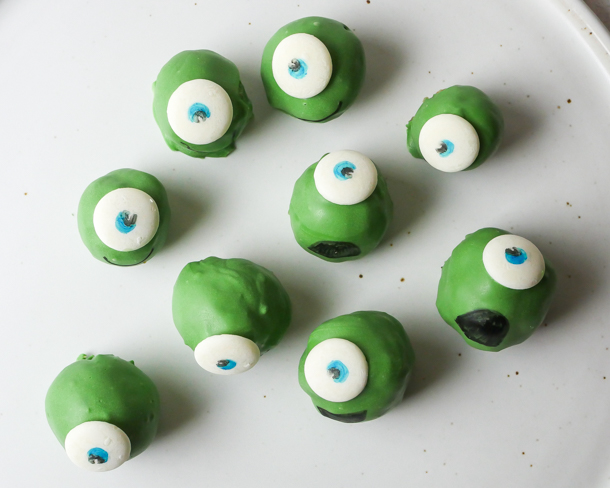
  5. Place on a piece of parchment and immediately press one of the “eyes” onto the cake ball. Gently hold in place about 5 seconds.
  6. Repeat with remaining cake balls.
  7. Place the cake balls in the refrigerator to set about 15 minutes.
  8. Once hard, use a black edible ink marker to draw on smiles, frowns, or whatever face you’d like to give Mike. Enjoy!

Notes

  • Boxed cake and canned frosting will also work for the cake balls if you don’t want to make from scratch. Just follow the amounts for the crumbled cake and amount of frosting on those recipe pages listed above.
  • The amount of candy melts here will fully cover at least 10 golf ball sized cake balls. You can always add more candy melts in to the mix if you need to cover more cake balls.
  • Extra candy melts that are free from food bits can be left to cool and harden, and then stored in an airtight container. You can re-melt and use again at a future date.
  • If you want to make these into cake pops, follow the instruction for the cake pop recipe listed in the ingredient section above.
  • Cake balls will last up to one week in the refrigerator in an airtight container.

Did you make this recipe?

Tag @magicaltreatsathome on Instagram and hashtag it #magicaltreatsathome

Disney Inspired: Mike Wazowski Cake Balls // magicaltreatsathome.com

Share this:

  • Click to share on Facebook (Opens in new window) Facebook
  • Click to share on X (Opens in new window) X

Like this:

Like Loading...

Filed Under: Recipes, Treats Tagged With: cake, cake pop, candy melts, character treat, chocolate, Monsters Inc, treat, white chocolate

Winnie the Pooh’s Hunny Pot Crispy Treats

March 19, 2020 by Elana Lepkowski Leave a Comment

Winne the Pooh Hunny Pot Crispy Treats // magicaltreatsathome.com

Where can I find the original treat?

  • This treat can be found in Pooh Corner in Critter Country in Disneyland.

Fun fact, my nursery, 30…*cough* almost 40 years ago was Winnie the Pooh themed. My baby blanket was the Hundred Acre Woods and just this past year my mother sent it to me across the country, in perfect condition. So, it’s probably no wonder that Pooh is a favorite of mine. And I thought it high time to show a little love to that chubby little cubby all stuffed with fluff with these Hunny Pot Crispy Treats inspired by those found in Disneyland.

There’s starting to be quite a number of these variations on the site and that’s because Disneyland just does the cutest job on these. I also love these because they’re not super hard to make.

Winnie the Pooh's Hunny Pot Crispy Treats // magicaltreatsathome.com

Right now the outside world is looking mighty different for many, if not most, of us. And while we’re all stuck indoors, many of us with one or more kids, now also stuck indoors with us, finding some projects like this to work on together can hopefully provide a bright spot in the day.

Also, let’s be real, crispy treats are great plain on their own too. So if you need a quick snack to whip up with very few ingredients, this works. But if you do want to try your hand at decorating these, please do! You don’t need to be an artist and if your kids start distracting you while decorating and you suddenly forgot what you were doing and mess up the words *ahem*, it’s still OK.

Winne the Pooh Hunny Pot Crispy Treats // magicaltreatsathome.com

The decoration on here is a simple combo of semisweet chocolate chips and yellow candy melts. The golden hue to the “honey” and lettering is achieved through adding a little of the melted semisweet chocolate to the yellow candy melts. I use a plastic piping bag to color in the honey and letters, but you can also do this by hand, or if you have it around, use a squeeze bottle for a bit more precision (I’ve seen the candy makers at Disneyland do this but they’re working with volume and have a lot of candy melts in that bottle to work with. Just putting a little bit in will cool them off quickly and you’ll need to keep a warm water bath nearby to prevent this.).

If you make these treats in a loaf pan, shaping them is also quite easy. Divide the rectangle into three equal-ish parts, and then shape with a sharp knife. You basically need to round the corners off and these cut through without much give. Just be careful that you’re not leaving them out too long from the fridge to cut and then dip, or they’ll soften up too much.

Winne the Pooh Hunny Pot Crispy Treats // magicaltreatsathome.com

Sounds pretty sweet, huh? Ok, let’s melt some marshmallows!

Print
clock clock iconcutlery cutlery iconflag flag iconfolder folder iconinstagram instagram iconpinterest pinterest iconfacebook facebook iconprint print iconsquares squares iconheart heart iconheart solid heart solid icon
Winne the Pooh Hunny Pot Crispy Treats // magicaltreatsathome.com

Winnie the Pooh’s Hunny Pot Crispy Treats

5 Stars 4 Stars 3 Stars 2 Stars 1 Star No reviews
  • Author: Elana Lepkowski
  • Yield: 3 Hunny Pot Crispy Treats 1x
Print Recipe
Pin Recipe

Description

A favorite at Pooh Corner! This chewy, crispy, sweet Hunny Pot Crispy Treat is a snap to make and decorate. A Disneyland-inspired treat.


Ingredients

Scale

For the crispy treat:

  • 2 tablespoons butter, unsalted
  • 2–1/2 cups mini marshmallows or 25 regular sized marshmallows
  • 2-1/2 cups crisped rice cereal

For the decoration:

  • 1/2 cup semisweet chocolate chips, 1 tbsp reserved
  • 1/2 cup yellow candy melts

Specialty Tools (Optional):

  • pastry bags
  • squeeze bottles

Instructions

For the crispy treat:

  1. Before beginning, line a loaf pan with parchment.
  2. Combine the butter and marshmallows in a medium sauce pan over medium-low heat. Stir constantly until marshmallows have melted and mixture is smooth.
  3. Immediately dump in the crisped rice cereal and mix to combine.
  4. Pour into the prepared pan and gently press mixture into place with a rubber spatula (or damp fingers). Set aside for at least an hour in the refrigerator so that the mixture can firm up enough to cut shapes.
  5. Once firm, use parchment to lift out crispy treats and cut into 3 roughly equal sized rectangles.
    Winne the Pooh Hunny Pot Crispy Treats // magicaltreatsathome.com
  6. Using a sharp knife, round off the corners so that the treat resembles a honey pot.
    Winne the Pooh Hunny Pot Crispy Treats // magicaltreatsathome.com

For the decorating:

  1. First, melt the semisweet chocolate in the microwave inside a microwave safe bowl, like glass, for 30 seconds. Stir and microwave again for an additional 30 seconds. Keep stirring and microwaving in short bursts of 15-20 seconds until melted and smooth. Use can alternatively use a double boiler for melting.
  2. Dip the top half of the treat into the melted chocolate, letting any excess drip off back into the bowl. Repeat for other treats. Refrigerate for 15 minutes so that the chocolate can firm up before the second dip.
  3. Next, melt the yellow candy melts with the reserved chocolate (or use a tablespoon of already melted chocolate mixed in with the yellow if you have leftovers) in the microwave inside a microwave safe bowl, like glass, for 30 seconds. Stir and microwave again for an additional 30 seconds. Keep stirring and microwaving in short bursts of 15-20 seconds until melted and smooth. You can alternatively use a double boiler for melting or melt everything in a piping bag, kneading together to mix colors between microwaving.
  4. Transfer the melted candy melts and chocolate to a squeeze bottle or a piping bag with a small portion of the tip cut off. Fill in the top of the treat to resemble honey, and write “Hunny” on the pot. Repeat until all treats are decorated.
  5. Let the treats firm up, at least 30 minutes in the refrigerator before serving. Enjoy!

Notes

  • Use a smaller pan than you think you’ll need for this. As the marshmallows melt into the butter, if there’s too much space in the pan they will start to dry out and form strings. Keeping the marshmallows closer together in the pan will ensure they melt more evenly, creating a better mixture to add the cereal into.
  • When mixing crisped rice cereal into the melted marshmallows, keep the mixture on the flame so that marshmallows stay liquid. Removing to mix in can seize up the liquid before the cereal is fully mixed.
  • You can sub in light candy melts for the semisweet chocolates.
  • If crisped rice cereal is unavailable right now, use any kind of puffed grain, or cereal. Cocoa Pebbles would work here too!
  • Treats can be kept in an air-tight container for up to 3 days.

Did you make this recipe?

Tag @magicaltreatsathome on Instagram and hashtag it #magicaltreatsathome

Winne the Pooh Hunny Pot Crispy Treats // magicaltreatsathome.com

Share this:

  • Click to share on Facebook (Opens in new window) Facebook
  • Click to share on X (Opens in new window) X

Like this:

Like Loading...

Filed Under: Recipes, Treats Tagged With: candy melts, chocolate, crispy treat, Critter Country, disneyland, marshmallow, rice krispie treat, Winnie the Pooh

Cheddar Garlic Bagel Twists

March 15, 2020 by Elana Lepkowski Leave a Comment

Cheddar Garlic Bagel Twists // magicaltreatsathome.com

Where can I find the original treat?

  • This treat can be found at Maurice’s Treats in Disneyland.

Tucked away just off the side of Sleeping Beauty Castle you might just miss Maurice’s Treats. And that would be a shame. Because then you would also miss this super sized, carb lovers treat: the Cheddar Garlic Bagel Twist. And in case you have, now you can make it at home!

Cheddar Garlic Bagel Twists // magicaltreatsathome.com

When I polled over on Instagram a few weeks ago if people would like to see more savory treats, there was a resounding YESSSS! I also have heard from readers that not everyone likes to make dough from scratch. I hear you, and today this recipe hits upon both those notes. So, unless you are deathly afraid of popping open a tube of dough, you can have this cheesy, garlicky, everything bagel topped treat in no time at all!

Cheddar Garlic Bagel Twists // magicaltreatsathome.com

I used the French bread dough tube here, but it wasn’t always available at all the grocery stores near me (I made sure to check for you all!). If that happens to you, sub out the crescent rolls and just be prepared for a flakier twist (which, honestly doesn’t sound that bad). I’m also using specifically the Trader Joe’s everything bagel topping mix. If you don’t have a TJ’s near you, don’t fret, Amazon has so may alternatives, including the TJ’s mix, so you can always find that there. Or check your pantry! You might have all the ingredients on hand to make your own (I’ve included an easy recipe in the notes below if you do want to try making your own).

Cheddar Garlic Bagel Twists // magicaltreatsathome.com
Cheese leaks with single layer dough.
Cheddar Garlic Bagel Twists // magicaltreatsathome.com
No cheese leaks with the folded over and twisted dough.

Now, you can stuff these with as much or as little cheese as you’d like, but keep in mind, the finely grated cheese will incorporate better into the dough. I loved the idea of chunks of cheese in my first round, but it mostly melted straight out of the dough. Also, I found that after flattening the dough out and filling with ingredients, folding the dough over on itself from end to end and then twisting kept all the ingredients in a lot better.

Cheddar Garlic Bagel Twists // magicaltreatsathome.com

This is a fun, interactive treat, and kids could definitely get involved here. From rolling out dough, to filling, and even adding the egg wash and toppings. If they have fun with Play-Doh this is a step up (because you will let them eat the *cooked* dough, and they won’t poop purple later).

So let’s crack open a roll of dough and get baking!

Cheddar Garlic Bagel Twists // magicaltreatsathome.com
Print
clock clock iconcutlery cutlery iconflag flag iconfolder folder iconinstagram instagram iconpinterest pinterest iconfacebook facebook iconprint print iconsquares squares iconheart heart iconheart solid heart solid icon
Cheddar Garlic Bagel Twists // magicaltreatsathome.com

Cheddar Garlic Bagel Twists

5 Stars 4 Stars 3 Stars 2 Stars 1 Star No reviews
  • Author: Elana Lepkowski
  • Prep Time: 5
  • Cook Time: 25
  • Total Time: 30
  • Yield: 4 Cheddar Garlic Bagel Twists 1x
Print Recipe
Pin Recipe

Description

Warm, garlic scented bagel twists are stuffed with cheddar and topped with everything bagel mix. A Disneyland-inspired treat.


Ingredients

Scale

1 refrigerated tube of French bread
1/2 cup finely shredded cheese
1 garlic clove, finely chopped
1 egg white
1 teaspoon water
1 tablespoon Everything Bagel Mix

marinara sauce for dipping, optional


Instructions

  1. Preheat oven to 350°f and line a baking sheet with parchment. Set aside.
  2. Open the tube of dough and cut into 4 equal pieces.
    Cheddar Garlic Bagel Twists // magicaltreatsathome.com
  3. Roll out the first piece into a flat rectangle and sprinkles in a few pieces of the garlic and about a tablespoon of the cheese. Use your fingers to push the garlic and cheese into the dough.
  4. Then, fold over the dough on itself end to end, and then twist both ends and flatten the dough down slightly. Pinch together any open parts, or places where the cheese and garlic might be peeking through. Set on the parchment and repeat with the other three pieces.
    Cheddar Garlic Bagel Twists // magicaltreatsathome.com
  5. Next, mix together the egg white and water in a small bowl. Using a pastry brush, lightly brush the tops of the dough with the mixture, careful not to saturate the dough. Sprinkle the everything bagel mix over the tops of the twists.
    Cheddar Garlic Bagel Twists // magicaltreatsathome.com
  6. Bake 25-28 minutes until golden brown.
  7. Let rest 5 minutes out of the oven, and then serve. Marinara makes a great dipping sauce for these!

Notes

  • If you cannot find French bread, crescent rolls could also be used in place, or even puff pastry. The texture will be more crisp and less chewy though.
  • If your rolls start to unravel while twisting, roll each hand in alternate directions while pressing down lightly on the dough.
  • We use cheddar here like the park’s version, but pepper jack would also be great!
  • If egg whites are not available, you can sub in a tablespoon of cream or milk with the water and use that on the tops to hold the toppings in place.
  • For extra garlic flavor, add finely sliced garlic pieces on the top of the bread in addition to chopped garlic inside.
  • To make your own everything bagel seasoning recipe, mix together  1 tablespoon poppy seeds, 1 tablespoon black sesame seeds, 1 tablespoon white sesame seeds, 1 tablespoon dehydrated onion pieces, 1 tablespoon dehydrated garlic pieces, 2 teaspoons flaky sea salt.

Did you make this recipe?

Tag @magicaltreatsathome on Instagram and hashtag it #magicaltreatsathome

Cheddar Garlic Bagel Twists // magicaltreatsathome.com

Share this:

  • Click to share on Facebook (Opens in new window) Facebook
  • Click to share on X (Opens in new window) X

Like this:

Like Loading...

Filed Under: Recipes, Savory Tagged With: cheese, disneyland, everything bagel mix, garlic, Maurice's Treats, savory, treat

Chocolate Strawberry Mickey Mouse Beignets

March 6, 2020 by Elana Lepkowski Leave a Comment

Mickey Mouse Chocolate Strawberry Beignets // magicaltreatsathome.com

Where can I find the original treat?

  • This seasonal treat can be found at the Mint Julep Bar in Disneyland.

Valentine’s Day at Disneyland brought a whole lot of strawberry-themed treats this year. Including beignets! So today we’re whipping up a batch of the Chocolate Strawberry Mickey Mouse Shaped Beignets that you can enjoy all year long.

Mickey Mouse Chocolate Strawberry Beignets // magicaltreatsathome.com

These are currently “seasonal” beyond Valentine’s Day right now, but they’re definitely reminiscent of the flavors of chocolate covered strawberries. And that’s due to the use of finely ground dehydrated strawberries (or strawberry powder if you can find it!). The powder still has a nice tart super strawberry flavor that stands out while the beignets melt in your mouth. I found the beignets at the park were more strawberry tasting than chocolate tasting, so I’ve kept just a hint of chocolate here with some Valrhona cocoa powder (which is insanely good cocoa powder and I highly suggest trying some).

Mickey Mouse Chocolate Strawberry Beignets // magicaltreatsathome.com

Now, strawberry powder might seem convenient, but it will come with a price tag. I’ve seen bags over $20 for very little in the actual bag. My suggestion here is to pick up a bag of dehydrated strawberries from your local supermarket (I found bags at Trader Joe’s and Sprouts). If your local mart doesn’t carry them, I’ve linked out to Amazon below. A quick spin in a coffee grinder pulverized them, but you could get to the same place crushing them in a baggie with a rolling pin too. I like grinding mine over the already ground powder because you also get a little inconsistency in size and that makes for some extra pops of strawberry flavor in some bites, and pretty red speckles all over your beignets.

For this recipe I tried something a little different with the flour and subbed in bread flour for the all purpose I generally use in these recipes. And you know what? You can sub these flours here 1:1. I’ve heard that bread flour can help with a yeasted recipe’s rise, and that you can get a chewier end product… but every step here felt the same as if I was making the beignet recipe with all purpose. So, if you suddenly crave some beignets, but only have bread flour in the house (hey, it could happen!), fear not! They’ll come out just fine.

Mickey Mouse Chocolate Strawberry Beignets // magicaltreatsathome.com

Kids can help here in the kitchen to toss the beignets in the powder. Beyond that I wouldn’t recommend any other help. That is unless you have maybe a teenager who is pretty comfortable around a stove and hot oil, and I’d still recommend supervision.

Mickey Mouse Chocolate Strawberry Beignets // magicaltreatsathome.com

Alright, there’s a few notes after the recipe so please read through before starting. Now let’s fry up some dough!

Print
clock clock iconcutlery cutlery iconflag flag iconfolder folder iconinstagram instagram iconpinterest pinterest iconfacebook facebook iconprint print iconsquares squares iconheart heart iconheart solid heart solid icon
Mickey Mouse Chocolate Strawberry Beignets // magicaltreatsathome.com

Chocolate Strawberry Mickey Beignets

5 Stars 4 Stars 3 Stars 2 Stars 1 Star No reviews
  • Author: Elana Lepkowski
  • Yield: 15–18 Mickey Mouse Chocolate Strawberry Beignets 1x
Print Recipe
Pin Recipe

Description

Melt-in-your-mouth Mickey Mouse Chocolate Strawberry Beignets are reminiscent of sweet-tart chocolate covered strawberries! A Disneyland-inspired treat.


Ingredients

Scale
  • 1/2 teaspoon dry yeast
  • 1/4 cup warm water (110º)
  • 1/4 cup (50 g) sugar
  • 2 tablespoons vegetable shortening (I used refined coconut oil)
  • 1/2 teaspoon salt
  • 1/2 cup heavy cream, or alternative milk
  • 1 egg
  • 4 cups all-purpose flour
  • 1/2 cup boiling water
  • Vegetable oil for frying, like avocado
  • 1 cup powdered sugar
  • 2 teaspoons unsweetened cocoa powder
  • 1/2 cup dehydrated strawberries, ground

Specialty Tools:

  • heavy bottomed dutch oven
  • candy thermometer
  • Mickey Mouse cutter

Instructions

  1. Sprinkle yeast over warm water in a small bowl, gently stirring to dissolve. Let stand for 5 minutes.
  2. Combine sugar, shortening, salt, heavy cream, egg, flour and boiling water in a large bowl. Mix until everything is just combined and then stir in yeast mixture. With the dough hook attachment of an electric mixer on medium-low speed, mix the dough just until combined and smooth. About 3-4 minutes. Let dough rest for 30 minutes in the bowl.
  3. Flour your surface and roll to 1/4-inch thickness. Using the Mickey Mouse cutter, cut dough pieces, twisting slightly, and carefully removing dough from around cutter before releasing. You may have to combine dough and roll out again to cut more shapes out. Cover with a towel and let dough rise until doubled in size in a warm, draft-free area, about 1-1/2 to 2 hours.
  4. While dough is rising, sift together the powdered sugar, cocoa powder, and ground dehydrated strawberries in a large bowl. Set aside.
  5. Pour enough oil into a deep-sided, heavy bottomed pot until it reaches 2 inches up sides; heat oil over medium heat to 370°F.
  6. Add 2-3 beignets to oil; fry until golden brown on both sides, about a minute each, turning once.
    Mickey Mouse Chocolate Strawberry Beignets // magicaltreatsathome.com
  7. Remove from hot oil with a slotted spoon and place on a baking sheet lined with paper towels.
  8. Let rest at least five minutes, and then toss in the powdered sugar mix. You can sift extra sugar over all the beignets before serving.
    Mickey Mouse Chocolate Strawberry Beignets // magicaltreatsathome.com

Notes

  • Sifting the powdered sugar, cocoa powder, and strawberries helps to loosen any clumps, especially in the cocoa powder.
  • If you are in a higher altitude, your dough may need less time to rise for the second proof.
  • Dough may have to be recombined and rolled a second time if you have a lot of scraps.
  • Wait for oil to come back to temperature before adding next batch of beignets to the pot.
  • No dough hook attachment? Knead dough until smooth and shiny, about 5-8 minutes and then proceed with the recipe.
  • Want to make these at night for the next morning? After cutting Mickey Mouse shapes out. Transfer to a baking sheet and let rest, covered with a towel, in the refrigerator overnight. Let come to room temperature before frying in the morning. Dough shapes can also be frozen and then left in refrigerator overnight and fried off.
  • If your dough gets a skin while rising, put the sticky side down first into the oil to avoid tearing while the beignet expands.
  • Strain your oil after it reaches room temperature. It can be used again!

Did you make this recipe?

Tag @magicaltreatsathome on Instagram and hashtag it #magicaltreatsathome

Mickey Mouse Chocolate Strawberry Beignets // magicaltreatsathome.com

Share this:

  • Click to share on Facebook (Opens in new window) Facebook
  • Click to share on X (Opens in new window) X

Like this:

Like Loading...

Filed Under: Recipes, Treats Tagged With: beignet, character treat, chocolate, doughnut, Mickey Mouse, Mint Julep Bar, strawberry, treat

Firefly Chips

February 22, 2020 by Elana Lepkowski Leave a Comment

Firefly Chips // magicaltreatsathome.com

Where can I find the original treat?

  • This treat can be found at the Refreshment Corner in Disneyland.

It’s not always sweet treats around here, and today we’ve got a super yummy, super spicy savory treat. If you’re a fan of Frito Pie in a Bag, then you’re gonna love these Firefly Chips!

Crunchy, salt corn chips are smothered in a bean and meat chili, and then topped with cheese and spicy jalapenos. This hits allll the right notes for me when I want a savory treat at the parks, or at home.

Firefly Chips // magicaltreatsathome.com

Now, I’m including a recipe for our favorite family chili below, but you could also turn this into a 5 Minute Treat if you opt to use canned chili instead. We love a good short cut and since you don’t need a huge amount of chili to make this, go right ahead and crack that can open if you want!

Firefly Chips // magicaltreatsathome.com

I made this into a kid DIY snack station and both kids (5 and under), had a lot of fun putting on their own toppings. Sure, it’s a few more dishes to wash, but giving them these small opportunities in the kitchen I feel really helps to improve their independent kitchen skills and foster self-confidence in cooking… even if it is just piling on more cheese than anyone needs.

If spicy is not your thing, there are some companies that make ‘mild’ jalapenos that have much less of a spicy factor than regular jarred ones. And if you just hate spice, well, leave ’em off! Maybe add a dollop of sour cream because that would be the delicious thing to do.

Alright, let’s make some chili!

Print
clock clock iconcutlery cutlery iconflag flag iconfolder folder iconinstagram instagram iconpinterest pinterest iconfacebook facebook iconprint print iconsquares squares iconheart heart iconheart solid heart solid icon
Firefly Chips // magicaltreatsathome.com

Firefly Chips

5 Stars 4 Stars 3 Stars 2 Stars 1 Star No reviews
  • Author: Elana Lepkowski
Print Recipe
Pin Recipe

Description

These spicy, crunchy Firefly chips are layers of corn chips, meat and bean chili, shredded cheese, and jalapeno peppers! A Disneyland-inspired treat.


Ingredients

Scale

For the chili:

  • 1 tablespoon avocado oil
  • 1 lb. ground beef
  • 1 medium yellow onion, diced
  • 1–1/2 teaspoons kosher salt
  • 3 cloves garlic, minced
  • 2 tablespoons tomato paste
  • 1 tablespoon chili powder
  • 1/4 teaspoon cayenne pepper
  • 1 teaspoon cumin
  • 1 teaspoon Worcestershire sauce
  • 1 can crushed fire-roasted tomatoes, drained
  • 2 cans red or pinto beans or mix of both with liquid
  • 1 cup chicken or beef broth
  • salt and pepper to taste

For the Firefly chips:

  • corn chips, like Fritos
  • meat and bean chili (see recipe above, or canned chili is also fine)
  • shredded Mexican cheese blend
  • jalapeno pepper slices

Instructions

For the chili:

  1. In a large dutch oven, warm the avocado oil over medium-high heat.
  2. Add in the ground beef, breaking it up as it cooks and browns.
  3. Add in the yellow onion, salt, garlic, and tomato paste. Saute until onions begin to turn translucent, about 5-8 minutes.
  4. Next, add in chili powder, cayenne powder, cumin, Worcestershire sauce, tomatoes, beans, and broth. Bring to a boil, and then turn down to a simmer. Cover and cook about 20-25 minutes.
  5. Remove the cover and continue to simmer an additional 10 minutes if you’d like a thicker stew, or remove from the heat and let cool slightly before serving. Salt and pepper to taste.

To assemble the Firefly Chips:

  1. Pour a layer of corn chips in the bottom of a small bowl (or if you’re serving for multiple people, a serving sized bowl).
  2. Top with chili, shredded cheese, and jalapeno pepper slices.
  3. Enjoy!

Notes

  • Chili can be cooled to room temperature and stored in an airtight container refrigerated up to 3 days.
  • This recipe can be scaled to individual portions, or served as an appetizer to a large crowd.
  • The Refreshment Corner also a hotdog topped with Firefly chips and I think you all should try doing that with this recipe at least once.

Did you make this recipe?

Tag @magicaltreatsathome on Instagram and hashtag it #magicaltreatsathome

Firefly Chips // magicaltreatsathome.com

Share this:

  • Click to share on Facebook (Opens in new window) Facebook
  • Click to share on X (Opens in new window) X

Like this:

Like Loading...

Filed Under: 5 Minute Treats, Recipes, Savory Tagged With: 5 Minute Treat, cheese, chili, corn chips, disneyland, jalapeno peppers, Refreshment Corner, savory

Valentine Heart Macaron

February 14, 2020 by Elana Lepkowski Leave a Comment

Heart Macarons for Valentine's Day // magicaltreatsathome.com

Where can I find the original treat?

  • This seasonal treat is available at Clarabelle’s in Disney California Adventure Park.

This past week, Disneyland released a bevy of pink and red treats in anticipation of Valentine’s Day and their after hours Sweethearts’ Nite. But what summed up this holiday the most for me (in treat form) was the oversized red and white heart macarons. And that’s what we’re making today!

Heart Macarons for Valentine's Day // magicaltreatsathome.com

It’s a giant macaron heart, with a surprise strawberry jam filled center surrounded by strawberry buttercream and decorated with tiny candy hearts. I think it would make a sweet gift for a loved one (and you bet I’m gifting myself a few of these too..).

These use the classic macaron base (with a little food coloring), store bought or homemade strawberry jam, and a Swiss meringue buttercream frosting flavored with that same strawberry jam. Using a Swiss meringue buttercream, as opposed to an American style buttercream, yields a light and slightly sweet frosting that pipes beautifully and softens quickly out of the fridge. Yes, you need to whip out a double boiler to warm your egg whites here, but American buttercream would be much too sweet alongside the jam and the cookies. Trust me, it’s worth dirtying a few extra pans.

Heart Macarons for Valentine's Day // magicaltreatsathome.com

You could freehand pipe the hearts out, however, to make it easy on you all, I’ve gone ahead and created another FREE printable sheet you can download below to make the hearts. You’ll need to print two as this recipe yields around 8 heart macarons. Or you can enlarge on your printer and make bigger cookies. That would also work!

Icon

3 inch heart template

1 file(s) 88.45 KB
Download
Heart Macarons for Valentine's Day // magicaltreatsathome.com

More experienced kid bakers can help pipe out shapes, mix batters, weigh out ingredients by themselves, and younger hands can plop jam and decorate with the sprinkle hearts.

Heart Macarons for Valentine's Day // magicaltreatsathome.com

Lots of notes after the recipe as macarons can sometimes be a bit finicky, but you’ll get through this and create something awesome! Now let’s make some sweets for our sweets!

Print
clock clock iconcutlery cutlery iconflag flag iconfolder folder iconinstagram instagram iconpinterest pinterest iconfacebook facebook iconprint print iconsquares squares iconheart heart iconheart solid heart solid icon
Heart Macarons for Valentine's Day // magicaltreatsathome.com

Valentine Macaron

5 Stars 4 Stars 3 Stars 2 Stars 1 Star No reviews
  • Author: Elana Lepkowski
  • Yield: 8–10 Heart Macarons 1x
Print Recipe
Pin Recipe

Description

Oversized heart-shaped macarons filled with strawberry Swiss buttercream and strawberry jam are a special sweet for your valentine. A Disneyland-inspired treat.


Ingredients

Scale

For the macarons:

  • 180g (2 cups) almond flour
  • 240g (2 cups) powdered sugar
  • 1/4 teaspoon kosher salt
  • 140g egg whites, from about 4 large eggs
  • 1/2 teaspoon cream of tartar
  • 80g (6 tablespoons) granulated sugar
  • red gel food coloring, like Americolor

For the filling:

  • 35g egg whites, from about 1 large egg
  • 1/3 cup (67 g) sugar
  • pinch salt
  • 1/2 teaspoon of vanilla extract
  • 4 ounces (1 stick) unsalted butter, cut into small pieces
  • 4 tablespoons strawberry jelly or jam, divided

For the decoration:

  • heart decorettes/sprinkles

Special Tools:

  • mesh strainer
  • pastry bags

Instructions

  1. First sift the almond flour, powdered sugar, and salt back and forth twice between two bowls using a mesh strainer. Alternatively you can pulse a few times in a food processor as well. Set aside.
  2. Line two baking sheets with parchment and place the templates underneath if using. Set aside.
  3. In the bowl of a stand mixer fitted with the whisk attachment, add in the egg white and whisk until slightly foamy about 30 seconds on medium speed. Add in the cream of tartar and whisk until soft peaks appear. Then slowly pour in the sugar. Whisk on high until stiff peaks form, about 1-2 minutes more.
    Main Street Electrical Parade Ladybug Macarons // magicaltreatsathome.com
  4. Remove the bowl from the mixer.
  5. Sift half of the dry mixture into the egg whites and fold until barely incorporated, about 10 turns. Repeat with remaining dry mix. Fold until batter forms a ribbon when dropped into bowl.
  6. Add 1/2 of the batter into a piping bag and pipe out the white heart shapes, banging the sheet pan on the counter 2 or 3 times to remove any air bubbles.
  7. Next add two drops of red food coloring into the batter still in the bowl. Mix until no white streaks remain. (Batter will look light red in color but will bake bright red when finished.)
  8. Pour the red batter into a new piping bag and cut the tip off the bag. Pipe out the red hearts, banging the sheet pan on the counter 2 or 3 times to remove any air bubbles.
  9. Let both sheets of hearts rest 45 minutes on the counter. Do not cover.
  10. Preheat your oven to 350°f. Place cookies in oven to bake, and lower the temperature to 300°f. Cook for 17-18 minutes.
    Heart Macarons for Valentine's Day // magicaltreatsathome.com
  11. Let the macarons cool at least 20-30 minutes before filling.

For the buttercream:

  1. First make the Swiss strawberry buttercream frosting by whisking the egg whites, sugar, and salt together over a double boiler (or bowl set over simmering water on the stove), until temperature reaches 160°f.
  2. Pour heated egg whites into the bowl of a stand mixer and beat until stiff peaks form.
  3. When the bowl is cool to the touch, add the butter, one piece at a time, whipping between pieces to incorporate butter, but not fully mixing it in.
  4. Next, add in vanilla and strawberry jam. Whip everything on high until smooth.

To decorate:

  1. Place the frosting in a piping bag and pipe out along inside edges of the white macarons, leaving a center well to fill with the jam. *You may have leftover frosting. Storage instructions in notes below.
  2. Fill the wells with a small amount of jam.
    Heart Macarons for Valentine's Day // magicaltreatsathome.com
  3. Place red hearts on top of the filled white hearts.
  4. Then, over a bowl, sprinkle heart decorettes on the outside of the macarons where the frosting is. Set aside and repeat until all macarons are decorated. Enjoy!

Notes

  • Sifting the almond flour and powdered sugar together is necessary for the absorption of oils and to prevent clumping of batter.
  • Using gel based food coloring will give a much deeper, and vibrant color, than standard food dye.
  • Any left over macaron batter can be piped into smaller cookies and baked off for 15 minutes.
  • Swiss buttercream heats the egg whites to 160°f to kill off any bacteria.
  • Leftover buttercream can be stored in the fridge up to two weeks, brought to room temperature, and whipped before using. It can also be stored in the freezer up to 3 months.
  • Cookies can be stored in an airtight container up to one week.

Did you make this recipe?

Tag @magicaltreatsathome on Instagram and hashtag it #magicaltreatsathome

Heart Macarons for Valentine's Day // magicaltreatsathome.com

Share this:

  • Click to share on Facebook (Opens in new window) Facebook
  • Click to share on X (Opens in new window) X

Like this:

Like Loading...

Filed Under: Gluten Free, Recipes, Treats Tagged With: buttercream frosting, Clarabelle's, cookies, gluten free, heart, jam, macarons, sprinkles, strawberry, treat, Valentine

5 Minute Treats: Hand-dipped Ice Cream Bars

February 12, 2020 by Elana Lepkowski 3 Comments

5 Minute Treats: Hand Dipped Ice Cream Bars // magicaltreatsathome.com

Where can I find the original treat?

  • This treat is available at Clarabelle’s in Disney California Adventure Park.

Welcome to the next post in our new series, 5 Minute Treats! And today’s recipe is just TWO ingredients! Sound too good to be true? Well, now you have the magic power to make Hand-dipped Ice Cream Bars!

5 Minute Treats: Hand Dipped Ice Cream Bars // magicaltreatsathome.com

Otherwise known as magic shell, you just need chocolate (either milk or dark or somewhere in-between, or even white chocolate if you’d like) and coconut oil. That’s it! Melt them together, and when they hit the frozen ice cream… BAM! The chocolate is instantly hardened and ready to eat. You’ll need to time adding your ingredients so that they stick if you choose to do that. Clarabelle’s, where we originally tried this treat, has lots of options including sprinkles, chocolate chips, even POP ROCKS!! And if you get “The Whole Herd”, you get ALLLLLLLL the toppings. We usually go that route.

5 Minute Treats: Hand Dipped Ice Cream Bars // magicaltreatsathome.com

This is a really fun treat for kids to get involved in making. They can dip their ice cream and add all the toppings they want. And you can always drizzle on more chocolate sauce if you need a stronger “glue” for the items.

5 Minute Treats: Hand Dipped Ice Cream Bars // magicaltreatsathome.com

Now, the magic here happens because the frozen surface of the ice cream hardens the coconut oil (coconut oil reaches a solid state just below 76°f). If you dip non frozen items in this magic sauce, well, it won’t instantly harden. However, a quick trip to the freezer will take care of that!

5 Minute Treats: Hand Dipped Ice Cream Bars // magicaltreatsathome.com

Ok, grab some ice cream bars and get dipping!

Print
clock clock iconcutlery cutlery iconflag flag iconfolder folder iconinstagram instagram iconpinterest pinterest iconfacebook facebook iconprint print iconsquares squares iconheart heart iconheart solid heart solid icon
5 Minute Treats: Hand Dipped Ice Cream Bars // magicaltreatsathome.com

5 Minute Treats: Hand-dipped Ice Cream Bars

5 Stars 4 Stars 3 Stars 2 Stars 1 Star No reviews
  • Author: Elana Lepkowski
  • Yield: 2 cups Chocolate Magic Shell 1x
Print Recipe
Pin Recipe

Description

Magically turn chocolate sauce into a chocolate shell for your ice cream bars with our latest 5 Minute Treat for Hand-dipped Ice Cream Bars. And don’t forget to generously top with “The Whole Herd”. A Disneyland-inspired treat.


Ingredients

Scale

For the Magic Shell:

  • 2 cup chocolate chips (dark, milk, semisweet, white, or any combination)
  • 3 tablespoons refined coconut oil
  • pinch salt, optional

To serve:

  • ice cream bars
  • sprinkles
  • decorettes
  • chocolate chips
  • Pop Rocks

Instructions

For the Magic Shell:

  • In a microwave safe bowl, combine chocolate chips, coconut oil, and salt if using. Microwave on high 30 seconds, stir, and then repeat microwaving at 20 second intervals, stirring between, until melted and smooth. Let cool to room temp and use.
  • Can be stored in the refrigerator up to one month. Gently rewarm cold magic shell in the microwave in short bursts, stirring between.

To serve:

  1. Let magic shell cool at least 5 minutes.
  2. Quickly dip the ice cream in the sauce and then place on a piece of parchment.
  3. Immediately cover in toppings.
  4. If more “glue” is needed to hold toppings, drizzle on some additional sauce. Serve immediately! 

Notes

  • If using blocks of chocolate, finely chop before melting.
  • Store in a tall, narrow container (tupperware works!) to make dipping ice cream easier.
  • Magic Shell can be stored in the refrigerator up to one month. Gently rewarm cold magic shell in the microwave in short bursts (5-10 seconds), stirring in between.
  • If you want to dip with non-frozen items, like fruit, dip, place on parchment, and then freeze at least 5-10 minutes.

Did you make this recipe?

Tag @magicaltreatsathome on Instagram and hashtag it #magicaltreatsathome

5 Minute Treats: Hand Dipped Ice Cream Bars // magicaltreatsathome.com

Share this:

  • Click to share on Facebook (Opens in new window) Facebook
  • Click to share on X (Opens in new window) X

Like this:

Like Loading...

Filed Under: 5 Minute Treats, Recipes, Treats Tagged With: 5 Minute Treat, chocolate, Clarabelle's, coconut oil, DCA, ice cream, sprinkles

Mickey Mouse Cake Pops: Chocolate, Vanilla, and Red Velvet

February 8, 2020 by Elana Lepkowski Leave a Comment

Mickey Mouse Cake Pops: chocolate, vanilla, and red velvet // magicaltreatsathome.com

Where can I find the original treat?

  • This treat can be found all over the Disneyland Resort.
Mickey Mouse Cake Pops: chocolate, vanilla, and red velvet // magicaltreatsathome.com

CAKE POPS!!! Is the answer I get when I ask my kids what they’d like for a treat lately while visiting Disneyland. And that is also what we’re making this week: cake pops. But why stop there? We’re making ALL THREE varieties of the oversized Mickey Mouse Cake Pops!

I noticed these cake pops last year and loved how they were heftier than the normal cake pops. And the marshmallow ears were a fun touch! Also, I will eat any and all Mickey Mouse shaped food.

Mickey Mouse Cake Pops: chocolate, vanilla, and red velvet // magicaltreatsathome.com

Now, because this post would just be super long to include the recipes for all three cake pop varieties currently found at the parks, and that would be chocolate, vanilla, and red velvet, I’ve separated out each recipe as a stand alone recipe page. And so, each image below links out to the corresponding cake pop. To be efficient, after all your cakes are made, you can assembly line adding the marshmallow ears, and then the chocolate dipping.

This yields more than our usual small batch recipes, so if you’re looking for some party food, or need something for Valentine’s Day next week, this would definitely be a hit. They also freeze well if you just want to keep them on hand for cake pop emergencies.

Mickey Mouse Cake Pops: chocolate, vanilla, and red velvet // magicaltreatsathome.com

Let your young bakers help cut out shapes, dip chocolate, and decorate the cake pops. If you want your ears to be more precise, you might want to take over that part, or let older bakers help.

Make one, two, or all varieties! You’ll love this sweet treat!

Mickey Mouse Chocolate Cake Pop // magicaltreatsathome.com

Chocolate Mickey Mouse Cake Pops

Mickey Mouse Vanilla Cake Pop // magicaltreatsathome.com

Vanilla Mickey Mouse Cake Pops

Mickey Mouse Red Velvet Cake Pop // magicaltreatsathome.com

Red Velvet Mickey Mouse Cake Pops

Share this:

  • Click to share on Facebook (Opens in new window) Facebook
  • Click to share on X (Opens in new window) X

Like this:

Like Loading...

Filed Under: Recipes, Treats Tagged With: cake, cake pop, character treat, chocolate, Mickey Mouse, red velvet, treat, vanilla

Mickey Mouse Chocolate Cake Pops

February 8, 2020 by Elana Lepkowski 1 Comment

Mickey Mouse Chocolate Cake Pop // magicaltreatsathome.com

Where can I find the original treat?

  • This treat can be found throughout the Disneyland resort.
Mickey Mouse Chocolate Cake Pop // magicaltreatsathome.com

These Mickey Mouse Chocolate Cake Pops are part of the three variety series. See the intro post here!

Mickey Mouse Chocolate Cake Pop // magicaltreatsathome.com

Let your young bakers help cut out shapes, dip chocolate, and decorate the cake pops. If you want your ears to be more precise, you might want to take over that part, or let older bakers help.

Mickey Mouse Chocolate Cake Pop // magicaltreatsathome.com
Print
clock clock iconcutlery cutlery iconflag flag iconfolder folder iconinstagram instagram iconpinterest pinterest iconfacebook facebook iconprint print iconsquares squares iconheart heart iconheart solid heart solid icon
Mickey Mouse Chocolate Cake Pop // magicaltreatsathome.com

Mickey Mouse Chocolate Cake Pops

5 Stars 4 Stars 3 Stars 2 Stars 1 Star No reviews
  • Author: Elana Lepkowski
  • Yield: 8 1″, or 4 2″ Mickey Mouse Chocolate Cake Pops 1x
Print Recipe
Pin Recipe

Description

Chocolate Mickey Mouse shaped cake pops have hidden marshmallow ears, covered with semisweet chocolate, and drizzled with blue candy melts for a fun treat! A Disneyland-inspired recipe.


Ingredients

Scale

For the chocolate cake pops:

  • 4 cups loosely packed chocolate cake crumbs (either from cake cuttings or from recipe below)
  • 1/4–1/3 cup cream cheese frosting (store bought or homemade)
  • 1/2 ounce white candy melts
  • 16 mini marshmallows, or 4 regular sized marshmallows cut in half
  • 6 ounces semisweet chocolate, divided
  • 1 ounce royal blue candy melts

For the chocolate cake:
(This makes one single layer 6″ cake and is adapted from this recipe. If you’d like more cake pops, or don’t want to measure by grams, make the original two 6″ cake layers and save one layer for another use.)

  • 45 g all purpose flour
  • 75 g granulated sugar
  • 14 g cocoa powder, unsweetened
  • 1/2 teaspoon baking soda
  • 1/4 teaspoon baking powder
  • 1/4 teaspoon salt
  • 1 egg
  • 3 tablespoons Greek yogurt
  • 1 teaspoon melted refined coconut oil
  • 3 tablespoons warm water
  • 1/2 teaspoon vanilla extract

Special Tools:

  • 1″  or 2″ round cutter
  • lollipop sticks

Instructions

For the cake:

  1. Preheat oven to 350°f and grease and flour a 6″ round cake pan.
  2. Combine the dry ingredients in the bowl of a stand mixer.
  3. Next, mix in the egg, Greek yogurt, coconut oil, warm water, and vanilla extract about 1 minute.
  4. Pour the batter into the cake pan and bake on center rack 26-28 minutes, or until a cake tester comes out clean.
  5. Let cool in the pan 5 minutes, turn out the cake onto a cooling rack, and let completely cool at least one hour.
  6. Cake can be wrapped until ready to use, or crumbled for the cake pops. Crumbs should be small and no larger than a pea.
    Mickey Mouse Cake Pops: chocolate, vanilla, and red velvet // magicaltreatsathome.com

For the cake pops:

  1. Combine the cake crumbs and frosting in a stand mixer until fully combined. Mixture should stay together when pressed in your hand.
  2. Next, line a loaf pan with parchment and press mixture firmly into about 1/2 to 2/3 of the pan. You want a solid brick to be able to cut out shapes later.
  3. Refrigerate the pan 1-2 hours, or 30 minutes in freezer.
  4. Next, using either a 1″ or 2″ round cookie cutter, cut out the shapes and set aside. This mix yields 8 1″ and 4 2″ circles. You can recombine scraps to cut out more shapes if you’d like, or roll into balls for classic shaped cake pops.
  5. Insert lollipop sticks into each circle.
  6. To attach marshmallows, melt the white chocolate in the microwave inside a microwave safe bowl, like glass, for 30 seconds. Stir and microwave again for an additional 30 seconds. Keep stirring and microwaving in short bursts of 15-20 seconds until melted and smooth. Place a small dollop at the 10 and 2 marks on the circle (like a clock), and immediately place the marshmallow circle facing outwards. Set to dry by placing in the fridge 20-30 minutes. You want to keep your cake pops firm before dipping into chocolate.
    Mickey Mouse Cake Pops: chocolate, vanilla, and red velvet // magicaltreatsathome.com
  7. Next, temper the chocolate. In a microwave safe bowl, add 2/3 of the chocolate. Microwave for 30 seconds, stir, microwave for another 30 seconds. Stir again and microwave in short bursts of 15-20 seconds until chocolate has uniformly melted and has reached between 114° – 118°F. Then add in some of the remaining chocolate, stir to completely melt and then add more (I did three batches). Continue to stir the chocolate until it has cooled to 88° – 89°F. The chocolate is now tempered and ready to use. (Alternatively, you can heat in a double boiler on the stove.)
  8. Remove the cake pops from the refrigerator for 5 minutes before dipping.
  9. Then either dip directly into the chocolate, or use a ladle or spoon to pour the chocolate over the cake pops. Gently tap the lollipop stick to remove any air bubbles and get off any excess chocolate, scraping the back side on the side of the bowl as well. Set aside on a sheet of parchment and repeat until all the cake pops have been covered.
  10. Finally, melt the blue candy melts in the microwave inside a microwave safe bowl, like glass, for 30 seconds. Stir and microwave again for an additional 30 seconds. Keep stirring and microwaving in short bursts of 15-20 seconds until melted and smooth. Transfer to a piping bag (or directly melt in a heat proof piping bag). Cut a small amount off the tip of the bag and make zig-zagging lines across the face of the cake pop. Let set at least 15 minutes and enjoy!

Notes

  • If cocoa powder is lumpy, sift before using.
  • Cake crumbs should be small and no larger than a pea.
  • To be efficient, after all your cakes are made in this series, you can assembly line adding the marshmallow ears, and then the chocolate dipping.
  • Cake balls should not be too wet or too dry to hold their shape properly. If too wet, add more cake crumbles. If too dry, add more frosting a small bit at a time.
  • You can use a combination semisweet/bittersweet at 75/25% for a less sweeter chocolate coating.
  • If cake balls are slipping off the sticks, dip lollipop stick tip in the melted chocolate and insert into cake ball. Refrigerate a few minutes to set.
  • If you do not pop the air bubbles, then moisture from the cake will seep out as the chocolate dries. If this happens, gently wipe away anything that has seeped out, and coat a second time in the melted chocolate. You can also store freshly baked cake a day or two in the refrigerator, wrapped in plastic wrap, to dry it out a bit before crumbling.

Tempering Chocolate tips:

  • Tempering chocolate creates a glossy sheen and a crisp snap
  • Using short bursts of time makes controlling the temperature easier
  • Keep all moisture and liquids away from the chocolate while tempering
  • Use an instant read candy thermometer with a clip (we like this one)
  • If chocolate starts to cool, microwave for 5-10 seconds
  • If you do not have a candy thermometer, read this article on tempering without one: https://www.thekitchn.com/how-to-temper-chocolate-without-a-thermometer-cooking-lessons-from-the-kitchn-196475
  • And if you don’t have the time to temper your chocolate, just melt and dip and eat!

Did you make this recipe?

Tag @magicaltreatsathome on Instagram and hashtag it #magicaltreatsathome

Mickey Mouse Cake Pops: chocolate, vanilla, and red velvet // magicaltreatsathome.com

Share this:

  • Click to share on Facebook (Opens in new window) Facebook
  • Click to share on X (Opens in new window) X

Like this:

Like Loading...

Filed Under: Recipes, Treats Tagged With: cake, cake pop, character treat, chocolate, Mickey Mouse, treat

Mickey Mouse Vanilla Cake Pops

February 8, 2020 by Elana Lepkowski 1 Comment

Mickey Mouse Vanilla Cake Pop // magicaltreatsathome.com

Where can I find the original treat?

  • This treat can be found throughout the Disneyland resort.
Mickey Mouse Vanilla Cake Pop // magicaltreatsathome.com

These Mickey Mouse Vanilla Cake Pops are part of the three variety series. See the intro post here!

Mickey Mouse Vanilla Cake Pop // magicaltreatsathome.com

Let your young bakers help cut out shapes, dip chocolate, and decorate the cake pops. If you want your ears to be more precise, you might want to take over that part, or let older bakers help.

Mickey Mouse Vanilla Cake Pop // magicaltreatsathome.com
Print
clock clock iconcutlery cutlery iconflag flag iconfolder folder iconinstagram instagram iconpinterest pinterest iconfacebook facebook iconprint print iconsquares squares iconheart heart iconheart solid heart solid icon
Mickey Mouse Vanilla Cake Pop // magicaltreatsathome.com

Mickey Mouse Vanilla Cake Pops

5 Stars 4 Stars 3 Stars 2 Stars 1 Star No reviews
  • Author: Elana Lepkowski
  • Yield: 8 1″, or 4 2″ Mickey Mouse Chocolate Cake Pops 1x
Print Recipe
Pin Recipe

Description

Vanilla Mickey Mouse shaped cake pops have hidden marshmallow ears, covered with semisweet chocolate, and drizzled with yellow candy melts for a fun treat! A Disneyland-inspired recipe.


Ingredients

Scale

For the vanilla cake pops:

  • 4 cups loosely packed vanilla cake crumbs (either from cake cuttings or from recipe below)
  • 1/4–1/3 cup vanilla frosting (store bought or homemade)
  • 1/2 ounce white candy melts
  • 16 mini marshmallows, or 4 regular sized marshmallows cut in half
  • 6 ounces semisweet chocolate, divided
  • 1 ounce yellow candy melts

Vanilla cake:
Recipe adapted from Dessert for Two

  • 6 tablespoons unsalted butter, softened
  • 1/2 cup granulated sugar
  • 1 large egg
  • 2 teaspoons vanilla extract
  • 3/4 cup all-purpose flour
  • 1/4 teaspoon kosher salt
  • 1/4 teaspoon baking soda
  • 6 tablespoons whole milk or milk alternative (I used almond milk)
  • 1/2 teaspoon apple cider vinegar

Special Tools:

  • 1″  or 2″ round cutter
  • lollipop sticks

Instructions

For the vanilla cake:

  1. Preheat the oven to 350°f and grease and flour a 6″ round cake pan.
  2. In the bowl of a stand mixer, cream together the butter and sugar, 1-2 minutes. Scrape down sides of bowl.
  3. Meanwhile, in a small bowl, whisk together the flour, salt, and baking soda. Set aside.
  4. To the creamed butter and sugar, mix in the egg and vanilla. Mix well 15 seconds.
  5. Then add half of the dry ingredients to the wet, stir to barely combine, add half the milk and all the vinegar, stir again. Then add in the remaining dry ingredients, and then the rest of the milk.
  6. Pour into the prepared cake pan, and bake on the center rack for 35-37 minutes, or until a cake tester comes out clean.
  7. Let cool in the pan 5 minutes, turn out the cake onto a cooling rack, and let completely cool at least one hour.
  8. Cake can be wrapped until ready to use, or crumbled for the cake pops. Crumbs should be small and no larger than a pea.
    Mickey Mouse Cake Pops: chocolate, vanilla, and red velvet // magicaltreatsathome.com

For the cake pops:

  1. Combine the cake crumbs and frosting in a stand mixer until fully combined. Mixture should stay together when pressed in your hand.
  2. Next, line a loaf pan with parchment and press mixture firmly into about 1/2 to 2/3 of the pan. You want a solid brick to be able to cut out shapes later.
  3. Refrigerate the pan 1-2 hours, or 30 minutes in freezer.
  4. Next, using either a 1″ or 2″ round cookie cutter, cut out the shapes and set aside. This mix yields 8 1″ and 4 2″ circles. You can recombine scraps to cut out more shapes if you’d like, or roll into balls for classic shaped cake pops.
  5. Insert lollipop sticks into each circle.
  6. To attach marshmallows, melt the white chocolate in the microwave inside a microwave safe bowl, like glass, for 30 seconds. Stir and microwave again for an additional 30 seconds. Keep stirring and microwaving in short bursts of 15-20 seconds until melted and smooth. Place a small dollop at the 10 and 2 marks on the circle (like a clock), and immediately place the marshmallow circle facing outwards. Set to dry by placing in the fridge 20-30 minutes. You want to keep your cake pops firm before dipping into chocolate.
    Mickey Mouse Cake Pops: chocolate, vanilla, and red velvet // magicaltreatsathome.com
  7. Next, temper the chocolate. In a microwave safe bowl, add 2/3 of the chocolate. Microwave for 30 seconds, stir, microwave for another 30 seconds. Stir again and microwave in short bursts of 15-20 seconds until chocolate has uniformly melted and has reached between 114° – 118°F. Then add in some of the remaining chocolate, stir to completely melt and then add more (I did three batches). Continue to stir the chocolate until it has cooled to 88° – 89°F. The chocolate is now tempered and ready to use. (Alternatively, you can heat in a double boiler on the stove.)
  8. Remove the cake pops from the refrigerator for 5 minutes before dipping.
  9. Then either dip directly into the chocolate, or use a ladle or spoon to pour the chocolate over the cake pops. Gently tap the lollipop stick to remove any air bubbles and get off any excess chocolate, scraping the back side on the side of the bowl as well. Set aside on a sheet of parchment and repeat until all the cake pops have been covered.
  10. Finally, melt the yellow candy melts in the microwave inside a microwave safe bowl, like glass, for 30 seconds. Stir and microwave again for an additional 30 seconds. Keep stirring and microwaving in short bursts of 15-20 seconds until melted and smooth. Transfer to a piping bag (or directly melt in a heat proof piping bag). Cut a small amount off the tip of the bag and make zig-zagging lines across the face of the cake pop. Let set at least 15 minutes and enjoy!

Notes

  • Cake crumbs should be small and no larger than a pea.
  • To be efficient, after all your cakes are made in this series, you can assembly line adding the marshmallow ears, and then the chocolate dipping.
  • Cake balls should not be too wet or too dry to hold their shape properly. If too wet, add more cake crumbles. If too dry, add more frosting a small bit at a time.
  • You can use a combination semisweet/bittersweet at 75/25% for a less sweeter chocolate coating.
  • If cake balls are slipping off the sticks, dip lollipop stick tip in the melted chocolate and insert into cake ball. Refrigerate a few minutes to set.
  • If you do not pop the air bubbles, then moisture from the cake will seep out as the chocolate dries. If this happens, gently wipe away anything that has seeped out, and coat a second time in the melted chocolate. You can also store freshly baked cake a day or two in the refrigerator, wrapped in plastic wrap, to dry it out a bit before crumbling.

Tempering Chocolate tips:

  • Tempering chocolate creates a glossy sheen and a crisp snap
  • Using short bursts of time makes controlling the temperature easier
  • Keep all moisture and liquids away from the chocolate while tempering
  • Use an instant read candy thermometer with a clip (we like this one)
  • If chocolate starts to cool, microwave for 5-10 seconds
  • If you do not have a candy thermometer, read this article on tempering without one: https://www.thekitchn.com/how-to-temper-chocolate-without-a-thermometer-cooking-lessons-from-the-kitchn-196475
  • And if you don’t have the time to temper your chocolate, just melt and dip and eat!

Did you make this recipe?

Tag @magicaltreatsathome on Instagram and hashtag it #magicaltreatsathome

Mickey Mouse Cake Pops: chocolate, vanilla, and red velvet // magicaltreatsathome.com

Share this:

  • Click to share on Facebook (Opens in new window) Facebook
  • Click to share on X (Opens in new window) X

Like this:

Like Loading...

Filed Under: Recipes, Treats Tagged With: cake, cake pop, candy melts, character treat, Mickey Mouse, treat, vanilla

  • « Go to Previous Page
  • Go to page 1
  • Go to page 2
  • Go to page 3
  • Go to page 4
  • Go to page 5
  • Go to page 6
  • Interim pages omitted …
  • Go to page 8
  • Go to Next Page »

Primary Sidebar

Follow Us

  • Instagram
  • Facebook
  • X
  • Pinterest
  • Email
  • YouTube

Hi! My name is Elana, and that’s me shoving a Mickey Mouse shaped treat in my face. I love the treats at Disneyland. A lot. So much so I’ve dedicated an entire website to making all my favorites, and hopefully yours too, out of my home kitchen. My aim is to create Disneyland-inspired treats, with easy to follow directions, and many recipes geared towards getting the kids in the kitchen to help too! Because putting sprinkles on things is F-U-N.

Top With Sprinkles

Get Recipes in Your Inbox!

* indicates required

Look for this icon in posts to find Kid Friendly recipes!

Recent Posts

  • Matterhorn Macaroon
  • Caramel Gingerbread Cookie Sandwiches
  • Colorful Fruit Hand Pies
  • Classic Mickey Shaped Beignets
  • Carrot Cake Cookies

Archives

  • February 2023
  • December 2022
  • August 2022
  • January 2022
  • December 2021
  • November 2021
  • December 2020
  • November 2020
  • October 2020
  • September 2020
  • August 2020
  • July 2020
  • June 2020
  • May 2020
  • April 2020
  • March 2020
  • February 2020
  • January 2020
  • December 2019
  • November 2019
  • October 2019
  • September 2019
  • August 2019
  • July 2019
  • June 2019
  • May 2019

Copyright © 2025 Magical Treats at Home on the Foodie Pro Theme

%d