
Description
A favorite at Pooh Corner! This chewy, crispy, sweet Hunny Pot Crispy Treat is a snap to make and decorate. A Disneyland-inspired treat.
Ingredients
Scale
For the crispy treat:
- 2 tablespoons butter, unsalted
- 2-1/2 cups mini marshmallows or 25 regular sized marshmallows
- 2-1/2 cups crisped rice cereal
For the decoration:
- 1/2 cup semisweet chocolate chips, 1 tbsp reserved
- 1/2 cup yellow candy melts
Specialty Tools (Optional):
Instructions
For the crispy treat:
- Before beginning, line a loaf pan with parchment.
- Combine the butter and marshmallows in a medium sauce pan over medium-low heat. Stir constantly until marshmallows have melted and mixture is smooth.
- Immediately dump in the crisped rice cereal and mix to combine.
- Pour into the prepared pan and gently press mixture into place with a rubber spatula (or damp fingers). Set aside for at least an hour in the refrigerator so that the mixture can firm up enough to cut shapes.
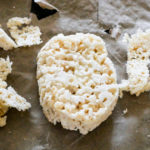
- Once firm, use parchment to lift out crispy treats and cut into 3 roughly equal sized rectangles.
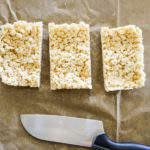
- Using a sharp knife, round off the corners so that the treat resembles a honey pot.
For the decorating:
- First, melt the semisweet chocolate in the microwave inside a microwave safe bowl, like glass, for 30 seconds. Stir and microwave again for an additional 30 seconds. Keep stirring and microwaving in short bursts of 15-20 seconds until melted and smooth. Use can alternatively use a double boiler for melting.
- Dip the top half of the treat into the melted chocolate, letting any excess drip off back into the bowl. Repeat for other treats. Refrigerate for 15 minutes so that the chocolate can firm up before the second dip.
- Next, melt the yellow candy melts with the reserved chocolate (or use a tablespoon of already melted chocolate mixed in with the yellow if you have leftovers) in the microwave inside a microwave safe bowl, like glass, for 30 seconds. Stir and microwave again for an additional 30 seconds. Keep stirring and microwaving in short bursts of 15-20 seconds until melted and smooth. You can alternatively use a double boiler for melting or melt everything in a piping bag, kneading together to mix colors between microwaving.
- Transfer the melted candy melts and chocolate to a squeeze bottle or a piping bag with a small portion of the tip cut off. Fill in the top of the treat to resemble honey, and write “Hunny” on the pot. Repeat until all treats are decorated.
- Let the treats firm up, at least 30 minutes in the refrigerator before serving. Enjoy!
Notes
- Use a smaller pan than you think you’ll need for this. As the marshmallows melt into the butter, if there’s too much space in the pan they will start to dry out and form strings. Keeping the marshmallows closer together in the pan will ensure they melt more evenly, creating a better mixture to add the cereal into.
- When mixing crisped rice cereal into the melted marshmallows, keep the mixture on the flame so that marshmallows stay liquid. Removing to mix in can seize up the liquid before the cereal is fully mixed.
- You can sub in light candy melts for the semisweet chocolates.
- If crisped rice cereal is unavailable right now, use any kind of puffed grain, or cereal. Cocoa Pebbles would work here too!
- Treats can be kept in an air-tight container for up to 3 days.