• Skip to primary navigation
  • Skip to main content
  • Skip to primary sidebar

Magical Treats at Home

  • About
  • Treats
  • Drinks
  • Savory
  • Favorite Tools
  • Etsy Shop

Recipes

Piranha Lemonade Slushy

June 25, 2019 by Elana Lepkowski 1 Comment

Piranha Lemonade Slushy // magicaltreatsathome.com
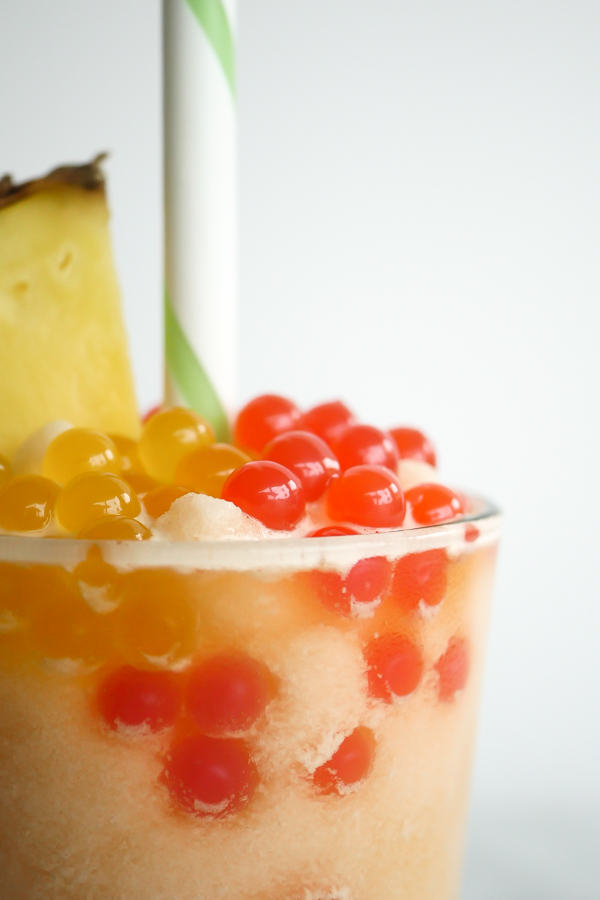
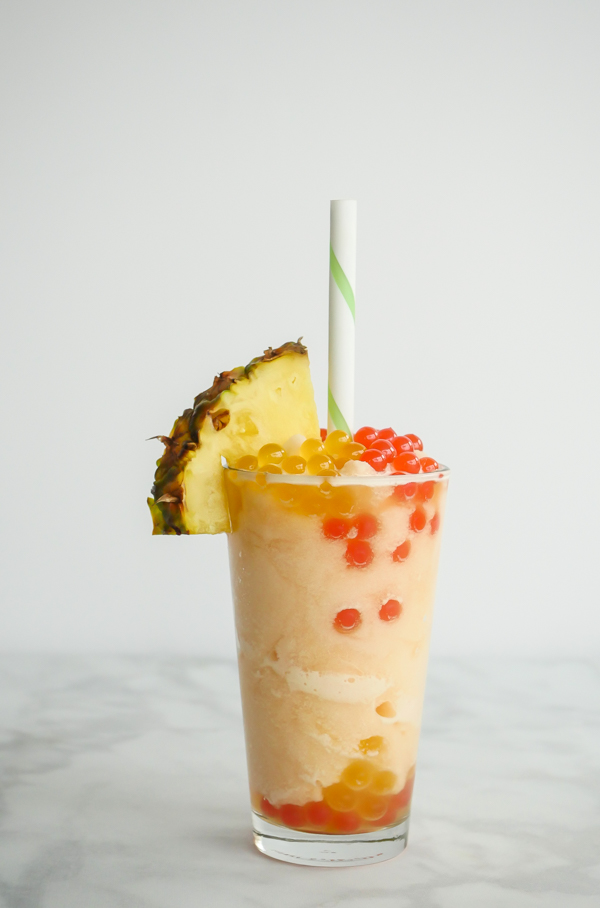
  • This beverage was part of the “Get Your Ears On” celebration at Disneyland Resort found at the Bengal Barbecue.

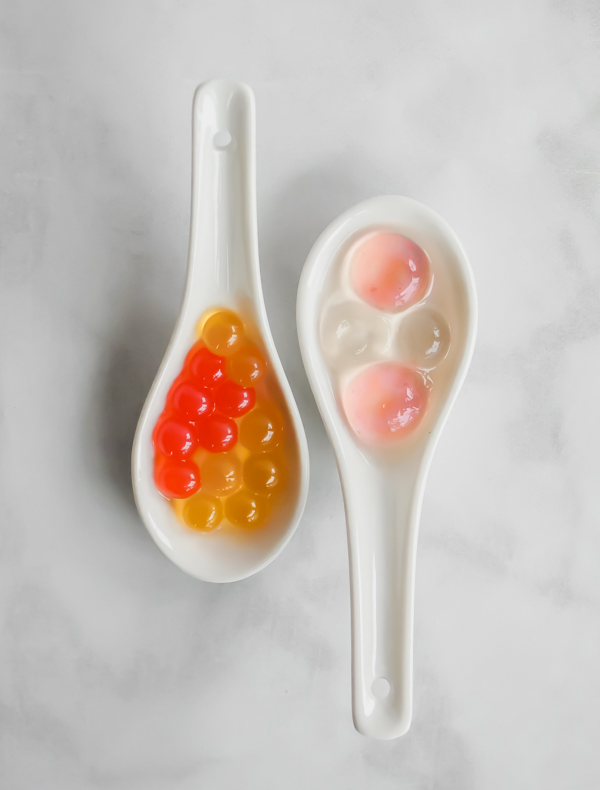
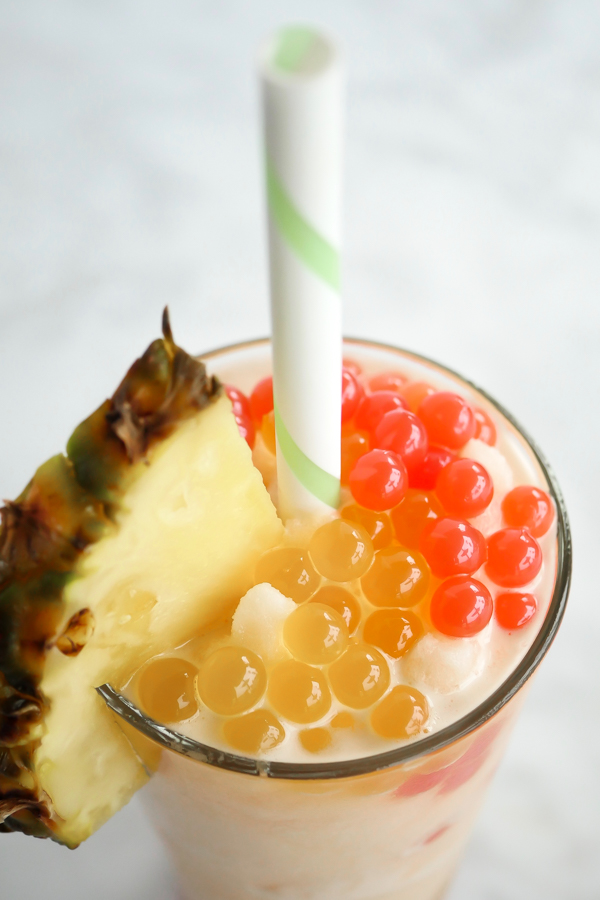
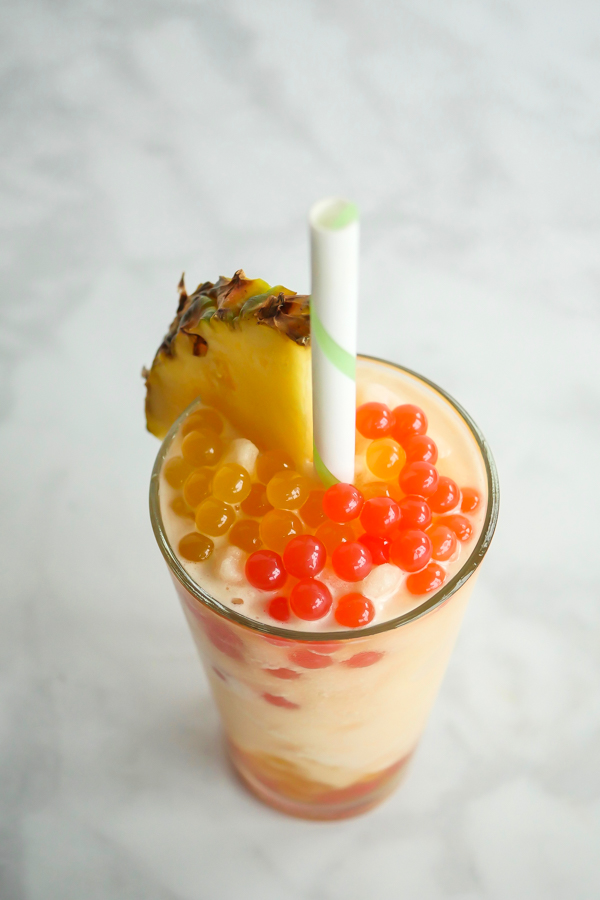
Part drink, part frozen treat, part molecular gastronomy wonder, the Piranha Lemonade Slushy was one of the more popular drink items during the “Get Your Ears On” celebration at the Disneyland Resort. Part of the fun of drinking this was the pomegranate and lychee “popping pearls” that were found on top…and you can actually make those at home!

Piranha Lemonade Slushy // magicaltreatsathome.com

But I’m not going to lie here, it might not be that easy for someone to casually make these. In fact, this post had to keep getting pushed back for more and more R&D as I worked out a few ways you could make these. In the end, I also found out that the popping pearls can be bought on Amazon. And really, unless you really want to try some culinary experiments at home, you should probably just pick up a pack. But for those of you who’d like to try your hand at this cool way to turn a liquid into a jelly sphere… keep reading!

Piranha Lemonade Slushy // magicaltreatsathome.com
Popping pearls on the left. Homemade spheres on the right.

Molecular Gastronomy, which combines science and the culinary arts, has been popular for quite a long time and I’m not surprised to see Disney experimenting with this fun way to “play” with your food. Now, they might not be doing too much experimenting, and chances are they’re buying these little guys in bulk (which would be waaaaay more cost and time effective). But that doesn’t mean you have to.

Piranha Lemonade Slushy // magicaltreatsathome.com

Now, if you are interested, you will need three things that you might not own in your kitchen: a scale that can measure grams, calcium lactate gluconate, and sodium alginate. And don’t worry, Amazon has all of these (and I’ve listed them all in the recipe below)! In fact, there are a few companies that offer kits for creating these popping pearls, otherwise known as spherification or reverse spherification. I prefer to use the frozen reverse spherification method as I find this more forgiving when making the popping pearls.

Initially I was going to suggest using reverse spherification because that is the technique I learned to use years ago when I was working with chefs doing this. However, in a home environment, I now, after running through this many times over the past couple of weeks, suggest the frozen method. It’s simply way easier to get a sphere to form.

Piranha Lemonade Slushy // magicaltreatsathome.com

Since these techniques are quite detailed I’m linking out to the sites whose products and instructions I used so that you can see the breakdown of how they suggest forming the spheres. Also, I HIGHLY suggest that you watch a few videos online on technique. For example, instructions will tell you to swirl the spherification bath after you drop in your liquid. But if you don’t start swirling that water immediately, it’s going to stick to the bottom of your pan. So, just watch the steps a few times before you proceed.

Another option, if you don’t want to buy the popping pearls, and you don’t want to make your own spheres, is to partially freeze the syrups so that they form balls, but don’t freeze all the way, so they sort of break open, but don’t pop. You can use the sphere ice cube tray listed below to freeze the spheres for the spherification process, or to just freeze them.

Piranha Lemonade Slushy // magicaltreatsathome.com

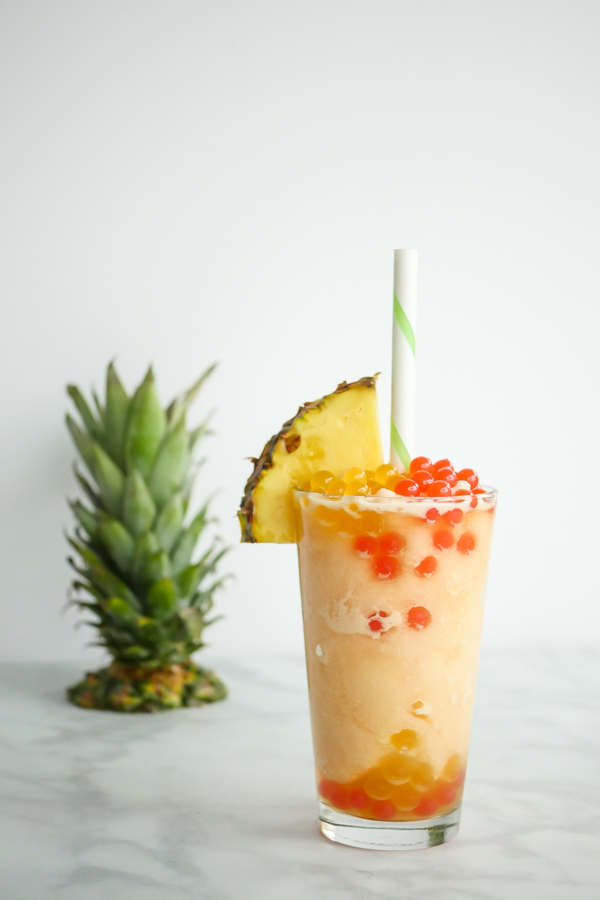
OH and hey! There’s also a slushy here too that all these popping pearls are sitting on top of! Well, my local grocery store sells a mango lemonade that I added fresh pineapple juice into and that worked out great. This was in lieu of using a separate mango juice and making lemonade from scratch. It’s all up to you whether you’d prefer to make it all fresh, some fresh, or all store-bought. Just use what tastes good to you and it will taste good in the end.

Print
clock clock iconcutlery cutlery iconflag flag iconfolder folder iconinstagram instagram iconpinterest pinterest iconfacebook facebook iconprint print iconsquares squares iconheart heart iconheart solid heart solid icon
Piranha Lemonade Slushy // magicaltreatsathome.com

Piranha Lemonade Slushy

5 Stars 4 Stars 3 Stars 2 Stars 1 Star No reviews
  • Author: Elana Lepkowski
  • Yield: 2 lemonades 1x
Print Recipe
Pin Recipe

Description

A tropical blend of mango and pineapple lemonade slushy with lychee and pomegranate popping pearls. A Disneyland-inspired treat from the “Get Your Ears On” celebration.


Ingredients

Scale

For the slushy:

  • 3 cups mango lemonade, divided
  • 1 cup pineapple juice, divided

For the popping pearls:

  • Popping Pearls/Bursting Boba (like these)

OR

  • 500 mL distilled water (has to be distilled, cannot use tap or filtered water)
  • 5 g Sphere Magic
  • 100 g pomegranate syrup
  • 100 g lychee syrup
  • 4 g calcium lactate gluconate, divided

Pineapple wedge for garnish

Specialty Tools:

  • scale that weighs down to 0.1 grams
  • slotted spoons
  • small sphere ice mold

Instructions

For the slushy:

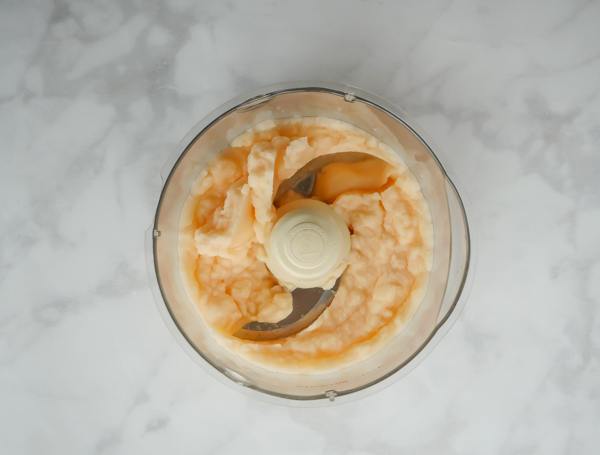
  1. First pour 2 cups of the mango lemonade and 1/2 cup of the pineapple juice into a gallon sized freezer bag. Lay flat and freeze at least 6 hours until solid.
  2. When frozen, use a rolling pin to break up into smaller frozen chunks. Add to a blender or food processor. Pour in remaining mango lemonade and pineapple juice. Blend to desired consistency. Set aside.

For the popping pearls:

  1. If you are making the pearls using the reverse spherification method, follow all the directions for that on the ChefSteps site below.Otherwise proceed to next step.
    1. Spherification Bath
    2. Frozen Reverse Spherification

Assembly:

  1. Add some popping pearls to the bottom of two pint glasses.
  2. Pour pineapple mango lemonade between two pint glasses.
  3. Top with more popping pearls and garnish with a pineapple slice. Enjoy with a wide straw!

Notes

  • Distilled water is necessary here, as regular tap water will congeal when introduced to the Sphere Magic powder.
  • Let the spherification bath sit at least a few hours for the Sphere Magic to get absorbed and for all the air bubbles to disappear. 
  • Swirling the spherification bath immediately after dispersing the calcium lactate gluconate infused syrups will prevent the sphere from sticking to the bottom of the pan.
  • I prefer a food processor to blend my frozen drinks now. Pulsing will make the ice fluffier and more of a “slushy” consistency than a standard blender.
  • Regular sized straws will be too narrow to suck up popping pearls. Use a wide straw or boba straw.

Did you make this recipe?

Tag @magicaltreatsathome on Instagram and hashtag it #magicaltreatsathome

Piranha Lemonade Slushy // magicaltreatsathome.com

Share this:

  • Click to share on Facebook (Opens in new window) Facebook
  • Click to share on X (Opens in new window) X

Like this:

Like Loading...

Filed Under: Drinks, Gluten Free, Recipes Tagged With: Bengal Barbecue, drinks, Get Your Ears On, lemonade, mango, pineapple, popping pearls

Mickey Mouse Butterscotch Beignets

June 10, 2019 by Elana Lepkowski 1 Comment

Mickey Mouse Butterscotch Beignets // magicaltreatsathome.com
  • Find these butterscotch beignets at the Mint Julep Bar in New Orleans Square.

We’re continuing our series of favorites from the “Get Your Ears On” celebration from Disneyland with these fluffy, melt-in-your-mouth, butterscotch beignets. These actually *might* be our favorite flavor of beignets, even more so than the original version. And lucky us! Even though these appeared as part of the “Get Your Ears On” celebration, they are still being served at the Mint Julep bar… we just don’t know until when!

Mickey Mouse Butterscotch Beignets // magicaltreatsathome.com

Since these could go away at any moment, the recipe had to be cracked ASAP. And recipe test we did! The secret to that butterscotch flavor is in the topping, not the actual beignet. At the park, the beignet itself tasted no different than an original one, it was the flavored sugar that imparted that buttery sweet butterscotch flavor. But how to do it?

Mickey Mouse Butterscotch Beignets // magicaltreatsathome.com

We tried a few methods: first, trying to flavor the powdered sugar. But, when you add a liquid to powdered sugar, it melts. So the next step was to coat the beignets with butterscotch syrup and then coat with powdered sugar. This definitely added a little flavor to the beignets, but not as strong as what we wanted. So lastly, we made a butterscotch powder using blitzed butterscotch candies. And there we seemed to get the right flavor. Now, I doubt they are crushing hard candies at the parks to get that flavor, and after doing some additional research, I’ve found you can purchase a butterscotch flavoring powder, so if you’re so obsessed with these and you want to make them every week, maybe you should check that out.

Mickey Mouse Butterscotch Beignets // magicaltreatsathome.com

Timing of applying the butterscotch powder here is crucial. Applying too late after they’ve cooled and the butterscotch powder along with powdered sugar just slides off the beignets and doesn’t really coat. Apply it too soon and it melts the butterscotch powder and hardens it back into a crunchy state (my husband actually really liked getting some crunchy bits in his so you might too). The key here to getting an even coating is to let the beignet rest a few minutes after it comes out of the oil, coat a little with butterscotch syrup and then dust with the butterscotch powder and powdered sugar.

Mickey Mouse Butterscotch Beignets // magicaltreatsathome.com

Ok, we’ve got the topping, but what about the actual beignet part? Well, this dough is a beauty to work with. It requires very little kneading (and if you’ve got a dough hook at home then all the kneading will be done in the machine for you), and it produces a shiny, smooth, easy to roll out dough. I barely needed flour to roll it out! What it does require is time. Since this is a yeasted dough, it needs to sit in total for a few hours, or overnight if you decided to make these in the evening and fry off in the morning. But if you need to have them that day, the nice thing is it is just only a few hours of waiting.

Mickey Mouse Butterscotch Beignets // magicaltreatsathome.com

Now, let’s say a few things about deep frying at home. First, it’s super easy as long as you have a few tools to help you (and I’ll list them in the recipe below). Second, none of the tools are fancy or expensive and you don’t need some sort of special frying machine. Lastly, you don’t need to be outside or in a specially ventilated area. If you don’t like the smell, open some windows, light a kitchen candle, and immediately deal with your oil as soon as it is cool enough to touch. Tip, you don’t need to toss out the oil after one doughnut frying session either. I bought a half gallon of avocado oil (it does well at high temps) and kept the container it came in. Once my oil was room temp, I strained it back into the bottle, sealed it, and used it again the next day for another batch of recipe testing. The number one rule though with working with hot oil: be safe and be aware! Wear an apron, closed toe shoes, and get a glove out if you’re afraid of oil splatters.

OK! That’s all my tips and notes for this yummy treat. If you’ve always wanted to enjoy those Mickey Mouse beignets, but were nowhere near the park that day, I highly encourage you to try this at home.

Mickey Mouse Butterscotch Beignets // magicaltreatsathome.com
Print
clock clock iconcutlery cutlery iconflag flag iconfolder folder iconinstagram instagram iconpinterest pinterest iconfacebook facebook iconprint print iconsquares squares iconheart heart iconheart solid heart solid icon
Mickey Mouse Butterscotch Beignets // magicaltreatsathome.com

Mickey Mouse Butterscotch Beignets

5 Stars 4 Stars 3 Stars 2 Stars 1 Star No reviews
  • Author: Elana Lepkowski
  • Yield: 15 Mickey Mouse shaped beignets 1x
Print Recipe
Pin Recipe

Description

Sweet, buttery, melt-in-your-mouth Mickey Mouse butterscotch beignets. Part of the “Get Your Ears On” celebration at Disneyland. Adapted from the Disney Parks Blog.


Ingredients

Scale
  • 15 hard butterscotch candies
  • 1/2 teaspoon dry yeast
  • 1/4 cup warm water (105º)
  • 1/4 cup sugar
  • 2 tablespoons vegetable shortening (I used refined coconut oil)
  • 1/2 teaspoon salt
  • 1/2 cup heavy cream
  • 1 egg
  • 4 cups all-purpose flour
  • 1/2 cup boiling water
  • Vegetable oil for frying, like avocado
  • 3/4 cup butterscotch syrup
  • Powdered sugar

Specialty Tools:

  • heavy bottomed dutch oven
  • candy thermometer
  • Mickey Mouse cutter
  • mesh strainer bag (I use these reusable straining bags for everything!)

Instructions

For the butterscotch powder:

  1. First, break up the butterscotch candies in a ziplock bag using a rolling pin or rubber mallet. You do not need to fully crush them, just break them into small pieces.
  2. Next, transfer to a food processor or spice grinder. Pulse until candies are a find powder. Set aside.

For the beignets:

  1. Sprinkle yeast over warm water in a small bowl, gently stirring to dissolve. Let stand for 5 minutes.
  2. Combine sugar, shortening, salt, heavy cream, egg, flour and boiling water in a large bowl. Mix until everything is just combined and then stir in yeast mixture. With the dough hook attachment of an electric mixer on medium speed, mix the dough just until combined and smooth. About 3-4 minutes. Let dough rest for 30 minutes in the bowl.
  3. Flour your surface and roll to 1/4-inch thickness. Using the Mickey Mouse cutter, cut dough pieces, twisting slightly, and carefully removing dough from around cutter before releasing. You may have to combine dough and roll out again to cut more shapes out. Cover with a towel and let dough rise until doubled in size in a warm, draft-free area, about 1-1/2 to 2 hours.
  4. Pour enough oil into a deep-sided, heavy bottomed pot until it reaches 2 inches up sides; heat oil over medium heat to 370°F.
    Mickey Mouse Butterscotch Beignets // magicaltreatsathome.com
  5. Add 2-3 beignets to oil; fry until golden brown on both sides, about a minute each, turning once.
  6. Remove from hot oil with a slotted spoon and place on a baking sheet lined with paper towels.
  7. Let cool about 5 minutes, coat with butterscotch syrup and then dust with butterscotch powder and then powdered sugar. Enjoy!

Notes

  • Dough may have to be recombined and rolled a second time if you have a lot of scraps
  • Wait for oil to come back to temperature before adding next batch of beignets to the pot
  • Let hot beignets rest 5 minutes, but no more than 30 minutes, before coating with syrup and powdered sugar
  • No dough hook attachment? Knead dough until smooth and shiny, about 5-8 minutes and then proceed with the recipe
  • Want to make these at night for the next morning? After cutting Mickey Mouse shapes out. Transfer to a baking sheet and let rest, covered with a towel, in the refrigerator overnight. Let come to room temperature before frying in the morning
  • Strain your oil after it reaches room temperature. It can be used again!

Did you make this recipe?

Tag @magicaltreatsathome on Instagram and hashtag it #magicaltreatsathome

Mickey Mouse Butterscotch Beignets // magicaltreatsathome.com

Share this:

  • Click to share on Facebook (Opens in new window) Facebook
  • Click to share on X (Opens in new window) X

Like this:

Like Loading...

Filed Under: Recipes, Treats Tagged With: beignet, character treat, Get Your Ears On, Mickey Mouse, Mint Julep Bar, treat

Bacon Mac & Cheese Footlong Hotdog

June 3, 2019 by Elana Lepkowski Leave a Comment

Bacon Mac & Cheese Footlong Hotdog // magicaltreatsathome.com
  • I’m kicking off a month of favorites from the “Get Your Ears On” celebration for June!

I thought it was time we tried a savory item on here. Treats do not necessarily have to be sweet, and the Bacon Mac & Cheese Footlong Hotdog was definitely one of my favorite savory items at the park during this festival.

Bacon Mac & Cheese Footlong Hotdog // magicaltreatsathome.com

Now, this recipe is an example of why I say “inspired” and not “copy cat” recipe… and that’s because if I could change one thing about this, it would be the mac & cheese; it just wasn’t 100% for me. Overall I loved this dish. I mean, it fed four of us as a snack and that’s a great bang for your buck! The mac & cheese worked just fine as part of the whole meal, but on its own I thought it could be better. So, today I’ll just sub in my favorite creamy mac & cheese and then it will be perfect!

Bacon Mac & Cheese Footlong Hotdog // magicaltreatsathome.com

This dish does not use standard hotdog buns. The whole meal rests inside a soft, french roll, and really, you need that sturdier bread to hold it all. If you decided to not go the footlong route and just make standard size hotdogs, I’d still suggest you use a sturdy bun, or you’ll need to eat it out of a bowl!

Bacon Mac & Cheese Footlong Hotdog // magicaltreatsathome.com
Print
clock clock iconcutlery cutlery iconflag flag iconfolder folder iconinstagram instagram iconpinterest pinterest iconfacebook facebook iconprint print iconsquares squares iconheart heart iconheart solid heart solid icon
Bacon Mac & Cheese Footlong Hotdog // magicaltreatsathome.com

Bacon Mac & Cheese Footlong Hotdog

5 Stars 4 Stars 3 Stars 2 Stars 1 Star No reviews
  • Author: Elana Lepkowski
  • Yield: 2 hotdogs 1x
Print Recipe
Pin Recipe

Description

Creamy mac & cheese with bacon bits and chives makes a delicious topping for a footlong hotdog! A Disneyland-inspired treat from the “Get Your Ears On” celebration.


Ingredients

Scale
  • 2 cups creamy mac & cheese, prepared
  • 3–4 slices of bacon
  • 2 footlong hotdogs (I used Farmer John’s Dodger Dogs)
  • 2 tablespoons chopped chives, divided
  • 2 french rolls

Instructions

  1. Start by preparing the mac & cheese per the box’s instructions.
  2. Next, cook bacon over medium-high heat until crispy. Watch that it does not go from crispy to burned! Set aside until warm and then chop bacon to small bite-sized pieces.
  3. Cook hotdogs over medium heat about 8 minutes, turning occasionally to crisp skin on all sides. While hotdogs are cooking, warm french rolls if desired. 
  4. To assemble: carve out a small section from french rolls and place hotdog inside. Scoop mac & cheese on top. Sprinkle with bacon bits and chopped chives. Enjoy!

Notes

  • Use a french roll instead of a standard hotdog bun for a sturdier base
  • All components can be prepared up to a day in advance and reheated to assemble

Did you make this recipe?

Tag @magicaltreatsathome on Instagram and hashtag it #magicaltreatsathome

Bacon Mac & Cheese Footlong Hotdog // magicaltreatsathome.com

Share this:

  • Click to share on Facebook (Opens in new window) Facebook
  • Click to share on X (Opens in new window) X

Like this:

Like Loading...

Filed Under: Recipes, Savory Tagged With: bacon, Get Your Ears On, hotdog, mac and cheese, savory

Mickey Mouse Celebration Whoopie Pies

May 27, 2019 by Elana Lepkowski Leave a Comment

Mickey Mouse Celebration Whoopie Pies // magicaltreatsathome.com

Where can I find the original treat?

  • These specialty treats were found at the Grand Californian Hotel.

Disneyland’s “Get Your Ears On” celebration is sadly coming to a close this week at the parks, but that doesn’t mean the celebration has to stop in your kitchen! We’re popping back in to White Water Snacks at the Grand Californian Hotel to recreate their massive Mickey Mouse Celebration Whoopie Pie. Bonus: there’s sprinkles involved.

Mickey Mouse Celebration Whoopie Pies // magicaltreatsathome.com

I consider myself a bit of a whoopie pie master. A few years back I decided to make some for a friend’s party and they were such a hit I feel like I haven’t stopped making them for friends and clients ever since. (I even made an adult’s only version with Kerrygold Irish Cream that is definitely worth checking out if that’s your thing.) The cakes are not super sweet because HELLO! they’re filled with vanilla buttercream and sprinkles; it’s a great balance that prevents them from becoming too sweet.

Mickey Mouse Celebration Whoopie Pies // magicaltreatsathome.com

Now let’s talk about the white chocolate medallion. This was purely an optional step on my part to really recreate what you get in the parks. The Mickey Mouse design on there is done with a printer outfitted with edible inks!! I have one!! If you are considering purchasing one, they’re not really that expensive. But unless you are doing lots of decorating that requires such a thing (or, *coughcough*, starting a side project based on a certain theme park’s foods), this is definitely not something you need to get. My kids didn’t even bother eating the medallion because they found the artwork too interesting to destroy.

Mickey Mouse Celebration Whoopie Pies // magicaltreatsathome.com

One tool that I do find helpful for making the whoopie pies is a disher. Dishers are used a lot by institutions for serving food that needs to be a certain amount. They are usually color coded to help identify them in the kitchen. However, they are excellent products to have in your kitchen since they scoop perfect sized cookies, or ice cream, or meatballs, or anything else that needs to be measured. A blue handled, #16, 2 ounce disher is the perfect way to dish out the batter for each whoopie pie half (yes, there is FOUR OUNCES OF CAKE you’re getting per whoopie pie). Feel free to size this down though if you’d like more petite whoopie pies. You’ll need to reduce baking time though depending on how small you go.

Mickey Mouse Celebration Whoopie Pies // magicaltreatsathome.com

Ok, I feel like I’ve written enough here, let’s make some whoopie pies!

Mickey Mouse Celebration Whoopie Pies // magicaltreatsathome.com
Print
clock clock iconcutlery cutlery iconflag flag iconfolder folder iconinstagram instagram iconpinterest pinterest iconfacebook facebook iconprint print iconsquares squares iconheart heart iconheart solid heart solid icon
Mickey Mouse Celebration Whoopie Pies // magicaltreatsathome.com

Mickey Mouse Celebration Whoopie Pies

5 Stars 4 Stars 3 Stars 2 Stars 1 Star No reviews
  • Author: Elana Lepkowski
  • Yield: 5 cakes
Print Recipe
Pin Recipe

Description

Rich chocolate whoopie pies are filled with sweet vanilla buttercream, sprinkled with Mickey Mouse decorettes, and topped with a white chocolate Celebration Mickey Mouse. A Disneyland-inspired treat from the “Get Your Ears On” celebration.


Ingredients

Cakes:

1/2 lb. butter

1 cup light brown sugar, packed

1 egg

1 teaspoon baking powder

1/2 teaspoon baking soda

3/4 teaspoon salt

1 teaspoon vanilla extract

1/2 cup cocoa, dutch-processed

10 ounces all purpose flour

1 cup milk (or milk substitute like almond)

Filling (this filling can be doubled if you want extra filling):

1/2 stick (2 ounces) unsalted butter, room temperature

1/2 pound powdered sugar

2-1/2 tablespoons heavy cream

Mickey Mouse celebration decorettes
2-1/2 ounces white candy melts, optional (for medallions)

Tools:
#16, 2 ounce disher


Instructions

Filling:

  1. Prepare the frosting by creaming together the butter and powdered sugar until smooth.
  2. Pour in the heavy cream until incorporated. Filling can be kept refrigerated in a sealed container up to three days.

Cakes:

  1. Preheat oven to 350 degrees.
  2. Make the cakes by creaming the sugar and butter together until smooth. Add in the egg and mix until incorporated.
  3. Next add in baking powder, baking soda, salt and vanilla extract. Mix until well combined.
  4. Sift in cocoa powder and mix until combined.
  5. Mix in 1/2 of flour and 1/2 the milk, and then mix in second half of flour and then the rest of the milk. Stir until just combined.
  6. Scoop out a 1/4 cup of mixture (or use the #16 disher) onto a sheet pan covered in parchment. You can fit 5 scoops on each sheet pan. Bake 18-22 minutes until a toothpick comes out clean from the center.
    Mickey Mouse Celebration Whoopie Pies // magicaltreatsathome.com
  7. Cool on sheet pan and then transfer to a wire rack to finish cooling completely. Store in an air tight container until ready to use.
  8. To assemble, spread filling on flat side of one half of the cakes. Top with second half of cake.
  9. Sprinkle Mickey Mouse decorettes to sides of whoopie pies.
  10. Set any extra frosting aside to attach medallions if making.

Medallions (optional)

  1. Melt the white candy melts in a microwave safe container like glass for 30 seconds, stir, and then continue to microwave in short bursts of 15-20 seconds, stirring between times, until fully melted and smooth. Optionally, melt using a double boiler.
  2. Next, line 5 standard muffin tins, covering bottoms and all the way up the sides, with cling wrap.
  3. Pour in candy melts among the 5 tins, making sure it is evenly distributed.
  4. Let set about 30 minutes and then, using the cling wrap, gently remove the discs and set aside.
  5. If using a chocolate transfer design, follow the directions on the package and adhere to medallion.
  6. Use remaining frosting to add a dot to the top of each assembled whoopie pie and adhere the medallion to the top.

Notes

  • A disher will help get even, rounded whoopie pies that are also consistent in size.
  • Frosting can be made ahead of time and kept refrigerated up to 3 days.

Did you make this recipe?

Tag @magicaltreatsathome on Instagram and hashtag it #magicaltreatsathome

Mickey Mouse Celebration Whoopie Pies // magicaltreatsathome.com

Share this:

  • Click to share on Facebook (Opens in new window) Facebook
  • Click to share on X (Opens in new window) X

Like this:

Like Loading...

Filed Under: Recipes, Treats Tagged With: buttercream frosting, chocolate, Get Your Ears On, Grand Californian Hotel, Mickey Mouse, treat, White Water Snacks

Minnie Mouse Rice Krispie Treat Pops

May 20, 2019 by Elana Lepkowski 1 Comment

Minnie Mouse Rice Crispie Pops // magicaltreatsathome.com

Where can I find the original treat?

  • These treats can be found at the Candy Palace on Main Street in Disneyland.

Since we covered Mickey Mouse doughnuts last week, I figured it was definitely time to give Minnie Mouse a turn. If you’re looking for a nostalgic treat, these Minnie Mouse Rice Krispie Treat Pops fit the bill!

Minnie Mouse Rice Crispie Pops // magicaltreatsathome.com

Chewy, Minnie Mouse shaped rice krispie pops are dipped into red and light cocoa candy melts and decorated with red sprinkles, white buttons, and Minnie’s signature red bow. The trick to getting that chewiness is with the butter; don’t skimp on it or the rice krispie treats will turn rock hard. Still edible, but rock hard.

Minnie Mouse Rice Crispie Pops // magicaltreatsathome.com

Also, try not to use too large of a sauce pan to melt the marshmallows in. If there’s too much space once you add in the cereal, what happens is the marshmallows have too much space to move around in, and will start to dry out and form strings, making it harder to mix together. I used the red candy melts to also make the bows in addition to the dipped lower half. If you are more advanced with your chocolate, go ahead and use high quality white chocolate here with red food dye and temper.

Minnie Mouse Rice Crispie Pops // magicaltreatsathome.com

There are lots of variations of these rice krispie treats throughout the parks. If you have a favorite one, let us know in the comments below, or shoot us an email at hello@magicaltreatsathome.com and we’ll add it to our list of treats to make.

With this post, I’ve also started to note which recipes kids can participate. A big reason for starting this site, apart from having Disneyland treats whenever I want them, was to get my kids more involved with baking and cooking projects at home. I started helping in the kitchen at an early age (maybe four?), and that helped cement a life long love of creating with food. Many people find baking intimidating because they did not do it at home, or had parents who didn’t do it or let them help, and because baking is, well, more specific, it can seem daunting. So, if you’re a little uneasy with the idea of baking, these kid friendly recipes are a great place to start!

Minnie Mouse Rice Crispie Pops // magicaltreatsathome.com

Kid Friendly tips:

  • Older kids can complete this recipe from start to finish. Have an adult supervise when using the stove.
  • Elementary age kids can help cut out shapes, dip in chocolate, and put on the sprinkles and decorations.
  • Very young kids can help sprinkle on the sanding sugar. Sprinkling on decorations is always a good task for the very little ones! (If the sanding sugar on these looks a bit uneven that’s because my two year old helped me with that!)
Print
clock clock iconcutlery cutlery iconflag flag iconfolder folder iconinstagram instagram iconpinterest pinterest iconfacebook facebook iconprint print iconsquares squares iconheart heart iconheart solid heart solid icon
Minnie Mouse Rice Crispie Pops // magicaltreatsathome.com

Minnie Mouse Rice Krispie Treat Pops

5 Stars 4 Stars 3 Stars 2 Stars 1 Star No reviews
  • Author: Elana Lepkowski
  • Yield: 3 Minnie Mouse Pops
Print Recipe
Pin Recipe

Description

Crispy, chewy, chocolatey Minnie Mouse shaped rice krispie treat pops. A Disneyland-inspired treat.


Ingredients

For the rice krispie treat:
2 tablespoons butter, unsalted
157 g ( 2 cups) mini marshmallows or 10 jumbo marshmallows, ripped apart
1-1/2 cups crisped rice cereal

For the chocolate dips:
2 ounces light cocoa candy melts
2 ounces red candy melts

For the bow:
8 red candy melts
1/2 ounce white candy melts

Decorations:
red sanding sugar
white M&Ms

Tools:
Minnie Mouse cutter
parchment
9″ bread loaf pan
Minnie Mouse bow mold
lollipop sticks


Instructions

For the rice krispie treat:

  1. Before beginning, line a 9″ bread loaf pan with parchment.
  2. Combine the butter and marshmallows in a small sauce pan over medium heat. Stir constantly until marshmallows have melted and mixture is smooth.
  3. Immediately dump in the crisped rice cereal and mix to combine.
  4. Pour into the prepared loaf pan and gently press mixture into place with a rubber spatula. Set aside for at least an hour in the refrigerator so that the mixture can firm up enough to cut shapes.
  5. Once firm, use parchment to lift out rice krispie treats. Use a Minnie Mouse shaped cutter to cut out shapes and set aside.

To decorate:

  1. First, melt the light cocoa candy melts in the microwave inside a microwave safe bowl, like glass, for 30 seconds. Stir and microwave again for an additional 30 seconds. Keep stirring and microwaving in short bursts of 15-20 seconds until melted and smooth. Use can alternatively use a double boiler for melting.
  2. Once melted, dip top half of Minnie ears into the light cocoa. Set aside on parchment. Repeat for all treats.
  3. Using the method above, melt the red candy melts. Dip the lower half of the Minnie Mouse treat, letting any excess drip off. Immediately sprinkle with red sanding sugar and press 5 white M&Ms into the sanding sugar. Set aside.
  4. Make the bows by melting the remaining red candy melts using the method above. Pour into bow molds and set aside for 15 minutes.
  5. Melt the white candy melts in a microwave safe piping bag using the method above but kneading instead of stirring.
  6. Gently pop out bows and pipe small white polkadots on them. Set aside.
  7. Pipe a small amount of the white candy melts onto the center head part of the rice krispie and press the bow to “glue” on.
  8. Let everything stand for about 30 minutes and then enjoy!

Notes

The chocolate will be smoother if you use the flat side as opposed to the bumpy rice krispie side.

You can combine some extra rice krispie treat scraps into the mold to shape a third Minnie Mouse if you could not cleanly cut out 3 from your batch.

Treats can be kept in an air-tight container for up to 3 days.

Did you make this recipe?

Tag @magicaltreatsathome on Instagram and hashtag it #magicaltreatsathome

Share this:

  • Click to share on Facebook (Opens in new window) Facebook
  • Click to share on X (Opens in new window) X

Like this:

Like Loading...

Filed Under: Recipes, Treats Tagged With: candy melts, character treat, chocolate, Minnie Mouse, rice krispie treat, treat

Mickey Mouse Shorts Doughnuts

May 13, 2019 by Elana Lepkowski 1 Comment

Mickey Mouse Shorts Doughnuts // magicaltreatsathome.com

Where can I find the original treat?

  • These vanilla cake doughnuts can only be found at Craftsman Bar and Grill (formerly White Water Snacks) inside the Grand Californian Hotel in Downtown Disney.

I found myself googling “does Mickey Mouse wear pants or shorts?” this morning to make sure I was getting the title correct for this treat. Answer: most definitely shorts.

Mickey Mouse Shorts Doughnuts // magicaltreatsathome.com

And these are most definitely delicious and easy to make. My #1 easy tip for this is that you most certainly can use store bought doughnuts to make these. The actual treat from White Water snacks reminds me of grocery store doughnuts (like Donettes!), but today I’m also providing a super quick (and I mean quick!) recipe to make baked doughnuts. So put that vat of hot oil away for another day (like churro making day… we have a lot of those recipes coming up!).

Mickey Mouse Shorts Doughnuts // magicaltreatsathome.com

One surprise after dissecting my doughnut to find out all the components… Disneyland uses M&Ms to make all their buttons for treats! Who knew? Well, maybe you if you’re like me and need to know how they make everything.

If you can find chocolate wafers, go ahead and use those for the ears, however since my chocolate wafers were on the small side, I used the same candy melts chocolate to make rounds in a mold, and then that chocolate was used again to coat the ears and doughnut.

Print
clock clock iconcutlery cutlery iconflag flag iconfolder folder iconinstagram instagram iconpinterest pinterest iconfacebook facebook iconprint print iconsquares squares iconheart heart iconheart solid heart solid icon
Mickey Mouse Shorts Doughnuts // magicaltreatsathome.com

Mickey Mouse Shorts Doughnuts

5 Stars 4 Stars 3 Stars 2 Stars 1 Star No reviews
  • Author: Elana Lepkowski
  • Yield: 6 doughnuts 1x
Print Recipe
Pin Recipe

Description

Vanilla cake doughnuts dipped in chocolate look a lot like Mickey Mouse’s shorts. A Disneyland-inspired treat!


Ingredients

Scale

Vanilla Cake Doughnuts
Adapted from King Arthur Flour

2 tablespoons butter
25g (1/8 cup) vegetable oil (or refined coconut oil)
49g (1/3 cup) granulated sugar
35g (1/4 cup) brown sugar
1 large eggs
3/4 teaspoons baking powder
1/4 teaspoon baking soda
1/4 teaspoon salt
1/2 teaspoon vanilla extract
159g (1-1/3 cups) Unbleached All-Purpose Flour
113g (1/2 cup) milk (or milk substitute like almond milk)

Chocolate Discs

1–1/2 ounces light cocoa candy melts

Decorating

5–1/2 ounces light cocoa candy melts
3-1/2 ounces red candy melts
12 yellow M&Ms


Instructions

For the doughnuts:

  1. Preheat the oven to 425°F. Lightly grease one standard doughnut pan.
  2. In a medium-sized mixing bowl, beat together the butter, vegetable oil, and sugars until smooth.
  3. Add the eggs, beating to combine.
  4. Stir in the baking powder, baking soda, salt, and vanilla.
  5. Stir the flour into the butter mixture alternately with the milk, beginning and ending with the flour and making sure everything is thoroughly combined. 
  6. Spoon the batter into the lightly greased doughnut pans, filling the wells to about 1/4″ shy of the rim.
  7. Bake the doughnuts for 10 minutes. Remove them from the oven, and wait 5 to 7 minutes before turning them out of the pans onto a rack.

For the Chocolate Discs:

  1. Melt candy melts in a microwave safe bowl (preferably glass) or piping bag for 30 seconds. Stir, and continue to microwave in short bursts until fully melted and smooth. (I found once more at 30 seconds and then again at 20 seconds worked for me, but your microwave may be different)
  2. Pour melted chocolate into round molds about 1/8″ high or alternatively, pipe out into rounds on parchment.
  3. Wait 10 minutes and then remove from molds. The discs are ready to use.
    Mickey Mouse Shorts Doughnuts // magicaltreatsathome.com

For assembly and decorating:

  1. Start by cutting two slits for the chocolate discs in each doughnut for the ears along the seam line of the doughnut. Insert the discs halfway into the doughnut. Set aside.
  2. Melt the light cocoa candy melts following the method above. Alternatively you can do this over a double boiler as well.
  3. Dip the doughnut half including the “ears” into the melted light cocoa candy melts. See note below if you have trouble keeping the discs in place.
  4. Set the dipped doughnuts down on parchment and melt the red candy melts using the same method above or in a double boiler. Dip the bottom half of the doughnut in the red candy melts, overlapping with the light cocoa candy melts. Immediately press two yellow M&Ms into the red to make Mickey’s buttons. Set aside.
  5. These take about 30 minutes to fully set and can be eaten then, or stored in an air tight container for up to 3 days.

Notes

  • Several components can be purchased instead of made. The doughnuts and chocolate discs can be store-bought and assembled.
  • If the discs pop out while dipping the doughnut into the melted chocolate, remove them and dip the doughnut separately, and then they can be dipped separately in the melted chocolate and inserted into the doughnuts.
  • Never rest items that have been dipped into candy melts on a wire rack. Always use parchment paper or you risk the melted chocolate fusing onto the wires and ripping off once cool.

Did you make this recipe?

Tag @magicaltreatsathome on Instagram and hashtag it #magicaltreatsathome

Share this:

  • Click to share on Facebook (Opens in new window) Facebook
  • Click to share on X (Opens in new window) X

Like this:

Like Loading...

Filed Under: Recipes, Treats Tagged With: candy melts, character treat, chocolate, doughnut, Mickey Mouse, treat

Chocolate Covered Pineapple Spears

May 6, 2019 by Elana Lepkowski 2 Comments

A Disneyland-inspired treat!

Disneyland Inspired Chocolate Covered Pineapple Spears // magicaltreatsathome.com

Where can I find the original treat?

  • These treats can be found in Disneyland, DCA, and Downtown Disney!

This treat might seem a bit odd to kick off a site devoted to making all the delicious foods found at Disneyland and Disney’s California Adventure. Sure, I never gave this treat a second look when I was visiting the park until I saw a photo on Instagram. And then it soon became one of my FAVORITE treats and I don’t even feel like I’m particularly indulging because… well, FRUIT. The combination of tart pineapple with rich, dark chocolate is just so delish.

Disneyland Inspired Chocolate Covered Pineapple Spears // magicaltreatsathome.com

Eating this can kinda be a bit of a HOT MESS at the parks too, especially while trying to act totally casual in front of crowds of people while juice runs down your face and hands. And arms. And maybe even your shirt. At home you can eat this over the sink with or without a shirt on. You can also make them small, or even use pineapple chunks and just pop a few at a time. Actually, that sounds so good I’m going to go and do that right now.

Disneyland Inspired Chocolate Covered Pineapple Spears // magicaltreatsathome.com

But first, of course, the recipe. To create that snappy exterior, the chocolate must be tempered and I have an easy microwave how-to below with a few tips at the end. However, if you just want to enjoy that pineapple spear dipped in chocolate, then just go ahead and melt some chocolate and dip away!

Disneyland Inspired Chocolate Covered Pineapple Spears // magicaltreatsathome.com

Tell me, have you tried one of these chocolate covered pineapple spears? Was it love at first bite?

Print
clock clock iconcutlery cutlery iconflag flag iconfolder folder iconinstagram instagram iconpinterest pinterest iconfacebook facebook iconprint print iconsquares squares iconheart heart iconheart solid heart solid icon
Disneyland Inspired Chocolate Covered Pineapple Spears // magicaltreatsathome.com

Chocolate Covered Pineapple Spears

5 Stars 4 Stars 3 Stars 2 Stars 1 Star No reviews
  • Author: Elana Lepkowski
  • Yield: 6–8 chocolate covered pineapple spears 1x
Print Recipe
Pin Recipe

Description

Juicy pineapple spears enrobed in rich, bittersweet chocolate. A Disneyland-inspired treat!


Ingredients

Scale

6–8 pineapple spears about 4″-5″ in length
8 ounces (227 g) 70% bittersweet chocolate, finely chopped and divided
2 ounces (60 grams) white candy melts
6″ lollipop sticks


Instructions

  1. First, pat your pineapple spears to remove any excess juice on the outside and set aside. 
  2. Next, temper the chocolate. In a microwave safe bowl, add 2/3 of the chocolate. Microwave for 30 seconds, stir, microwave for another 30 seconds. Stir again and microwave in short bursts of 15-20 seconds until chocolate has uniformly melted and has reached between 114° – 118°F. Then add in some of the remaining chocolate, stir to completely melt and then add more (I did three batches). Continue to stir the chocolate until it has cooled to 88° – 89°F. The chocolate is now tempered and ready to use.
  3. Working quickly, dip each pineapple spear in the chocolate and use a fork to turn it around and remove the spear, letting any excess chocolate drip off before placing onto a sheet pan lined with parchment paper.
  4. Next, in a microwave safe pastry bag, pour in white candy melts and microwave for 30 seconds. Knead the bag and microwave in 20-30 second bursts, kneading in between each round. When fully melted, snip end of bag to make a small hole for piping. Pipe across pineapples to make stripes.
  5. Insert a lollipop stick into each pineapple base. Will keep refrigerated up to 3 days. 

Notes

Tempering Chocolate tips:

  • Tempering chocolate creates a glossy sheen and a crisp snap
  • Using short bursts of time makes controlling the temperature easier
  • Keep all moisture and liquids away from the chocolate while tempering
  • Use an instant read candy thermometer with a clip (we like this one)
  • If chocolate starts to cool, microwave for 5-10 seconds
  • If you do not have a candy thermometer, read this article on tempering without one: https://www.thekitchn.com/how-to-temper-chocolate-without-a-thermometer-cooking-lessons-from-the-kitchn-196475
  • And if you don’t have the time to temper your chocolate, just melt and dip and eat!

Did you make this recipe?

Tag @magicaltreatsathome on Instagram and hashtag it #magicaltreatsathome

Disneyland Inspired Chocolate Covered Pineapple Spears // magicaltreatsathome.com

Share this:

  • Click to share on Facebook (Opens in new window) Facebook
  • Click to share on X (Opens in new window) X

Like this:

Like Loading...

Filed Under: Gluten Free, Recipes, Treats Tagged With: chocolate, disneyland, pineapple, treat

  • « Go to Previous Page
  • Go to page 1
  • Interim pages omitted …
  • Go to page 6
  • Go to page 7
  • Go to page 8

Primary Sidebar

Follow Us

  • Instagram
  • Facebook
  • X
  • Pinterest
  • Email
  • YouTube

Hi! My name is Elana, and that’s me shoving a Mickey Mouse shaped treat in my face. I love the treats at Disneyland. A lot. So much so I’ve dedicated an entire website to making all my favorites, and hopefully yours too, out of my home kitchen. My aim is to create Disneyland-inspired treats, with easy to follow directions, and many recipes geared towards getting the kids in the kitchen to help too! Because putting sprinkles on things is F-U-N.

Top With Sprinkles

Get Recipes in Your Inbox!

* indicates required

Look for this icon in posts to find Kid Friendly recipes!

Recent Posts

  • Matterhorn Macaroon
  • Caramel Gingerbread Cookie Sandwiches
  • Colorful Fruit Hand Pies
  • Classic Mickey Shaped Beignets
  • Carrot Cake Cookies

Archives

  • February 2023
  • December 2022
  • August 2022
  • January 2022
  • December 2021
  • November 2021
  • December 2020
  • November 2020
  • October 2020
  • September 2020
  • August 2020
  • July 2020
  • June 2020
  • May 2020
  • April 2020
  • March 2020
  • February 2020
  • January 2020
  • December 2019
  • November 2019
  • October 2019
  • September 2019
  • August 2019
  • July 2019
  • June 2019
  • May 2019

Copyright © 2025 Magical Treats at Home on the Foodie Pro Theme

%d