• Skip to primary navigation
  • Skip to main content
  • Skip to primary sidebar

Magical Treats at Home

  • About
  • Treats
  • Drinks
  • Savory
  • Favorite Tools
  • Etsy Shop

Archives for May 2019

Mickey Mouse Celebration Whoopie Pies

May 27, 2019 by Elana Lepkowski Leave a Comment

Mickey Mouse Celebration Whoopie Pies // magicaltreatsathome.com

Where can I find the original treat?

  • These specialty treats were found at the Grand Californian Hotel.

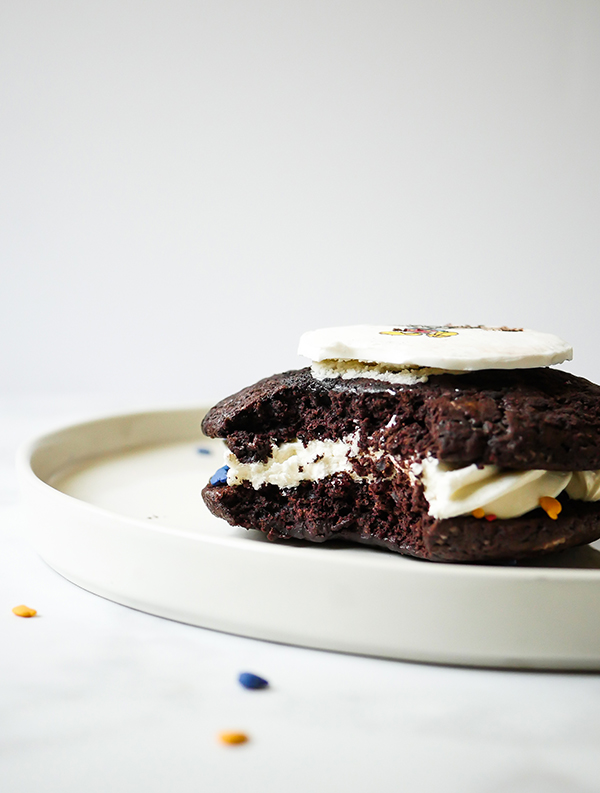
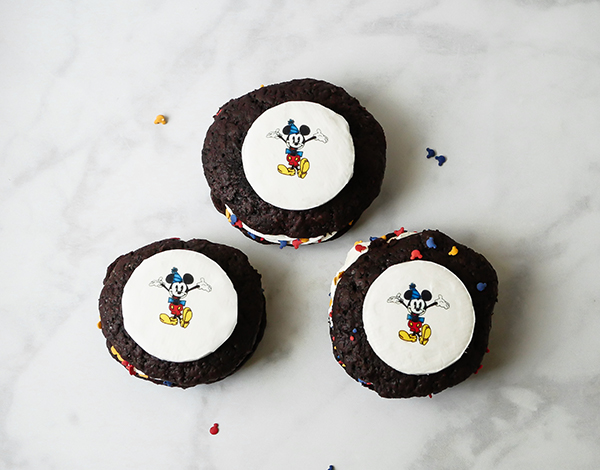
Disneyland’s “Get Your Ears On” celebration is sadly coming to a close this week at the parks, but that doesn’t mean the celebration has to stop in your kitchen! We’re popping back in to White Water Snacks at the Grand Californian Hotel to recreate their massive Mickey Mouse Celebration Whoopie Pie. Bonus: there’s sprinkles involved.

Mickey Mouse Celebration Whoopie Pies // magicaltreatsathome.com

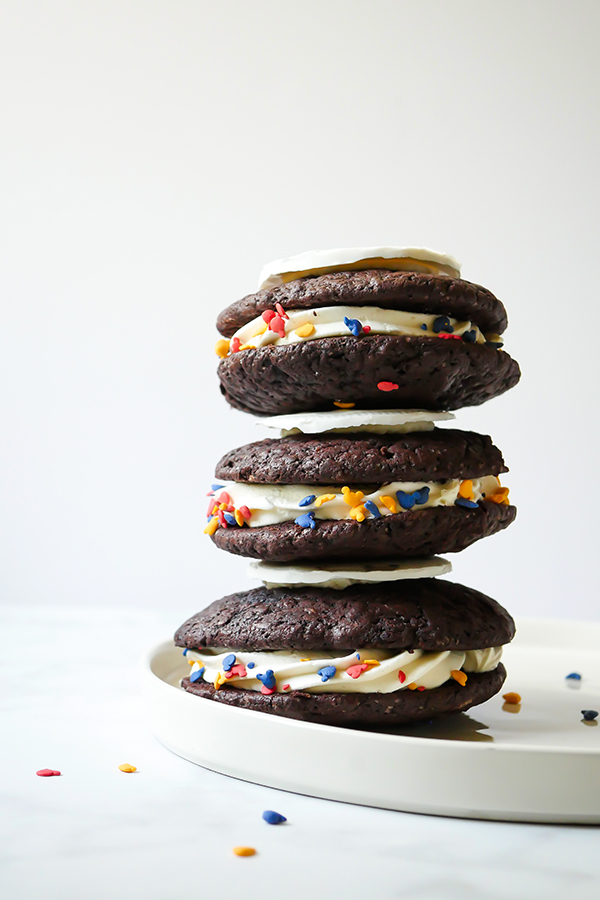
I consider myself a bit of a whoopie pie master. A few years back I decided to make some for a friend’s party and they were such a hit I feel like I haven’t stopped making them for friends and clients ever since. (I even made an adult’s only version with Kerrygold Irish Cream that is definitely worth checking out if that’s your thing.) The cakes are not super sweet because HELLO! they’re filled with vanilla buttercream and sprinkles; it’s a great balance that prevents them from becoming too sweet.

Mickey Mouse Celebration Whoopie Pies // magicaltreatsathome.com

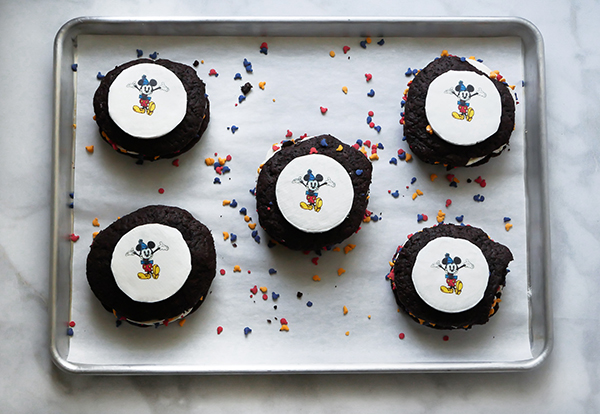
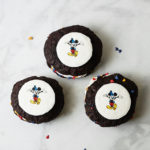
Now let’s talk about the white chocolate medallion. This was purely an optional step on my part to really recreate what you get in the parks. The Mickey Mouse design on there is done with a printer outfitted with edible inks!! I have one!! If you are considering purchasing one, they’re not really that expensive. But unless you are doing lots of decorating that requires such a thing (or, *coughcough*, starting a side project based on a certain theme park’s foods), this is definitely not something you need to get. My kids didn’t even bother eating the medallion because they found the artwork too interesting to destroy.

Mickey Mouse Celebration Whoopie Pies // magicaltreatsathome.com

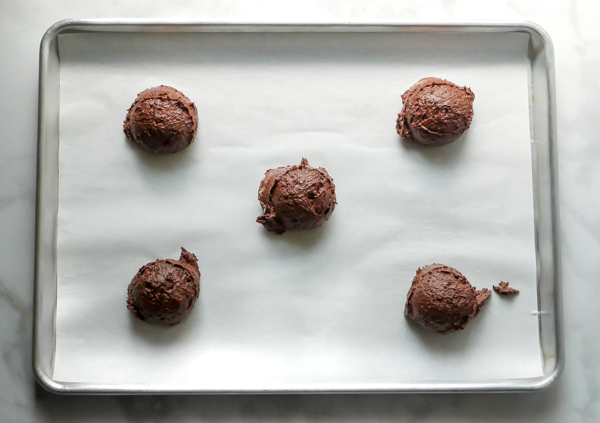
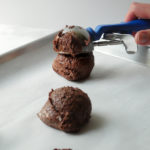
One tool that I do find helpful for making the whoopie pies is a disher. Dishers are used a lot by institutions for serving food that needs to be a certain amount. They are usually color coded to help identify them in the kitchen. However, they are excellent products to have in your kitchen since they scoop perfect sized cookies, or ice cream, or meatballs, or anything else that needs to be measured. A blue handled, #16, 2 ounce disher is the perfect way to dish out the batter for each whoopie pie half (yes, there is FOUR OUNCES OF CAKE you’re getting per whoopie pie). Feel free to size this down though if you’d like more petite whoopie pies. You’ll need to reduce baking time though depending on how small you go.

Mickey Mouse Celebration Whoopie Pies // magicaltreatsathome.com

Ok, I feel like I’ve written enough here, let’s make some whoopie pies!

Mickey Mouse Celebration Whoopie Pies // magicaltreatsathome.com
Print
clock clock iconcutlery cutlery iconflag flag iconfolder folder iconinstagram instagram iconpinterest pinterest iconfacebook facebook iconprint print iconsquares squares iconheart heart iconheart solid heart solid icon
Mickey Mouse Celebration Whoopie Pies // magicaltreatsathome.com

Mickey Mouse Celebration Whoopie Pies

5 Stars 4 Stars 3 Stars 2 Stars 1 Star No reviews
  • Author: Elana Lepkowski
  • Yield: 5 cakes
Print Recipe
Pin Recipe

Description

Rich chocolate whoopie pies are filled with sweet vanilla buttercream, sprinkled with Mickey Mouse decorettes, and topped with a white chocolate Celebration Mickey Mouse. A Disneyland-inspired treat from the “Get Your Ears On” celebration.


Ingredients

Cakes:

1/2 lb. butter

1 cup light brown sugar, packed

1 egg

1 teaspoon baking powder

1/2 teaspoon baking soda

3/4 teaspoon salt

1 teaspoon vanilla extract

1/2 cup cocoa, dutch-processed

10 ounces all purpose flour

1 cup milk (or milk substitute like almond)

Filling (this filling can be doubled if you want extra filling):

1/2 stick (2 ounces) unsalted butter, room temperature

1/2 pound powdered sugar

2-1/2 tablespoons heavy cream

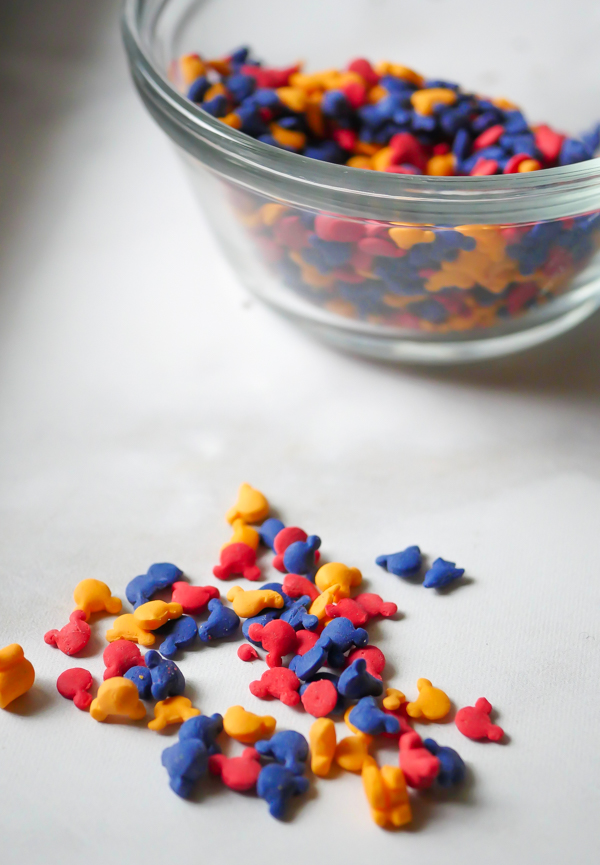
Mickey Mouse celebration decorettes
2-1/2 ounces white candy melts, optional (for medallions)

Tools:
#16, 2 ounce disher


Instructions

Filling:

  1. Prepare the frosting by creaming together the butter and powdered sugar until smooth.
  2. Pour in the heavy cream until incorporated. Filling can be kept refrigerated in a sealed container up to three days.

Cakes:

  1. Preheat oven to 350 degrees.
  2. Make the cakes by creaming the sugar and butter together until smooth. Add in the egg and mix until incorporated.
  3. Next add in baking powder, baking soda, salt and vanilla extract. Mix until well combined.
  4. Sift in cocoa powder and mix until combined.
  5. Mix in 1/2 of flour and 1/2 the milk, and then mix in second half of flour and then the rest of the milk. Stir until just combined.
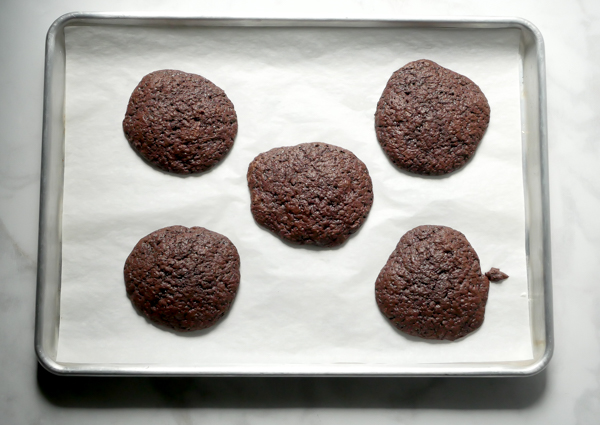
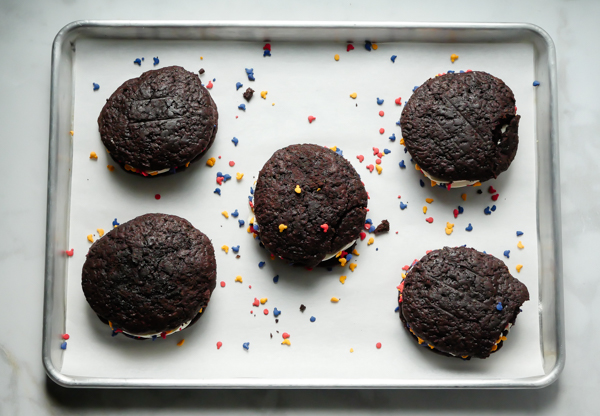
  6. Scoop out a 1/4 cup of mixture (or use the #16 disher) onto a sheet pan covered in parchment. You can fit 5 scoops on each sheet pan. Bake 18-22 minutes until a toothpick comes out clean from the center.
    Mickey Mouse Celebration Whoopie Pies // magicaltreatsathome.com
  7. Cool on sheet pan and then transfer to a wire rack to finish cooling completely. Store in an air tight container until ready to use.
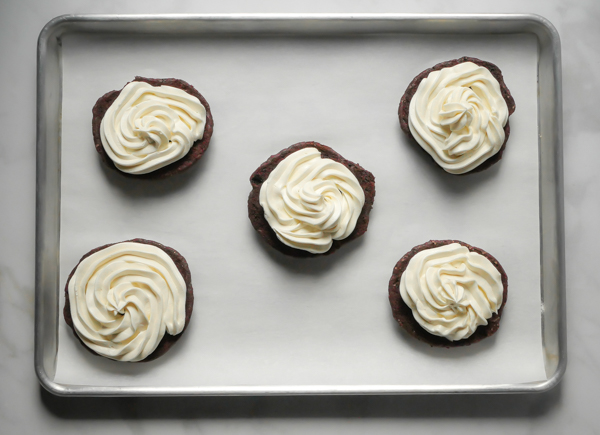
  8. To assemble, spread filling on flat side of one half of the cakes. Top with second half of cake.
  9. Sprinkle Mickey Mouse decorettes to sides of whoopie pies.
  10. Set any extra frosting aside to attach medallions if making.

Medallions (optional)

  1. Melt the white candy melts in a microwave safe container like glass for 30 seconds, stir, and then continue to microwave in short bursts of 15-20 seconds, stirring between times, until fully melted and smooth. Optionally, melt using a double boiler.
  2. Next, line 5 standard muffin tins, covering bottoms and all the way up the sides, with cling wrap.
  3. Pour in candy melts among the 5 tins, making sure it is evenly distributed.
  4. Let set about 30 minutes and then, using the cling wrap, gently remove the discs and set aside.
  5. If using a chocolate transfer design, follow the directions on the package and adhere to medallion.
  6. Use remaining frosting to add a dot to the top of each assembled whoopie pie and adhere the medallion to the top.

Notes

  • A disher will help get even, rounded whoopie pies that are also consistent in size.
  • Frosting can be made ahead of time and kept refrigerated up to 3 days.

Did you make this recipe?

Tag @magicaltreatsathome on Instagram and hashtag it #magicaltreatsathome

Mickey Mouse Celebration Whoopie Pies // magicaltreatsathome.com

Share this:

  • Click to share on Facebook (Opens in new window) Facebook
  • Click to share on X (Opens in new window) X

Like this:

Like Loading...

Filed Under: Recipes, Treats Tagged With: buttercream frosting, chocolate, Get Your Ears On, Grand Californian Hotel, Mickey Mouse, treat, White Water Snacks

Minnie Mouse Rice Krispie Treat Pops

May 20, 2019 by Elana Lepkowski 1 Comment

Minnie Mouse Rice Crispie Pops // magicaltreatsathome.com

Where can I find the original treat?

  • These treats can be found at the Candy Palace on Main Street in Disneyland.

Since we covered Mickey Mouse doughnuts last week, I figured it was definitely time to give Minnie Mouse a turn. If you’re looking for a nostalgic treat, these Minnie Mouse Rice Krispie Treat Pops fit the bill!

Minnie Mouse Rice Crispie Pops // magicaltreatsathome.com

Chewy, Minnie Mouse shaped rice krispie pops are dipped into red and light cocoa candy melts and decorated with red sprinkles, white buttons, and Minnie’s signature red bow. The trick to getting that chewiness is with the butter; don’t skimp on it or the rice krispie treats will turn rock hard. Still edible, but rock hard.

Minnie Mouse Rice Crispie Pops // magicaltreatsathome.com

Also, try not to use too large of a sauce pan to melt the marshmallows in. If there’s too much space once you add in the cereal, what happens is the marshmallows have too much space to move around in, and will start to dry out and form strings, making it harder to mix together. I used the red candy melts to also make the bows in addition to the dipped lower half. If you are more advanced with your chocolate, go ahead and use high quality white chocolate here with red food dye and temper.

Minnie Mouse Rice Crispie Pops // magicaltreatsathome.com

There are lots of variations of these rice krispie treats throughout the parks. If you have a favorite one, let us know in the comments below, or shoot us an email at hello@magicaltreatsathome.com and we’ll add it to our list of treats to make.

With this post, I’ve also started to note which recipes kids can participate. A big reason for starting this site, apart from having Disneyland treats whenever I want them, was to get my kids more involved with baking and cooking projects at home. I started helping in the kitchen at an early age (maybe four?), and that helped cement a life long love of creating with food. Many people find baking intimidating because they did not do it at home, or had parents who didn’t do it or let them help, and because baking is, well, more specific, it can seem daunting. So, if you’re a little uneasy with the idea of baking, these kid friendly recipes are a great place to start!

Minnie Mouse Rice Crispie Pops // magicaltreatsathome.com

Kid Friendly tips:

  • Older kids can complete this recipe from start to finish. Have an adult supervise when using the stove.
  • Elementary age kids can help cut out shapes, dip in chocolate, and put on the sprinkles and decorations.
  • Very young kids can help sprinkle on the sanding sugar. Sprinkling on decorations is always a good task for the very little ones! (If the sanding sugar on these looks a bit uneven that’s because my two year old helped me with that!)
Print
clock clock iconcutlery cutlery iconflag flag iconfolder folder iconinstagram instagram iconpinterest pinterest iconfacebook facebook iconprint print iconsquares squares iconheart heart iconheart solid heart solid icon
Minnie Mouse Rice Crispie Pops // magicaltreatsathome.com

Minnie Mouse Rice Krispie Treat Pops

5 Stars 4 Stars 3 Stars 2 Stars 1 Star No reviews
  • Author: Elana Lepkowski
  • Yield: 3 Minnie Mouse Pops
Print Recipe
Pin Recipe

Description

Crispy, chewy, chocolatey Minnie Mouse shaped rice krispie treat pops. A Disneyland-inspired treat.


Ingredients

For the rice krispie treat:
2 tablespoons butter, unsalted
157 g ( 2 cups) mini marshmallows or 10 jumbo marshmallows, ripped apart
1-1/2 cups crisped rice cereal

For the chocolate dips:
2 ounces light cocoa candy melts
2 ounces red candy melts

For the bow:
8 red candy melts
1/2 ounce white candy melts

Decorations:
red sanding sugar
white M&Ms

Tools:
Minnie Mouse cutter
parchment
9″ bread loaf pan
Minnie Mouse bow mold
lollipop sticks


Instructions

For the rice krispie treat:

  1. Before beginning, line a 9″ bread loaf pan with parchment.
  2. Combine the butter and marshmallows in a small sauce pan over medium heat. Stir constantly until marshmallows have melted and mixture is smooth.
  3. Immediately dump in the crisped rice cereal and mix to combine.
  4. Pour into the prepared loaf pan and gently press mixture into place with a rubber spatula. Set aside for at least an hour in the refrigerator so that the mixture can firm up enough to cut shapes.
  5. Once firm, use parchment to lift out rice krispie treats. Use a Minnie Mouse shaped cutter to cut out shapes and set aside.

To decorate:

  1. First, melt the light cocoa candy melts in the microwave inside a microwave safe bowl, like glass, for 30 seconds. Stir and microwave again for an additional 30 seconds. Keep stirring and microwaving in short bursts of 15-20 seconds until melted and smooth. Use can alternatively use a double boiler for melting.
  2. Once melted, dip top half of Minnie ears into the light cocoa. Set aside on parchment. Repeat for all treats.
  3. Using the method above, melt the red candy melts. Dip the lower half of the Minnie Mouse treat, letting any excess drip off. Immediately sprinkle with red sanding sugar and press 5 white M&Ms into the sanding sugar. Set aside.
  4. Make the bows by melting the remaining red candy melts using the method above. Pour into bow molds and set aside for 15 minutes.
  5. Melt the white candy melts in a microwave safe piping bag using the method above but kneading instead of stirring.
  6. Gently pop out bows and pipe small white polkadots on them. Set aside.
  7. Pipe a small amount of the white candy melts onto the center head part of the rice krispie and press the bow to “glue” on.
  8. Let everything stand for about 30 minutes and then enjoy!

Notes

The chocolate will be smoother if you use the flat side as opposed to the bumpy rice krispie side.

You can combine some extra rice krispie treat scraps into the mold to shape a third Minnie Mouse if you could not cleanly cut out 3 from your batch.

Treats can be kept in an air-tight container for up to 3 days.

Did you make this recipe?

Tag @magicaltreatsathome on Instagram and hashtag it #magicaltreatsathome

Share this:

  • Click to share on Facebook (Opens in new window) Facebook
  • Click to share on X (Opens in new window) X

Like this:

Like Loading...

Filed Under: Recipes, Treats Tagged With: candy melts, character treat, chocolate, Minnie Mouse, rice krispie treat, treat

Mickey Mouse Shorts Doughnuts

May 13, 2019 by Elana Lepkowski 1 Comment

Mickey Mouse Shorts Doughnuts // magicaltreatsathome.com

Where can I find the original treat?

  • These vanilla cake doughnuts can only be found at Craftsman Bar and Grill (formerly White Water Snacks) inside the Grand Californian Hotel in Downtown Disney.

I found myself googling “does Mickey Mouse wear pants or shorts?” this morning to make sure I was getting the title correct for this treat. Answer: most definitely shorts.

Mickey Mouse Shorts Doughnuts // magicaltreatsathome.com

And these are most definitely delicious and easy to make. My #1 easy tip for this is that you most certainly can use store bought doughnuts to make these. The actual treat from White Water snacks reminds me of grocery store doughnuts (like Donettes!), but today I’m also providing a super quick (and I mean quick!) recipe to make baked doughnuts. So put that vat of hot oil away for another day (like churro making day… we have a lot of those recipes coming up!).

Mickey Mouse Shorts Doughnuts // magicaltreatsathome.com

One surprise after dissecting my doughnut to find out all the components… Disneyland uses M&Ms to make all their buttons for treats! Who knew? Well, maybe you if you’re like me and need to know how they make everything.

If you can find chocolate wafers, go ahead and use those for the ears, however since my chocolate wafers were on the small side, I used the same candy melts chocolate to make rounds in a mold, and then that chocolate was used again to coat the ears and doughnut.

Print
clock clock iconcutlery cutlery iconflag flag iconfolder folder iconinstagram instagram iconpinterest pinterest iconfacebook facebook iconprint print iconsquares squares iconheart heart iconheart solid heart solid icon
Mickey Mouse Shorts Doughnuts // magicaltreatsathome.com

Mickey Mouse Shorts Doughnuts

5 Stars 4 Stars 3 Stars 2 Stars 1 Star No reviews
  • Author: Elana Lepkowski
  • Yield: 6 doughnuts 1x
Print Recipe
Pin Recipe

Description

Vanilla cake doughnuts dipped in chocolate look a lot like Mickey Mouse’s shorts. A Disneyland-inspired treat!


Ingredients

Scale

Vanilla Cake Doughnuts
Adapted from King Arthur Flour

2 tablespoons butter
25g (1/8 cup) vegetable oil (or refined coconut oil)
49g (1/3 cup) granulated sugar
35g (1/4 cup) brown sugar
1 large eggs
3/4 teaspoons baking powder
1/4 teaspoon baking soda
1/4 teaspoon salt
1/2 teaspoon vanilla extract
159g (1-1/3 cups) Unbleached All-Purpose Flour
113g (1/2 cup) milk (or milk substitute like almond milk)

Chocolate Discs

1–1/2 ounces light cocoa candy melts

Decorating

5–1/2 ounces light cocoa candy melts
3-1/2 ounces red candy melts
12 yellow M&Ms


Instructions

For the doughnuts:

  1. Preheat the oven to 425°F. Lightly grease one standard doughnut pan.
  2. In a medium-sized mixing bowl, beat together the butter, vegetable oil, and sugars until smooth.
  3. Add the eggs, beating to combine.
  4. Stir in the baking powder, baking soda, salt, and vanilla.
  5. Stir the flour into the butter mixture alternately with the milk, beginning and ending with the flour and making sure everything is thoroughly combined. 
  6. Spoon the batter into the lightly greased doughnut pans, filling the wells to about 1/4″ shy of the rim.
  7. Bake the doughnuts for 10 minutes. Remove them from the oven, and wait 5 to 7 minutes before turning them out of the pans onto a rack.

For the Chocolate Discs:

  1. Melt candy melts in a microwave safe bowl (preferably glass) or piping bag for 30 seconds. Stir, and continue to microwave in short bursts until fully melted and smooth. (I found once more at 30 seconds and then again at 20 seconds worked for me, but your microwave may be different)
  2. Pour melted chocolate into round molds about 1/8″ high or alternatively, pipe out into rounds on parchment.
  3. Wait 10 minutes and then remove from molds. The discs are ready to use.
    Mickey Mouse Shorts Doughnuts // magicaltreatsathome.com

For assembly and decorating:

  1. Start by cutting two slits for the chocolate discs in each doughnut for the ears along the seam line of the doughnut. Insert the discs halfway into the doughnut. Set aside.
  2. Melt the light cocoa candy melts following the method above. Alternatively you can do this over a double boiler as well.
  3. Dip the doughnut half including the “ears” into the melted light cocoa candy melts. See note below if you have trouble keeping the discs in place.
  4. Set the dipped doughnuts down on parchment and melt the red candy melts using the same method above or in a double boiler. Dip the bottom half of the doughnut in the red candy melts, overlapping with the light cocoa candy melts. Immediately press two yellow M&Ms into the red to make Mickey’s buttons. Set aside.
  5. These take about 30 minutes to fully set and can be eaten then, or stored in an air tight container for up to 3 days.

Notes

  • Several components can be purchased instead of made. The doughnuts and chocolate discs can be store-bought and assembled.
  • If the discs pop out while dipping the doughnut into the melted chocolate, remove them and dip the doughnut separately, and then they can be dipped separately in the melted chocolate and inserted into the doughnuts.
  • Never rest items that have been dipped into candy melts on a wire rack. Always use parchment paper or you risk the melted chocolate fusing onto the wires and ripping off once cool.

Did you make this recipe?

Tag @magicaltreatsathome on Instagram and hashtag it #magicaltreatsathome

Share this:

  • Click to share on Facebook (Opens in new window) Facebook
  • Click to share on X (Opens in new window) X

Like this:

Like Loading...

Filed Under: Recipes, Treats Tagged With: candy melts, character treat, chocolate, doughnut, Mickey Mouse, treat

Chocolate Covered Pineapple Spears

May 6, 2019 by Elana Lepkowski 2 Comments

A Disneyland-inspired treat!

Disneyland Inspired Chocolate Covered Pineapple Spears // magicaltreatsathome.com

Where can I find the original treat?

  • These treats can be found in Disneyland, DCA, and Downtown Disney!

This treat might seem a bit odd to kick off a site devoted to making all the delicious foods found at Disneyland and Disney’s California Adventure. Sure, I never gave this treat a second look when I was visiting the park until I saw a photo on Instagram. And then it soon became one of my FAVORITE treats and I don’t even feel like I’m particularly indulging because… well, FRUIT. The combination of tart pineapple with rich, dark chocolate is just so delish.

Disneyland Inspired Chocolate Covered Pineapple Spears // magicaltreatsathome.com

Eating this can kinda be a bit of a HOT MESS at the parks too, especially while trying to act totally casual in front of crowds of people while juice runs down your face and hands. And arms. And maybe even your shirt. At home you can eat this over the sink with or without a shirt on. You can also make them small, or even use pineapple chunks and just pop a few at a time. Actually, that sounds so good I’m going to go and do that right now.

Disneyland Inspired Chocolate Covered Pineapple Spears // magicaltreatsathome.com

But first, of course, the recipe. To create that snappy exterior, the chocolate must be tempered and I have an easy microwave how-to below with a few tips at the end. However, if you just want to enjoy that pineapple spear dipped in chocolate, then just go ahead and melt some chocolate and dip away!

Disneyland Inspired Chocolate Covered Pineapple Spears // magicaltreatsathome.com

Tell me, have you tried one of these chocolate covered pineapple spears? Was it love at first bite?

Print
clock clock iconcutlery cutlery iconflag flag iconfolder folder iconinstagram instagram iconpinterest pinterest iconfacebook facebook iconprint print iconsquares squares iconheart heart iconheart solid heart solid icon
Disneyland Inspired Chocolate Covered Pineapple Spears // magicaltreatsathome.com

Chocolate Covered Pineapple Spears

5 Stars 4 Stars 3 Stars 2 Stars 1 Star No reviews
  • Author: Elana Lepkowski
  • Yield: 6–8 chocolate covered pineapple spears 1x
Print Recipe
Pin Recipe

Description

Juicy pineapple spears enrobed in rich, bittersweet chocolate. A Disneyland-inspired treat!


Ingredients

Scale

6–8 pineapple spears about 4″-5″ in length
8 ounces (227 g) 70% bittersweet chocolate, finely chopped and divided
2 ounces (60 grams) white candy melts
6″ lollipop sticks


Instructions

  1. First, pat your pineapple spears to remove any excess juice on the outside and set aside. 
  2. Next, temper the chocolate. In a microwave safe bowl, add 2/3 of the chocolate. Microwave for 30 seconds, stir, microwave for another 30 seconds. Stir again and microwave in short bursts of 15-20 seconds until chocolate has uniformly melted and has reached between 114° – 118°F. Then add in some of the remaining chocolate, stir to completely melt and then add more (I did three batches). Continue to stir the chocolate until it has cooled to 88° – 89°F. The chocolate is now tempered and ready to use.
  3. Working quickly, dip each pineapple spear in the chocolate and use a fork to turn it around and remove the spear, letting any excess chocolate drip off before placing onto a sheet pan lined with parchment paper.
  4. Next, in a microwave safe pastry bag, pour in white candy melts and microwave for 30 seconds. Knead the bag and microwave in 20-30 second bursts, kneading in between each round. When fully melted, snip end of bag to make a small hole for piping. Pipe across pineapples to make stripes.
  5. Insert a lollipop stick into each pineapple base. Will keep refrigerated up to 3 days. 

Notes

Tempering Chocolate tips:

  • Tempering chocolate creates a glossy sheen and a crisp snap
  • Using short bursts of time makes controlling the temperature easier
  • Keep all moisture and liquids away from the chocolate while tempering
  • Use an instant read candy thermometer with a clip (we like this one)
  • If chocolate starts to cool, microwave for 5-10 seconds
  • If you do not have a candy thermometer, read this article on tempering without one: https://www.thekitchn.com/how-to-temper-chocolate-without-a-thermometer-cooking-lessons-from-the-kitchn-196475
  • And if you don’t have the time to temper your chocolate, just melt and dip and eat!

Did you make this recipe?

Tag @magicaltreatsathome on Instagram and hashtag it #magicaltreatsathome

Disneyland Inspired Chocolate Covered Pineapple Spears // magicaltreatsathome.com

Share this:

  • Click to share on Facebook (Opens in new window) Facebook
  • Click to share on X (Opens in new window) X

Like this:

Like Loading...

Filed Under: Gluten Free, Recipes, Treats Tagged With: chocolate, disneyland, pineapple, treat

Primary Sidebar

Follow Us

  • Instagram
  • Facebook
  • X
  • Pinterest
  • Email
  • YouTube

Hi! My name is Elana, and that’s me shoving a Mickey Mouse shaped treat in my face. I love the treats at Disneyland. A lot. So much so I’ve dedicated an entire website to making all my favorites, and hopefully yours too, out of my home kitchen. My aim is to create Disneyland-inspired treats, with easy to follow directions, and many recipes geared towards getting the kids in the kitchen to help too! Because putting sprinkles on things is F-U-N.

Top With Sprinkles

Get Recipes in Your Inbox!

* indicates required

Look for this icon in posts to find Kid Friendly recipes!

Recent Posts

  • Matterhorn Macaroon
  • Caramel Gingerbread Cookie Sandwiches
  • Colorful Fruit Hand Pies
  • Classic Mickey Shaped Beignets
  • Carrot Cake Cookies

Archives

  • February 2023
  • December 2022
  • August 2022
  • January 2022
  • December 2021
  • November 2021
  • December 2020
  • November 2020
  • October 2020
  • September 2020
  • August 2020
  • July 2020
  • June 2020
  • May 2020
  • April 2020
  • March 2020
  • February 2020
  • January 2020
  • December 2019
  • November 2019
  • October 2019
  • September 2019
  • August 2019
  • July 2019
  • June 2019
  • May 2019

Copyright © 2025 Magical Treats at Home on the Foodie Pro Theme

%d