• Skip to primary navigation
  • Skip to main content
  • Skip to primary sidebar

Magical Treats at Home

  • About
  • Treats
  • Drinks
  • Savory
  • Favorite Tools
  • Etsy Shop

fudge

Almond Mocha Shake

September 7, 2020 by Elana Lepkowski Leave a Comment

Almond Mocha Shake // magicaltreatsathome.com

Where can I find the original treat?

  • This treat was originally found at Shmoozies! in DCA as part of the Food and Wine Festival.

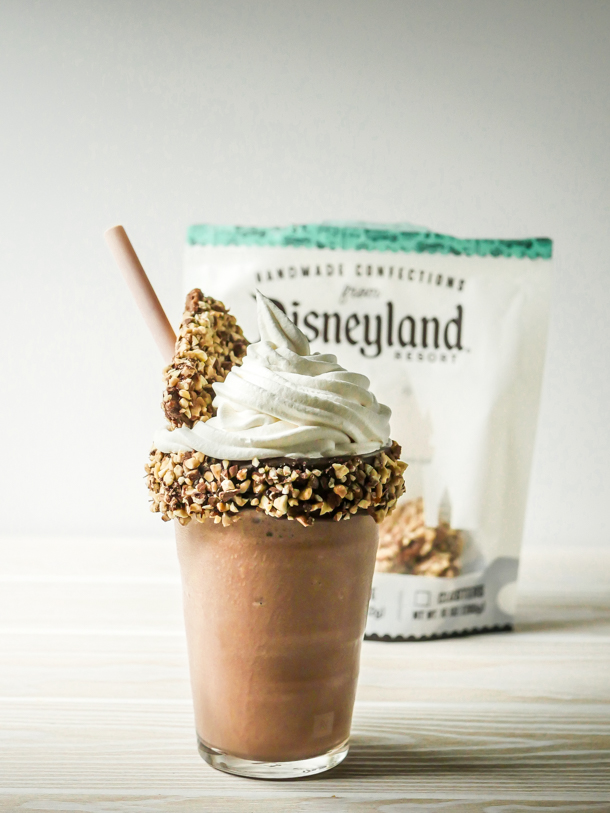
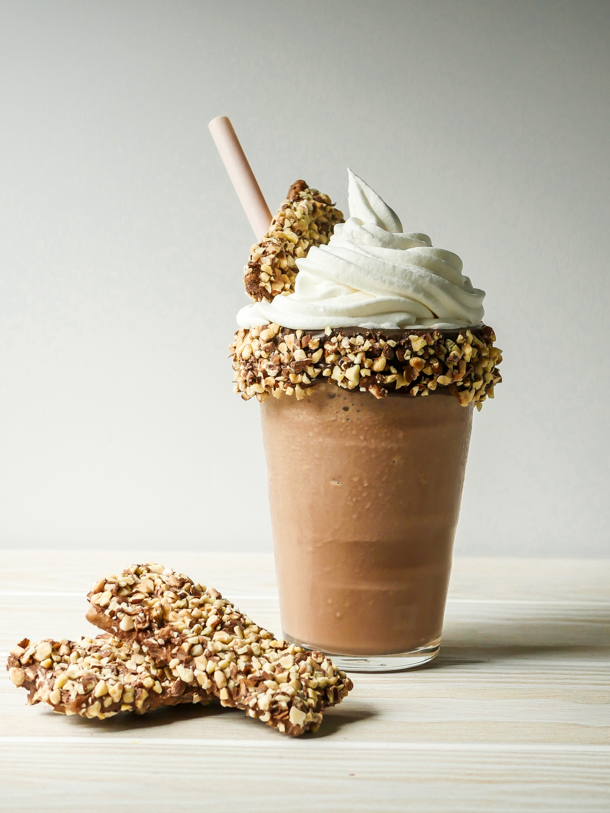
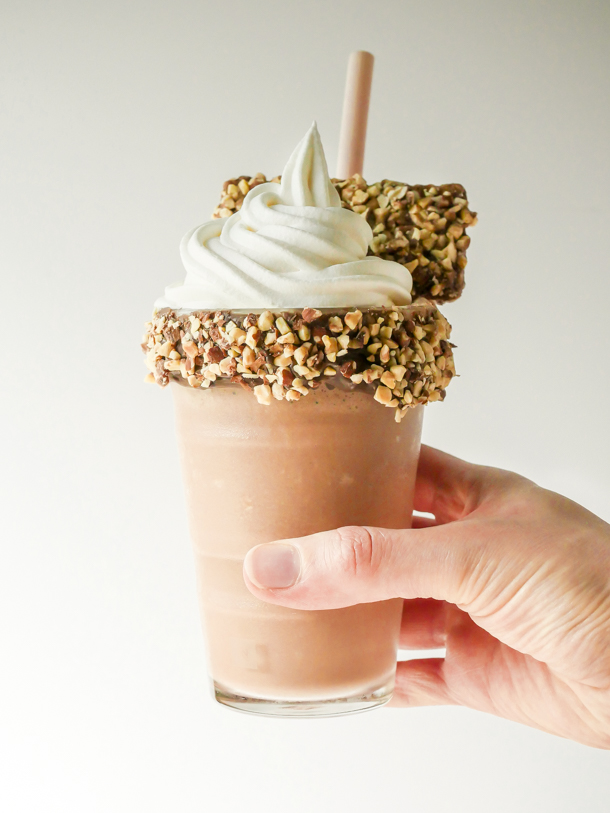
It’s been record-breaking hot in Southern California this weekend, and as today is the unofficial close to summer, I thought we’d end on a sweet, ice cold note. If there’s one thing you can rely on to cool you off and satisfy a sweet tooth at Disneyland, it’s their shakes. So today we’re making the Almond Mocha Shake, which happened to be the very last thing I ate when I was visiting California Adventure back in March for the Food and Wine Festival.

Almond Mocha Shake // magicaltreatsathome.com

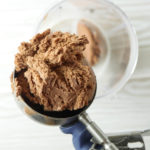
So no, for this recipe I will not ask you to make your own ice cream. That’s because I recently discovered that Disneyland uses Dreyer’s brand ice cream in the park. So, if you want an almond mocha shake… you can grab mocha almond fudge ice cream from the supermarket. For those of you who live on the east coast, that would be Edy’s brand (not Breyer’s!).

Almond Mocha Shake // magicaltreatsathome.com

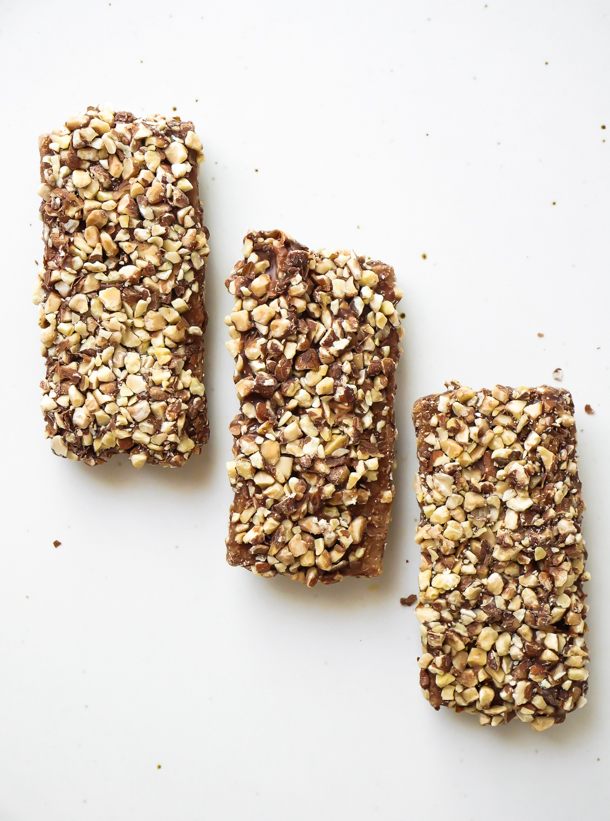
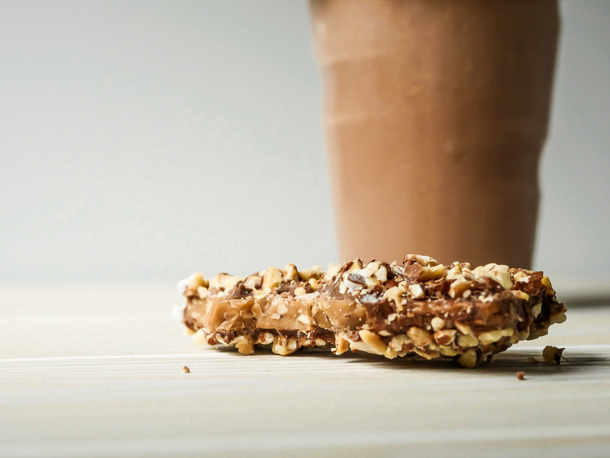
Now, one component here that you can either make yourself, or buy pre-made, is the English toffee. You’ve got a few options here. One, you can make it, and I have my favorite adaptation below. Second, if you’re able to get to Marceline’s in Downtown Disney, they are selling the English toffee BY THE BAG FULL!!!! It’s the exact kind you’d find on the shake and it’s a hefty bag and yes, I finished the whole package in less than two days… Your third option is to buy either an Almond Roca bar, a Skor bar, or Heath bar from the store. It won’t be the same as what you get on the shake, but it will be reminiscent of the original.

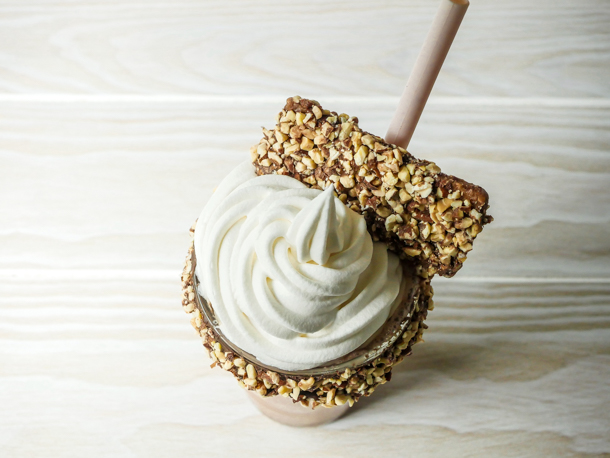
The third component of this shake is the whipped cream and here’s the thing about whipped cream on shakes in Disneyland: it’s thick. My guess is stabilizers in there, but it could also be something like Cool Whip (but not the actual brand). At home I make homemade whipped cream because I have a dispenser, but you could pick up a canister at the store. If you want your cream to be closer to what’s at the parks, I like the brand Truwhip. To create the swirl effect, spoon it semi frozen into a piping bag, attach a open star tip (or just cut the end off the bag), and pipe on top of the shake. 

Almond Mocha Shake // magicaltreatsathome.com

I love that this recipe can be quickly made by a few grocery store ingredients, but also can be adjusted to how much involvement you’d like in the kitchen. And since we’re making this on Labor Day, I say just buy the ingredients and give yourself a day off.

Kids can help assemble the ingredients and add them to the blender (I used my Magic Bullet for this and it was a perfect one serving container). They can also help decorate the glass and top with whipped cream. Older kids can help to make the English toffee due to the extremely high temperatures you need. I would not recommend it for the younger kids.

Almond Mocha Shake // magicaltreatsathome.com

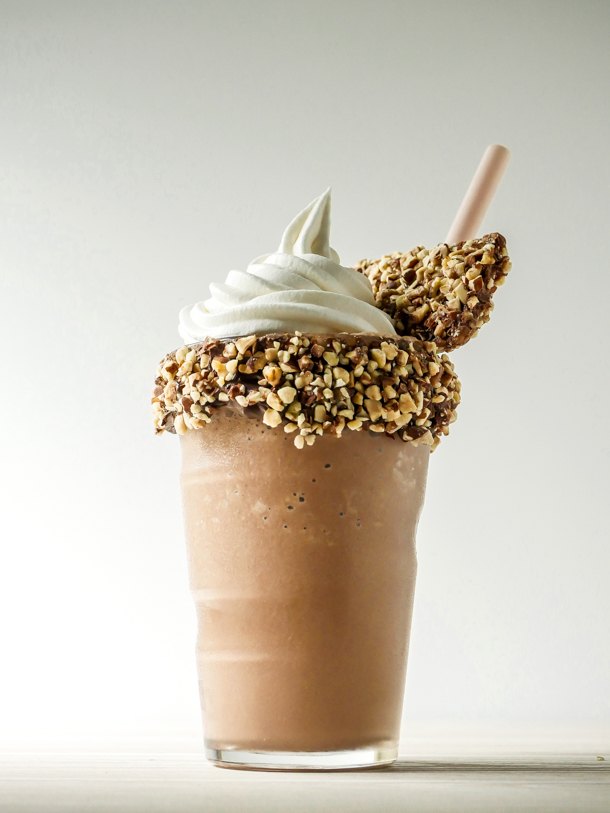
Extra credit: the shakes at Disneyland, like this shake, will sometimes come with a delicious decoration on the outside of the cup. Totally not necessary to enjoy at home unless you want the true park treat experience. So, if you’d like that, we’ve included the instructions below in the recipe card. It’s pretty easy, but it’s one more step.

Now let’s relax and blend up some magic!

Almond Mocha Shake // magicaltreatsathome.com
Print
clock clock iconcutlery cutlery iconflag flag iconfolder folder iconinstagram instagram iconpinterest pinterest iconfacebook facebook iconprint print iconsquares squares iconheart heart iconheart solid heart solid icon
Almond Mocha Shake // magicaltreatsathome.com

Almond Mocha Shake

5 Stars 4 Stars 3 Stars 2 Stars 1 Star No reviews
  • Author: Elana Lepkowski
  • Yield: 1 Almond Mocha Shake 1x
Print Recipe
Pin Recipe

Description

The 2020 Food and Wine Festival at DCA gave us this chocolatey-almond shake with buttery, crunchy toffee topping that you can make at home! A Disneyland-inspired recipe.


Ingredients

Scale

Almond Mocha Shake:

  • 3, 2 ounce scoops of Dreyer’s Mocha Almond Fudge ice cream
  • 1/4 cup milk, more or less to taste

English Toffee (adapted from King Arthur):

  • 16 tablespoons (227g) unsalted butter, cold

  • 1/2 teaspoon salt

  • 1–1/2 cups (298g) sugar

  • 3 tablespoons (43g) water

  • 1 tablespoon (21g) light corn syrup

  • 2 cups (227g) chopped peanuts, toasted (see notes below)

  • 2–2/3 cups (454g) semisweet or bittersweet chocolate, finely chopped; or chocolate chips


Toppings and Decorations:

  • 1/2 cup light cocoa candy melts, optional if decorating cup (see tips about what chocolate to use below)
  • 1/3 cup chopped peanuts, toasted, optional if decorating cup
  • whipped cream (or 1 cup heavy cream, 1 teaspoon each vanilla extract and simple syrup or liquid sweetener of your choice with directions below for making from scratch)

Specialty Tools:

  • Soda fountain pint glasses
  • Whipped cream dispenser
  • N2O chargers
  • reusable straws

Instructions

For the English Toffee:

  1. In a large, deep (3 quart) saucepan, melt the butter. Stir in the salt, sugar, water, and corn syrup, and bring the mixture to a boil. Boil gently over medium heat, without stirring, until the mixture reaches hard-crack stage (300°F on an instant-read or candy thermometer; you’ll be taking it off the heat a few degrees sooner). The syrup will bubble without seeming to change much for awhile, but be patient; all of a sudden it will darken, and at that point you need to take its temperature and see if it’s ready. (If you don’t have a thermometer, test a dollop in ice water; it should immediately harden to a brittleness sufficient that you’ll be able to snap it in two, without any bending or softness). This whole process should take about 10 to 12 minutes. Pay attention; too long on the heat, and the syrup will burn.
  2. While the sugar is boiling, spread half of the nuts in an even, closely packed layer on a parchment-lined 9″ x 13″ pan. Top the nuts with half the chocolate.
  3. When the syrup has reached 295°F, remove from the heat. Pour the syrup quickly and evenly over the nuts and chocolate. Top with the remaining chocolate and let sit for 2 to 3 minutes, until it softens; spread the chocolate with an offset spatula in an even layer and immediately sprinkle the remaining nuts on top.
  4. While the candy is still slightly warm, pull it out of the pan and use a thin spatula to loosen it from the parchment. When completely cool, break into chunks.

For the shake:

  1. Blend the ice cream and milk together until smooth. Set aside.
    Almond Mocha Shake // magicaltreatsathome.com

For the glass decoration (optional):

  1. Pour the chopped, toasted peanuts into a wide, shallow dish. Set aside.
  2. Melt the cocoa candy melts in a microwave safe bowl, like glass. Microwave for 30 seconds. Stir and microwave again for an additional 30 seconds. Keep stirring and microwaving in short bursts of 15-20 seconds until melted and smooth. Use can alternatively use a double boiler for melting or melt directly in a heat-safe piping bag.
    Almond Mocha Shake // magicaltreatsathome.com
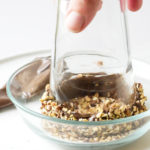
  3. Dip and coat the outer rim of a glass with the melted candy melts (or if melted in a pastry bag, clip the tip off and pipe the chocolate around the outer edge). Then dip into the chopped peanuts, turning to coat the entire outside rim. Place in the fridge for five minutes to harden.

Assembly:

  1. Pour the blended shake mixture into your prepared glass.
  2. Spoon or spray whipped cream on top of the shake mixture.
    Almond Mocha Shake // magicaltreatsathome.com
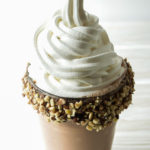
  3. Place a piece of English toffee in the whipped cream and enjoy!

Notes

  • To toast nuts, place in a frying pan over medium high heat. Stir peanuts around until they start to smell, well, toasty. This can take anywhere from 5-10 minutes depending on the heat of your stove. Keep watch though, as the oils from the nuts will cause they to scorch.
  • Cocoa melts are best to use for coating the glass because they will melt but not become too thin and liquid. Regular baking chocolate will be thinner and run more.
  • English toffee can be kept, wrapped, at room temperature for several weeks. Or frozen for longer storage.

Did you make this recipe?

Tag @magicaltreatsathome on Instagram and hashtag it #magicaltreatsathome

Almond Mocha Shake // magicaltreatsathome.com

Share this:

  • Click to share on Facebook (Opens in new window) Facebook
  • Click to share on X (Opens in new window) X

Like this:

Like Loading...

Filed Under: Recipes, Treats Tagged With: almond, DCA, disneyland, English toffee, Food and Wine Festival, fudge, ice cream, mocha, peanuts, Schmoozies, treat, whipped cream

African Sunshine Cupcake (Sunflower Cupcake)

April 4, 2020 by Elana Lepkowski Leave a Comment

African Sunshine Sunflower Cupcake // magicaltreatsathome.com

Where can I find the original treat?

  • This treat was originally found at The Mara in Disney’s Animal Kingdom Lodge.

How is it already a week since our last recipe?! Time sure is strange right now, at least for all of us at home. But, another week, another Disney treat. And this week we’re traveling from our home base here in SoCal to Florida to make the African Sunshine Cupcake that was at The Mara in Disney’s Animal Kingdom Lodge!

This sunflower cupcake was a request from a follower on Instagram. So, just a reminder to everyone that if there’s something you’d like to make and you don’t see it here on the site yet, just ask us and we’ll see if it’s something we can make! I’ll also point out that even though the cupcake recipe makes 12 total cupcakes, the buttercream should decorate about 6, as the other remaining 6 cupcakes we’ll crumble and use for our cake pop recipe in a few days!

African Sunshine Sunflower Cupcake // magicaltreatsathome.com

This treat is a chocolate cupcake flavored with orange extract and topped with a layer of fudge, chocolate crisp pearls, and yellow and green vanilla buttercream frosting. They sure are a pop of sunshine! And don’t let all those individual petals scare you into thinking this is more of an advanced decorating project; it’s not! I’ve got a quick video I’ll link to on our YouTube page (yes, we have one but it’s a bit sparse!) and it shows the technique for piping on the petals. In summary, you’ll want to start the tip at the inner edge of the baking cup and fold up and over to create some height for the flower petals since you’ll want an area to catch all the pearls in.

While you might want perfect petals for your cupcake, kids can help mix the cupcake batter, and pipe their own petals for the flowers. It’s a good lesson in patience to slowly get the buttercream to come out!

African Sunshine Sunflower Cupcake // magicaltreatsathome.com

If you’re wondering where the name comes from, Disney states that South Africa is the 10th largest producer of sunflowers in the world. Now let’s make some buttercream sunshine!

Print
clock clock iconcutlery cutlery iconflag flag iconfolder folder iconinstagram instagram iconpinterest pinterest iconfacebook facebook iconprint print iconsquares squares iconheart heart iconheart solid heart solid icon
African Sunshine Sunflower Cupcake // magicaltreatsathome.com

African Sunshine Cupcake (Sunflower Cupcake)

5 Stars 4 Stars 3 Stars 2 Stars 1 Star No reviews
  • Author: Elana Lepkowski
  • Yield: 6 Sunflower Cupcakes 1x
Print Recipe
Pin Recipe

Description

Bring a little sunshine into your home with these orange-chocolate cupcakes topped with bright yellow and green vanilla buttercream surrounding a pool of fudge and crisp chocolate pearls. A Walt Disney World inspired treat.


Ingredients

Scale

For the cupcakes (adapted from Sally’s Baking Addiction):

  • 3/4 cup (95g) all-purpose flour
  • 1/2 cup (45g) unsweetened natural cocoa powder
  • 3/4 teaspoon baking powder
  • 1/2 teaspoon baking soda
  • 1/4 teaspoon salt
  • 2 large eggs, at room temperature
  • 1/2 cup (100g) granulated sugar
  • 1/2 cup (100g) packed light brown sugar
  • 1/3 cup melted coconut oil or vegetable oil
  • 1 teaspoons pure vanilla extract
  • 1–1/2 teaspoons orange extract
  • 1/2 cup Greek yogurt, at room temperature

For the fudge:

  • 4 ounces sweetened condensed milk
  • 4 ounces semisweet chocolate, finely chopped
  • 1/2 teaspoon vanilla extract

For the buttercream:

  • 1 stick (1/2 cup) butter
  • 2 cups powdered sugar
  • 1 teaspoon vanilla extract
  • 1 teaspoon heavy cream, milk, or nondairy milk
  • green gel paste food coloring (I used Americolor Leaf Green)
  • yellow gel paste food coloring (I used Americolor Lemon Yellow)

Chocolate crisp pearls for decoration

Specialty Tools:

  • piping bags
  • leaf tip
  • baking cups

Instructions

For the cupcakes:

  1. Preheat the oven to 350°F. Line a 12-cup muffin pan with the baking cups. Set aside.
  2. Whisk the flour, cocoa powder, baking powder, baking soda, and salt together in a large bowl until thoroughly combined. Set aside. In a medium bowl, whisk the eggs, granulated sugar, brown sugar, oil, vanilla, and orange extract together until combined. Pour half of the wet ingredients into the dry ingredients. Then half of the Greek yogurt. Gently whisk until just combined. Repeat alternating with the remaining wet ingredients and Greek yogurt. Stir only until there are no visible white streaks of yogurt to avoid over-mixing the batter. This is a thin batter!
  3. Fill baking cups halfway with batter. Bake for 18-21 minutes, or until a toothpick inserted in the center comes out clean. Allow to cool completely before decorating. ** You will only need 6 for this recipe. Save the others for the cake pop recipe we’ll have in a few days!
    African Sunshine Sunflower Cupcake // magicaltreatsathome.com

For the fudge:

  1. While the cupcakes are baking, combine the sweetened condensed milk and chocolate in a heat safe bowl and microwave for 30 seconds. Stir and microwave an additional 30 seconds. If chocolate is still lumpy, microwave an additional 15 seconds. Stir rapidly until smooth.
  2. Add vanilla extract in and stir to combine.
  3. Set aside in fridge while cupcakes continue to bake. You’ll want a pour-able, but thick consistency. See notes below for making ahead.

For the frosting and decoration:

  1. Cream the butter in a mixer until light and fluffy; about 1 – 2 minutes.
  2. Add in powdered sugar and mix until all the sugar is incorporated.
  3. Pour in vanilla and cream/milk and beat again for an additional 30 seconds. You want a stiffer buttercream to pipe the sharp edges of the leaf and flower petals. If buttercream seems too wet (flops off your spoon), beat in an additional 1-2 tablespoons of powdered sugar.
  4. Once desired consistency has been reached, scoop out 1/4 of the buttercream and put in a bowl big enough to mix it around in. Add in 2 drops of green food coloring for the leaves. Mix the frosting until no white remains and then transfer to a piping bag fitted with the leaf tip. Set aside.
  5. Grab your fudge and spoon a small circle of fudge in the center of each cupcake, leaving room to pipe frosting on the outside (about a 1/4″).
    African Sunshine Sunflower Cupcake // magicaltreatsathome.com
  6. Then, pipe 3-4 leaves on each cupcake starting from the fudge and moving to the edge of the wrapper, set aside. Remove piping tip, clean it, and fit onto a new piping bag.
    African Sunshine Sunflower Cupcake // magicaltreatsathome.com
  7. To the remaining white frosting, add in 2-3 drops of the yellow food coloring. Mix well until there are no longer any white streaks. Transfer the yellow buttercream to the new piping bag.
  8. Pipe sunflower petals around the edges of the fudge in 2-3 layers, piping over the leaves until desired number of petals have been created. You’ll want a small well to pour in the crisp pearls so keep that in mind when building your layers.
  9. Finish your cupcakes by spooning about a tablespoon of chocolate crisp pearls into the center of each cupcake. Enjoy immediately or refrigerate in an airtight container up to 3 days.

Notes

  • The remaining cupcakes can be tightly wrapped in clingwrap and frozen for up to 6 months or crumbled and saved for cake pops.
  • If fudge is made ahead of time, remove from the refrigerator at least an hour to hour and a half prior to cupcakes being cool for decoration. If fudge is still stodgy, scoop out a small ball and warm between your hands, forming a disc to top cupcake with.
  • If petal or leaf tips are not available, you can make a DIY tip with just a pastry bag. Cut an inverse V in the tip of the bag and continue with the same piping movements.
  • Any extra buttercream can be frozen for up to 3 months. Defrost in the refrigerator the day before needed and rewhip until spreadable.

Did you make this recipe?

Tag @magicaltreatsathome on Instagram and hashtag it #magicaltreatsathome

African Sunshine Sunflower Cupcake // magicaltreatsathome.com

Share this:

  • Click to share on Facebook (Opens in new window) Facebook
  • Click to share on X (Opens in new window) X

Like this:

Like Loading...

Filed Under: Recipes, Treats Tagged With: buttercream frosting, chocolate, chocolate pearls, cupcakes, fudge, orange, sunflower, treat, WDW

Mickey S’more Square

August 12, 2019 by Elana Lepkowski Leave a Comment

Mickey S'more Square // magicaltreatsathome.com

Where can I find the original treat?

  • These treats can be found all over the Disneyland Resort.

Did you know that Saturday was National S’mores Day? Don’t worry, you won’t find it marked on the calendar, and there isn’t an elf that sneaks into your house at night and leaves s’mores in your shoes. It’s just an excuse to enjoy one of the BEST treats for summer. And Disneyland has you covered… with no fire required!

Mickey S'more Square // magicaltreatsathome.com

One of the year-round favorites at the resort, you can usually find this square at Candy Palace, Pooh Corner, Marceline’s in Downtown Disney, and Trolley Treats at DCA. And now you can have it at home too!

Mickey S'more Square // magicaltreatsathome.com

The Mickey S’more square is made up of a crisp graham cracker base, a layer of rich milk chocolate fudge, a layer of thick marshmallow, and it’s all covered in a semi-sweet chocolate topped with a yellow chocolate Mickey Mouse. Our recipe below has a few steps, but it all comes together fairly easily once you’re ready to assemble. There’s just the added wait time for the fudge to set up, and the chocolate to set. You WILL NOT need to make graham crackers for this recipe, however, if you do have a homemade recipe you love, by all means use it! We’re using store bought here for consistency and time. For your final square, the Mickey chocolate on top is definitely optional, but we do give an easy way to make one below too, just in case you want a few to snack on!

Mickey S'more Square // magicaltreatsathome.com

We won’t be making any campfires for this recipe, and the only fire you’ll see is on a gas stove, but you’ll definitely know you’re eating a S’more when you take a bite of this yummy treat.

Print
clock clock iconcutlery cutlery iconflag flag iconfolder folder iconinstagram instagram iconpinterest pinterest iconfacebook facebook iconprint print iconsquares squares iconheart heart iconheart solid heart solid icon
Mickey S'more Square // magicaltreatsathome.com

Mickey S’more Square

5 Stars 4 Stars 3 Stars 2 Stars 1 Star No reviews
  • Author: Elana Lepkowski
  • Yield: 6 S’mores Squares 1x
Print Recipe
Pin Recipe

Description

Layers of crisp graham crackers, rich milk chocolate fudge, and gooey marshmallow are covered in semi-sweet chocolate and topped with a yellow Mickey Mouse chocolate in this dessert reminiscent of the classic s’mores. A Disneyland-inspired treat!


Ingredients

Scale

For the Milk Chocolate Fudge:

  • 8 ounces (227 g) milk chocolate, finely chopped
  • 2 tablespoons unsalted butter
  • 7 ounces sweetened condensed milk
  • pinch teaspoon salt

For the Marshmallows:

  • 1–1/2 cups granulated sugar
  • 3/4 corn light corn syrup
  • pinch salt
  • 1 teaspoon vanilla extract
  • 2 packets of gelatine
  • 2/3 cups of water, divided

For assembly:

  • 6 graham cracker squares (3 large sheets broken in half)
  • 12 ounces (340 g) semi-sweet chocolate, finely chopped and divided
  • 2–1/2 ounces white chocolate (71 g), chopped, optional
  • yellow oil-based chocolate covering, optional

Special Tools:

  • Candy Thermometer
  • Mickey Mouse mold

Instructions

For the Milk Chocolate Fudge:

  1. Line a loaf pan with parchment paper or wax paper.
  2. In a double boiler, combine milk chocolate, butter, sweetened condensed milk, and salt. Stir occasionally, until smooth.
  3. Pour into loaf pan and chill, uncovered, until firm, about 4 hours. Set aside.

For the Marshmallows:

  1. Grease a loaf pan and line with parchment paper or wax paper. Grease top of paper as well. Set aside.
  2. In a medium saucepan over high heat, combine sugar, corn syrup, salt, and 1/3 cup of water. Stir to dissolve sugar. Once mixture reaches a boil, do not disturb. Let the mixture reach “soft ball” stage, approximately 238°F (use a candy thermometer or probe thermometer to get an accurate temperature).
  3. While syrup is boiling, in the bowl of a stand mixer, pour in the other 1/3 cup of water and sprinkle gelatine over it. Let sit for five minutes so water can absorb the gelatine. Not all of it will absorb and that’s ok.
  4. Then, attach the whisk attachment and turn mixer on slowest speed. Wearing oven mitts in case of splashing, slowly pour in the syrup mixture into the mixer. Whisk two minutes and then raise speed to medium. Whisk another two minutes and then gradually move speed to highest. Whisk another 3-5 minutes until mixture is stiff. Beat in vanilla extract for 30 seconds and then pour everything into the prepared pan. Mixture will be very sticky and you might not be able to get everything out of the bowl. See notes below. Mickey S'more Square // magicaltreatsathome.com
  5. Use wet fingers to smooth out the marshmallow top and let sit out, uncovered, until firm. About 3 hours.

Mickey Mouse chocolate toppers (optional)

  1. In a microwave safe bowl, combine chopped white chocolate and a few drops of the oil-based yellow food coloring.
  2. Heat in microwave for 30 seconds, stir, and continue to microwave in short 15 -20 second bursts, stirring between, until chocolate is melted and smooth.
  3. Pour into molds and let sit in the refrigerator about 30 minutes to harden. Remove from molds and set aside.

Assembly:

  1. First, temper the semi-sweet chocolate for coating: In a microwave safe bowl, add 2/3 of the chocolate. Microwave for 30 seconds, stir, microwave for another 30 seconds. Stir again and microwave in short bursts of 15-20 seconds until chocolate has uniformly melted and has reached between 114° – 118°F. Then add in some of the remaining chocolate, stir to completely melt and then add more (I did three batches). Continue to stir the chocolate until it has cooled to 88° – 89°F (this can take several minutes of stirring). The chocolate is now tempered and ready to use. Set aside.
  2. Un-mold the fudge from the pan and using a graham cracker as a guide, divide and cut the fudge to fit on the base of cracker. You may need to combine some pieces of fudge if your graham crackers are larger.
  3. Next, remove the marshmallow from the pan keeping it on the parchment. To square off ends of marshmallows, use a long, sharp knife to trim sides. Clean knife with hot water between cuts.
  4. Then, using a graham cracker as a guide, divide the pan into roughly 9 squares, using the same, long, sharp knife to make cuts. You will only need six of the marshmallows for this recipe. See notes below for storing extra marshmallows. Use damp fingers to remove marshmallows from each other if they get stuck together.
  5. Create each stack by starting with the graham cracker base, a piece of fudge, and then top with the marshmallow. Set aside on a sheet pan lined with parchment.
    Mickey S'more Square // magicaltreatsathome.com
  6. Dip each stack into the tempered chocolate, using a spoon to pour chocolate on top and let drip down sides. Use a chocolate fork or slotted spatula to remove the stack from the chocolate. Allow the chocolate to drip from the stack for a minute or two (or you’ll end up with lots of pooled chocolate) and then place on sheet pan. Repeat until all stacks have been dipped.
  7. If you are using the yellow chocolate Mickey Mouse topper, place one on each stack after you have dipped it.
  8. Allow everything to set at least 4 hours or overnight. Enjoy!

Notes

  • Making marshmallows is a sticky, hot mess. You will need to wear an apron, close toed shoes, and make sure you have a candy thermometer and the clear space to work.
  • Be OK with the fact that you were going to lose some of the marshmallow in the mixing bowl, on your spoon, and probably on your hands. It’s OK! You’ll have plenty left over.
  • Any leftover marshmallows in the pan can be cut and tossed in powdered sugar. Keep in an airtight container up to a week.
  • When tempering chocolate, keep all moisture and liquids away from the chocolate.
  • If chocolate starts to cool after it is tempered, microwave for 5-10 seconds.
  • A note on pan sizes. I mention that the fudge is made in a loaf pan and the marshmallows are made in an 8″ square pan. Both hold around 8 cups capacity so you would be able to make both in the 8″ square pan. I was able to get 6 squares of fudge from the loaf pan, I just had to smoosh a few pieces together as noted in the recipe above. Force of habit of making fudge in a loaf pan automatically had me write the recipe this way!

Did you make this recipe?

Tag @magicaltreatsathome on Instagram and hashtag it #magicaltreatsathome

Mickey S'more Square // magicaltreatsathome.com

Share this:

  • Click to share on Facebook (Opens in new window) Facebook
  • Click to share on X (Opens in new window) X

Like this:

Like Loading...

Filed Under: Recipes, Treats Tagged With: chocolate, DCA, disneyland, Downtown Disneyland, fudge, graham cracker, marshmallow, Mickey Mouse, treat

Primary Sidebar

Follow Us

  • Instagram
  • Facebook
  • X
  • Pinterest
  • Email
  • YouTube

Hi! My name is Elana, and that’s me shoving a Mickey Mouse shaped treat in my face. I love the treats at Disneyland. A lot. So much so I’ve dedicated an entire website to making all my favorites, and hopefully yours too, out of my home kitchen. My aim is to create Disneyland-inspired treats, with easy to follow directions, and many recipes geared towards getting the kids in the kitchen to help too! Because putting sprinkles on things is F-U-N.

Top With Sprinkles

Get Recipes in Your Inbox!

* indicates required

Look for this icon in posts to find Kid Friendly recipes!

Recent Posts

  • Matterhorn Macaroon
  • Caramel Gingerbread Cookie Sandwiches
  • Colorful Fruit Hand Pies
  • Classic Mickey Shaped Beignets
  • Carrot Cake Cookies

Archives

  • February 2023
  • December 2022
  • August 2022
  • January 2022
  • December 2021
  • November 2021
  • December 2020
  • November 2020
  • October 2020
  • September 2020
  • August 2020
  • July 2020
  • June 2020
  • May 2020
  • April 2020
  • March 2020
  • February 2020
  • January 2020
  • December 2019
  • November 2019
  • October 2019
  • September 2019
  • August 2019
  • July 2019
  • June 2019
  • May 2019

Copyright © 2025 Magical Treats at Home on the Foodie Pro Theme

%d