• Skip to primary navigation
  • Skip to main content
  • Skip to primary sidebar

Magical Treats at Home

  • About
  • Treats
  • Drinks
  • Savory
  • Favorite Tools
  • Etsy Shop

Archives for July 2020

Karamell-Küche Caramel Drizzled Mickey Mouse Crispy Treat

July 16, 2020 by Elana Lepkowski 2 Comments

Mickey Mouse Caramel Chocolate Crispy Treat // magicaltreatsathome.com

Where can I find the original treat?

  • This Walt Disney World treat was found in Epcot at Karamell–Küche.

I am in a Facebook group with a bunch of people who are fanatical about the caramel corn from Karamell-Küche inside the Germany pavillion at Epcot. But you will probably never see a recipe for that here for one little reason… I hate popcorn. From the smell to the tiny shells getting stuck in my gums, everything about popcorn is just a miss for me. I do, however, thoroughly enjoy the buttered popcorn flavor from Jelly Belly, and “butter” is my favorite flavor of KitKat. You WILL see some caramel treats from Karamell-Küche on here though, just not the popcorn. And today, we’ll be making the caramel drizzled Mickey Mouse shaped crispy treat.

Back in March I panicked about what might be hard to get once we were in quarantine and I ended up with a case of marshmallows. A case. Of marshmallows. You all might want to buckle up for more crispy treats and marshmallow wand ideas because I’ve got PLENTY.

Mickey Mouse Caramel Chocolate Crispy Treat // magicaltreatsathome.com

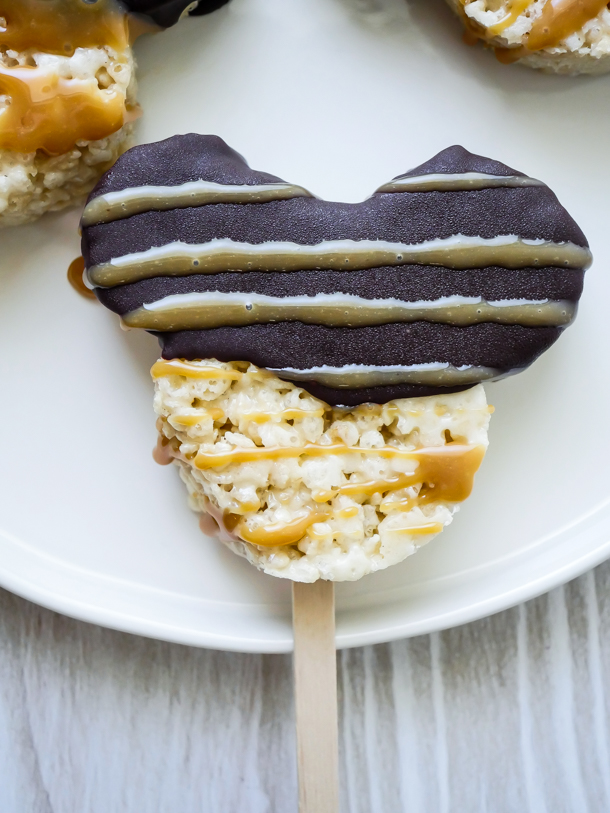
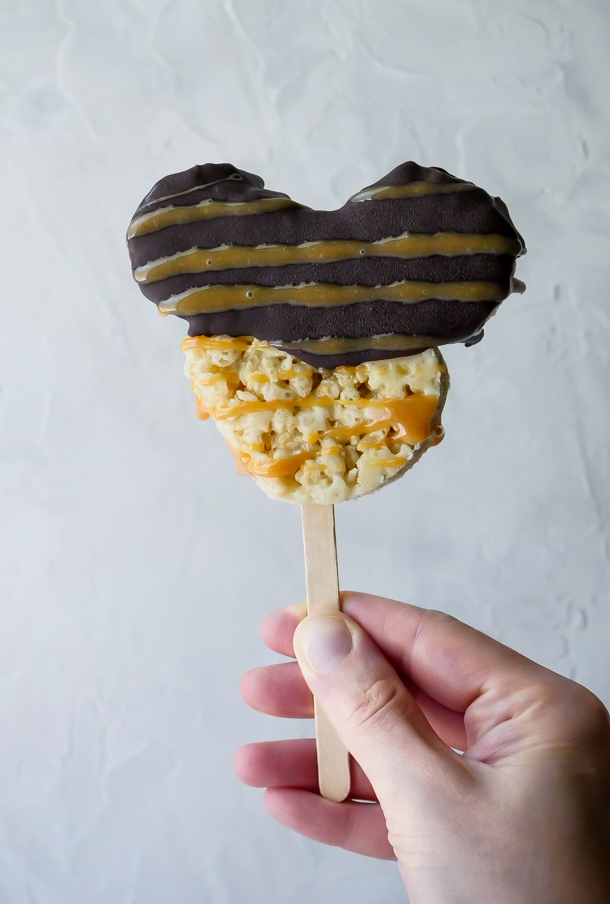
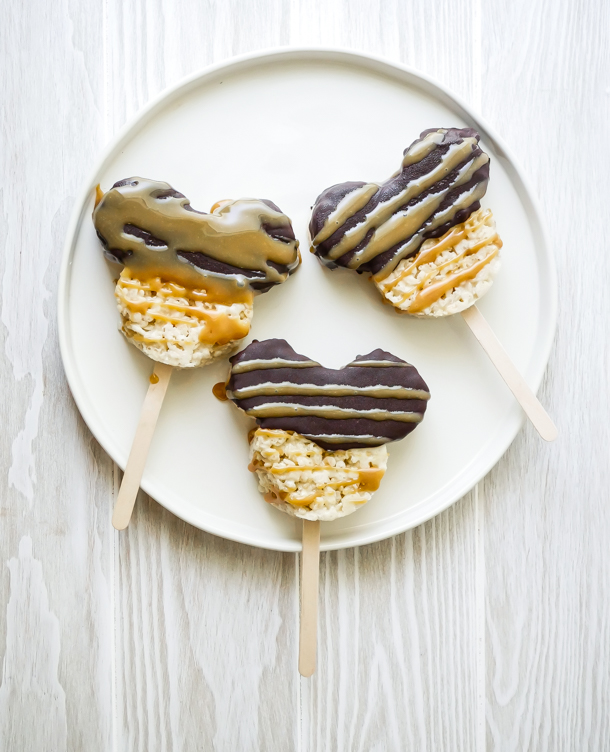
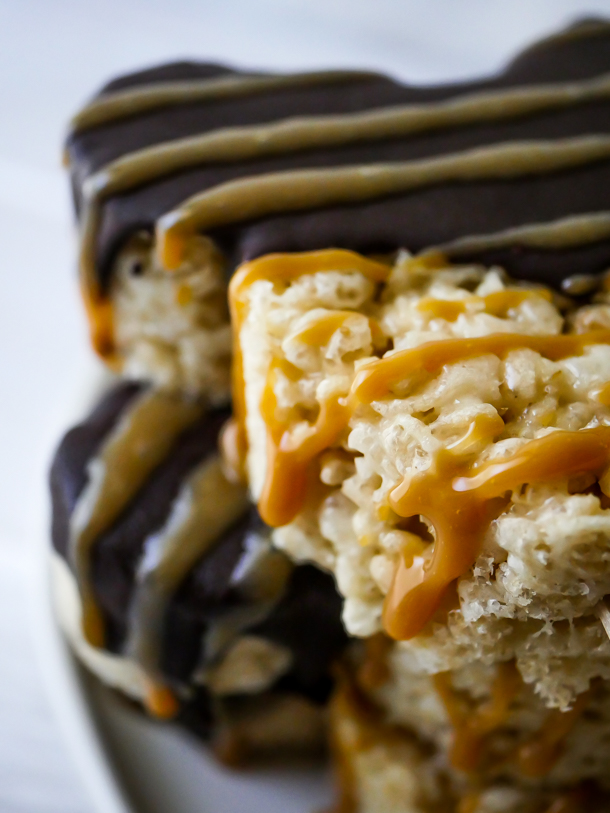
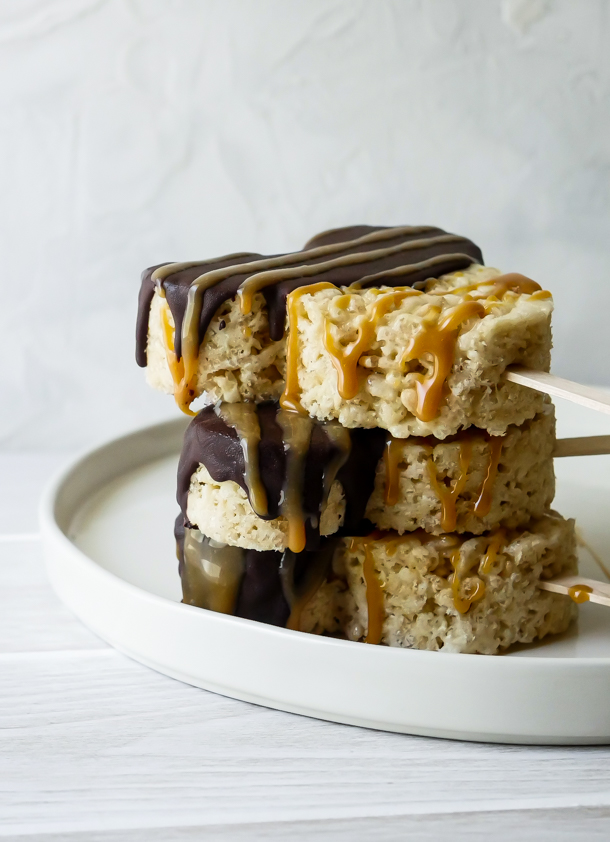
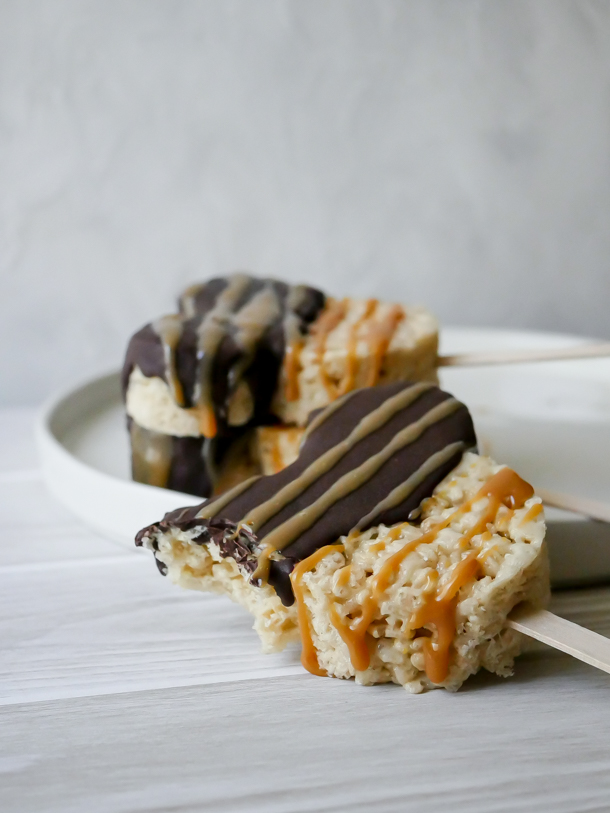
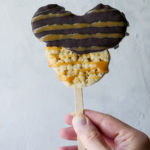
Over the past year of making these Disney-inspired treats I’ve come to realize that I’m a real fan of cripsy treats. Well, most any treat on a stick I guess. And the Disney team gets very creative and cute with these, and right now I’m especially into this version from Karamell-Küche at Epcot. At its base, a plain crispy treat is delicious. But this version, besides being a fun Mickey Mouse shape, is coated in chocolate and drizzled in caramel. The combination, although simple, hits so many right notes, in my mouth.

I’ve also learned a new technique for decoration from those candy masters that I’ll share with you today if you’re interested in getting nice clean lines for decorations on the odd angles you find with a Mickey Mouse crispy treat. Hint: grab a piping bag.

Mickey Mouse Caramel Chocolate Crispy Treat // magicaltreatsathome.com

For the caramel, you can optionally decorate a few ways. One is to just buy yourself some caramel sauce if you want the easiest method. Second, you can melt caramel squares with some milk or cream and a little water and then go from there. Or, if you’ve got the time, make caramel sauce from scratch. As always, I’ve got all the info you need in the recipe below.

Kids love to decorate, so for this recipe, once cooled, kids can help cut out the Mickey Mouse shapes. And then they can decorate with the warm melted chocolate. Depending on which route you take for the caramel they may be able to help decorate with the drizzle. Just remember, cooked caramel on the stove is SUPER HOT and little hands might want to get in there and taste it. Don’t let that happen.

Mickey Mouse Caramel Chocolate Crispy Treat // magicaltreatsathome.com

Epcot might be open to some people right now, but it’s slim pickings at Karamell-Küche, so stay home, make a batch of these caramel drizzled crispy treats, and maybe watch a YouTube video of last years Garden Festival. Enjoy!

Mickey Mouse Caramel Chocolate Crispy Treat // magicaltreatsathome.com
Print
clock clock iconcutlery cutlery iconflag flag iconfolder folder iconinstagram instagram iconpinterest pinterest iconfacebook facebook iconprint print iconsquares squares iconheart heart iconheart solid heart solid icon
Mickey Mouse Caramel Chocolate Crispy Treat // magicaltreatsathome.com

Karamell-Küche Caramel Drizzled Mickey Mouse Crispy Treat

5 Stars 4 Stars 3 Stars 2 Stars 1 Star No reviews
  • Author: Elana Lepkowski
  • Yield: 3 Caramel Drizzled Mickey Mouse Crispy Treats 1x
Print Recipe
Pin Recipe

Description

The classic Mickey Mouse crispy treat is made into a decadent goodie with a dip in semisweet chocolate and topped with buttery caramel. A Walt Disney World inspired treat!


Ingredients

Scale

For the crispy treat:

  • 2 tablespoons butter, unsalted
  • 3 cups mini marshmallows or ~30 regular sized marshmallows
  • 3 cups crisped rice cereal

For the chocolate:

  • 4 ounces semisweet chocolate, coarsely chopped

For the caramel:

  • 14 individually wrapped caramels/4 ounces/115 g/ 1/2 cup
  • (OR 1/4 cup store bought caramel sauce or homemade caramel sauce from scratch)
  • 1 tablespoon cream or milk
  • 1 teaspoon water

Specialty Tools:

  • Mickey Mouse Cookie Cutter
  • loaf pan

Instructions

For the crispy treat:

  1. Before beginning, line a loaf pan with parchment.
  2. Combine the butter and marshmallows in a medium sauce pan over medium-low heat. Stir constantly until marshmallows have melted and mixture is smooth.
  3. Immediately dump in the crisped rice cereal and quickly mix to combine.
  4. Pour into the prepared pan and gently press mixture into place with a rubber spatula (or damp fingers, which is my favorite method). Set aside for at least an hour in the refrigerator (or 20 minutes in the freezer) so that the mixture can firm up enough to cut shapes.
  5. When the treats have firmed up, use a Mickey Mouse cutter to cut out your shapes. Set aside.

For the chocolate layer:

  1. Melt the semisweet chocolate in the microwave inside a microwave safe bowl, like glass, for 30 seconds. Stir and microwave again for an additional 30 seconds. Keep stirring and microwaving in short bursts of 15-20 seconds until melted and smooth. You can alternatively use a double boiler for melting. OR you can directly melt in a heat safe pastry bag similar to how you’d melt in the bowl. (20 second bursts, kneading bag in-between)
  2. When melted, transfer to a pastry bag (if you did not melt directly in one), snip off the tip, and outline and fill the ears and top 1/3 of the head. Repeat with all treats. Set aside in the refrigerator for 15 minutes.

For the caramel layer:

  1. In a small sauce pan over low heat, combine the caramels, cream or milk, and water. Stir continuously until melted and smooth. Do not let the mixture sit or it could burn.
  2. Once the mixture is melted and pour-able, take one crispy treat and hold over the saucepan. Drizzle caramel horizontally across the whole treat, lightly tapping any excess off back into the pan. Set aside on parchment and repeat until all treats are done. If sauce starts to stiffen, keep over a very low flame, stirring until smooth and pour-able again.
  3. Enjoy!

Notes

  • Use a smaller pan than you think you’ll need for this. As the marshmallows melt into the butter, if there’s too much space in the pan, they will start to dry out and form strings. Keeping the marshmallows closer together in the pan will ensure they melt more evenly, creating a better mixture to add the cereal into.
  • When mixing crisped rice cereal into the melted marshmallows, keep the mixture on the flame so that marshmallows stay liquid. Removing to mix in can seize up the liquid before the cereal is fully mixed.
  • If crisped rice cereal is unavailable right now, use any kind of puffed grain, or cereal. Cocoa Pebbles would work here too!
  • After you’ve cut out your treats, extra cereal/marshmallow mixture can be recombined by hand and cut again (or just combined and shaped into another treat by hand).
  • If you do not have pastry bags, this can be dipped into the bowl you melted the chocolate in. Using a pastry bag ensures neater lines, nothing more.
  • Melted caramel is HOT! Use caution in the kitchen. Do not dip your fingers or hands into the caramel has it can adhere to skin and burn you. Keep away from children.
  • Use hot water to remove caramel from pans and utensils.
  • Leftover caramel can be kept in an airtight container in the refrigerator up to one month.
  • Treats can be kept in an air-tight container refrigerated for up to 3 days.

Did you make this recipe?

Tag @magicaltreatsathome on Instagram and hashtag it #magicaltreatsathome

Mickey Mouse Caramel Chocolate Crispy Treat // magicaltreatsathome.com

Share this:

  • Click to share on Facebook (Opens in new window) Facebook
  • Click to share on X (Opens in new window) X

Like this:

Like Loading...

Filed Under: Recipes, Treats Tagged With: caramel, chocolate, crispy treat, Epcot, Karamell-Küche, marshmallow, rice krispie treat, treat, WDW

Jolly Holiday Maple Bacon Doughnuts

July 3, 2020 by Elana Lepkowski Leave a Comment

Maple Bacon Doughnut // magicaltreatsathome.com

Where can I find the original treat?

  • This treat was found at the Jolly Holiday Bakery Cafe in Disneyland.

The Donut Cart at Disneyland was always my favorite place to visit for a treat and to say I was bummed when they decided to get rid of it to widen the walkways around Sleeping Beauty Castle is an understatement. However, some of those fabulous doughnuts can be found over at the Jolly Holiday Bakery Cafe on occasion. (Although they will sell out quickly if it’s a good one!)

One of the last doughnuts I had while visiting the park this year was the Maple Bacon Doughnut, and let me tell you, the combination of sweet maple and salty bacon was *chef’s kiss*. I love sweet and salty treat combos, but I get it’s not for everyone (my husband picked all the bacon off and ate it separately). But I urge you to try the combo once, because it’s not just crispy bacon on top, it’s lacquered bacon and it gives another maple dimension to the doughnut.

Maple Bacon Doughnut // magicaltreatsathome.com

These are yeasted doughnuts so they require two rises, but they also make the most fluffiest, softest doughnuts and it’s worth the time you put in. However, if yeast is not available to you right now, or the time is not there, you could also bake a batch (like these doughnuts!) or even just buy some plain doughnuts and decorate. We’ve got all the recipes below for every component, so choose whatever option works for you.

I would not recommend that kids get involved for the actual frying part of the doughnut making, but mixing, shaping and decorating are all ways they can get involved. Although my kids just wanted to dip the bacon in the glaze.

Maple Bacon Doughnut // magicaltreatsathome.com

TIP: Now, if making homemade doughnuts seems like a chore, please let me assure you it’s not! Hope on over to our Instagram account and head to our doughnut making highlight bubble for lots of tips. And remember to read all our tips below in the notes section of the recipe card. Also, if you want doughnuts in the morning, make the dough up the night before! Here’s the run down from our Churro Gears post…

Don’t wake up at 4am for breakfast doughnuts! Start them the night before!

  • The night before, mix up the dough and instead of having it sit out to double in size for an hour and a half, cover and refrigerate it at least 8 hours and up to 12.
  • The next day, take them out of the fridge, let the dough sit for 5 minutes uncovered, and then roll out and proceed with making the doughnuts.
  • Once shaped, doughnuts need to rise for 45 minutes before frying off. So, during this time you can brew some coffee, scroll Instagram, make lunches, heat the oil, and whatever else eats up all that precious morning time every day.
  • You should definitely though start heating the oil around 15-20 minutes before your timer goes off. I start on high to get it warmed up quickly in my dutch oven, and then ease on down to medium-high or medium at around 320°f or so. Otherwise it can reach temp and then get too hot and you don’t want that to happen.
  • And from there you’ll start frying off doughnuts and have them ready to eat within 10 minutes!
Maple Bacon Doughnut // magicaltreatsathome.com

Have a magical weekend everyone! And if you try these in an air fryer, let me know how they turn out (I still haven’t bought one yet…).

Print
clock clock iconcutlery cutlery iconflag flag iconfolder folder iconinstagram instagram iconpinterest pinterest iconfacebook facebook iconprint print iconsquares squares iconheart heart iconheart solid heart solid icon
Maple Bacon Doughnut // magicaltreatsathome.com

Jolly Holiday Maple Bacon Doughnuts

5 Stars 4 Stars 3 Stars 2 Stars 1 Star No reviews
  • Author: Elana Lepkowski
  • Yield: 4 Maple Bacon Doughnuts 1x
Print Recipe
Pin Recipe

Description

This sweet and salty breakfast treat combines rich maple glaze and lacquered bacon on the softest yeast dougnut. A Disneyland-inspired treat.


Ingredients

Scale

For the doughnuts:

  • 3/4 teaspoon active dry yeast (not rapid rise)
  • 1 tablespoon warm water (around 110°f)
  • 1 cup (120 grams) all-purpose flour
  • 1/4 cup warmed whole milk, or milk alternative of your choice (see notes below)
  • 1 tablespoon unsalted butter, softened
  • 1 large egg yolk
  • 2 teaspoons granulated sugar
  • 1/2 teaspoon kosher salt
  • 4 cups neutral oil like avocado or canola

For the lacquered bacon:

  • 4 strips bacon
  • 1/4 cup maple syrup

For the maple glaze:

  • 1/3 cup maple syrup (I used a robust grade B for a richer flavor)
  • 1 tablespoon butter, unsalted
  • 1 cup powdered sugar
  • splash of cream or milk

Specialty Tools:

  • 1-1/4″ circle cutter
  • candy/frying thermometer
  • spider strainer

Instructions

For the doughnuts:

  1. Mix together yeast and warm water in a small bowl. Let sit for five minutes until bubbles form on top (if bubbles do not form, throw away and try again. Your yeast might be too old, or your water too hot/cold to activate yeast).
  2. While yeast sits, in the bowl of a stand mixer or a freestanding large bowl with a hand mixer, combine the flour, milk, butter, egg yolk, sugar and salt. Add in yeast mixture.
  3. Stir until just combined and then attach a dough hook and mix in the stand mixer on low until dough comes together. Then increase speed to high and mix for 3 more minutes. Alternatively, you can knead dough by hand for 5-7 minutes.
  4. Remove dough from the dough hook and let sit in the bowl, covered, at room temperature, for one hour until dough has doubled in size. (It will be done rising once you can leave an indentation in the dough with your finger and it doesn’t spring back)
  5. Next, sprinkle flour onto your counter and divide your dough into four equal pieces.
  6. Roll each segment into balls, and then shape them by either making a hole through them with your finger, or flattening into a circle and using a 1-1/4″ circle cutter to make a center hole, and let rise again for 30 minutes covered with a tea towel.
  7. About 20 minutes before the second rise is complete, heat oil in a dutch oven with a candy thermometer attached.
  8. When the oil reaches 350°f, carefully lower the dough into the hot oil. You can fry two to three doughnuts at a time in a wide dutch oven.
  9. Fry on each side about one minute. Then remove with a spider or slotted spoon onto a cooling rack with paper towels underneath. Let temperature in the pot come back to 350°f before frying next batch.
  10. Let doughnuts come to room temperature before glazing and filling.

For the lacquered bacon:

  1. Heat oven to 350°f.
  2. Cover the bottom of a sheet pan with foil and place a grate over the top. Set aside.
  3. In a bowl wide enough to accommodate the bacon, place bacon inside and then pour the maple syrup over them.
  4. Use your hands to massage the maple syrup into the bacon and to ensure all of the bacon is covered in the syrup.
  5. Lay the pieces of bacon flat on the grate and move into the oven.
  6. Bake for 20 minutes (starting to check at 18 to make sure it is not burning) until crisp and shiny.
  7. Remove from the oven and let cool. Then chop into 1-1/2″ sections. Set aside.

For the maple glaze:

  1. In a small sauce pan, melt the maple syrup and butter together.
  2. Remove from the heat and add in the powdered sugar. Mix until smooth. If too thick, add a splash of milk or cream.
  3. Move back to the stove on the lowest setting to keep warm.

To assemble the doughnuts:

  1. Dip a doughnut top into the maple glaze.
  2. Add pieces of bacon to the center.
  3. Set aside and repeat on remaining doughnuts.

Notes

  • This recipe can be doubled as is with no adjustments.
  • Frying reaches temperatures of over 350°F so please use caution in the kitchen! Wear gloves, an apron, closed toe shoes, and use a candy thermometer. Keep children away when handling hot dishes.
  • I made my batch of doughnuts with almond milk and they came out exactly the same as with cow milk, so feel free to use a milk alternative.
  • If you choose to cut out your doughnuts instead of hand shaping, save the doughnut holes and fry those off as well! 40 seconds on side one, and then 30 seconds on the other side.
  • Remember, bacon is a raw pork product, so clean your hands and any surfaces before handling cooked doughnuts.
  • Doughnuts are best the day they are made, but can be placed in an air-tight container and eaten the next day (but no longer than that!).
  • Extra glaze can be kept in an air-tight container in the refrigerator for up to 5 days and reheated on the stove with a splash of cream or milk.

Did you make this recipe?

Tag @magicaltreatsathome on Instagram and hashtag it #magicaltreatsathome

Maple Bacon Doughnut // magicaltreatsathome.com

Share this:

  • Click to share on Facebook (Opens in new window) Facebook
  • Click to share on X (Opens in new window) X

Like this:

Like Loading...

Filed Under: Recipes, Treats Tagged With: bacon, disneyland, donut, doughnut, maple, maple bacon, Sleeping Beauty

Make it Pink! Make it Blue! Frosting How To!

July 1, 2020 by Elana Lepkowski Leave a Comment

Make it Pink! Make it Blue! Frosting demo // magicaltreatsathome.com

Where can I find the original treat?

  • This frosting how-to is inspired by the Royal Cupcake at Disneyland found at the Jolly Holiday Bakery Cafe.

One of the easiest ways to make a dessert feel elevated, to seem really special, is to decorate it with fancy frosting and sprinkles. Cupcakes always seemed like a personal present to give to someone, and instead of sparkly bows and wrapping paper, we’ve got two-toned frosting and edible stars.

Make it Pink! Make it Blue! Frosting demo // magicaltreatsathome.com

When the Royal Cupcake debuted at Disneyland, its unofficial title was the Make it Pink! Make it Blue! cupcake, as the dueling fairies in Sleeping Beauty were known to yell at each other. And today we’ve actually got a short video to show two ways to make this frosting!

Make it Pink! Make it Blue! Frosting demo // magicaltreatsathome.com

Method one is adding the colored frosting to a piping bag directly. Each color is spooned in on opposite sides and when piped together, you get the two colors. This method produces a more blurred line between colors, although still distinct.

Method two is a little extra work, but has a sharper line between colors. You start by laying down a piece of plastic wrap and spooning your frosting colors in stripes longways (you can also pipe them out if you want but that was too much for me). Then you fold over your colors lengthwise, making a sausage with the plastic wrap, and insert that inside a piping bag fitted with a round tip. Pull the plastic wrap through the tip and cut off the extra that hangs out. Then pipe as you normally would!

Now it’s time for me to make some cupcakes disappear!

Make it Pink! Make it Blue! Frosting demo // magicaltreatsathome.com

Share this:

  • Click to share on Facebook (Opens in new window) Facebook
  • Click to share on X (Opens in new window) X

Like this:

Like Loading...

Filed Under: Recipes, Tips Tagged With: buttercream frosting, disneyland, frosting, Sleeping Beauty, tutorial

Primary Sidebar

Follow Us

  • Instagram
  • Facebook
  • X
  • Pinterest
  • Email
  • YouTube

Hi! My name is Elana, and that’s me shoving a Mickey Mouse shaped treat in my face. I love the treats at Disneyland. A lot. So much so I’ve dedicated an entire website to making all my favorites, and hopefully yours too, out of my home kitchen. My aim is to create Disneyland-inspired treats, with easy to follow directions, and many recipes geared towards getting the kids in the kitchen to help too! Because putting sprinkles on things is F-U-N.

Top With Sprinkles

Get Recipes in Your Inbox!

* indicates required

Look for this icon in posts to find Kid Friendly recipes!

Recent Posts

  • Matterhorn Macaroon
  • Caramel Gingerbread Cookie Sandwiches
  • Colorful Fruit Hand Pies
  • Classic Mickey Shaped Beignets
  • Carrot Cake Cookies

Archives

  • February 2023
  • December 2022
  • August 2022
  • January 2022
  • December 2021
  • November 2021
  • December 2020
  • November 2020
  • October 2020
  • September 2020
  • August 2020
  • July 2020
  • June 2020
  • May 2020
  • April 2020
  • March 2020
  • February 2020
  • January 2020
  • December 2019
  • November 2019
  • October 2019
  • September 2019
  • August 2019
  • July 2019
  • June 2019
  • May 2019

Copyright © 2025 Magical Treats at Home on the Foodie Pro Theme

%d