Where can I find the original treat?
- This holiday time treat can be found throughout the Disneyland resort.
Of all the treats this holiday season, the Mickey Mouse Gingerbread Man cookie was THE COOKIE to have. In fact, it was probably one of the most sought after TREATS in general at the parks. These last few weeks I’ve gone looking for the cookie inside the parks only to have it sell out before I could buy it by 11am (it may have even sold out sooner!). Of course, I could always wander into the Grand Californian and get it there too, but the premium price tag just meant I’d try again another day at the parks. Or, of course, make it at home! Which is what I did and now you can too!
Let me preface this post with this one caveat, if you turned over the back of the packaging the gingerbread cookies came in, you would see that, well, there’s a lot of ingredients listed there, probably because they’re trying to preserve the cookies a bit before they can be sold (although, come on, I watched a guy buy all the cookies from the tray that were being brought to replenish the cookie cart—at the Grand Californian no less!). I don’t have a cabinet of preservatives; I have eggs, flour, sugar, and the like. So, this cookie will not taste exactly like THAT cookie—but I think it comes close!
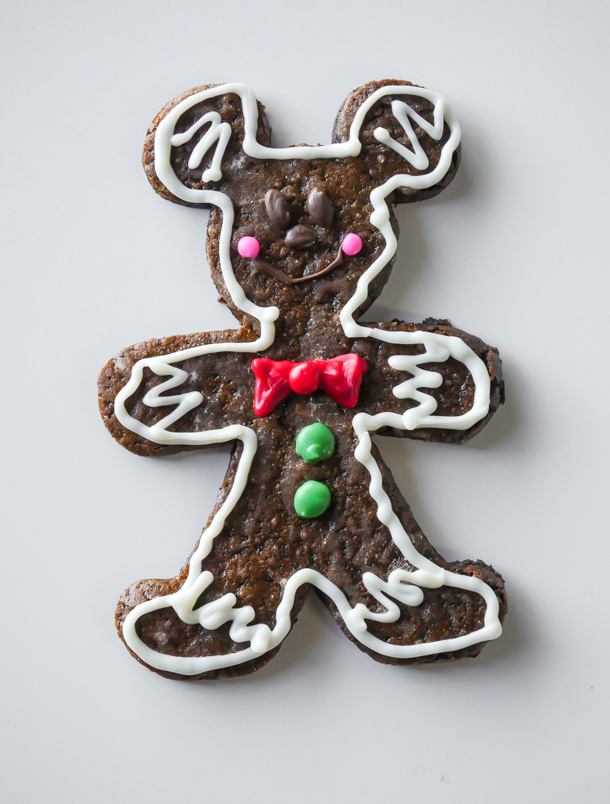
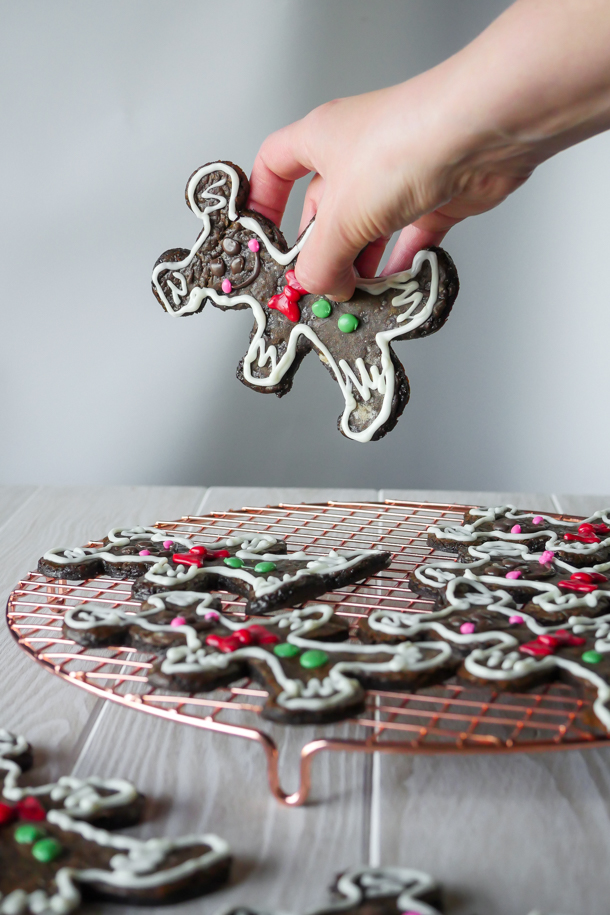
The original cookie has some rather unique characteristics for a gingerbread cookie. For one, it’s thick and soft. Not the usual thin and crisp cookies you find for decorating houses. It is heavily spiced of cloves (clove is actually listed first before ginger), and the design work on it is done with chocolate, not the royal icing that you might get on any other holiday cookie. It’s also big, coming in around 7 inches.
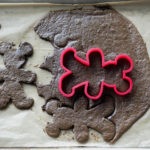
Now, you don’t need a Mickey Mouse gingerbread man cutter if you don’t already own one. If you have a gingerbread man cutter and a circle cutter, you could easily Frankenstein the design together once the shapes are on the sheet pan. However, this will work only if you’re pre-cutting the shapes and then baking them, which is definitely the more routine way to go, although, with this recipe, I found more luck in getting sharp outlines if I baked squares of the cookie dough first, and then used a cutter on the baked dough. And that’s because this dough is really soft.
With the pre-baking method you’re going to have more scraps (which you can keep in an airtight container and eat when all the gingerbread men are gone). However, a little pre-planning will mean less of them. I would suggest measuring out the shapes of your cutter and trying to roll out smaller sections of the dough so that you’re only going to have small sections around the cookies that will become scraps. If this seems like a lot of work just keep in mind you’ll be chilling dough with the pre-cut shapes several times. It’s the nature of these soft cookies!
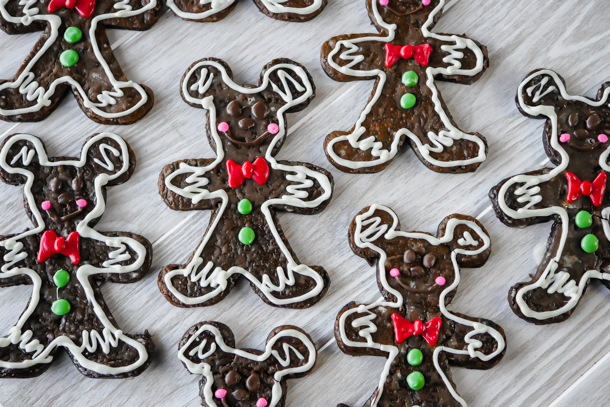
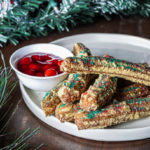
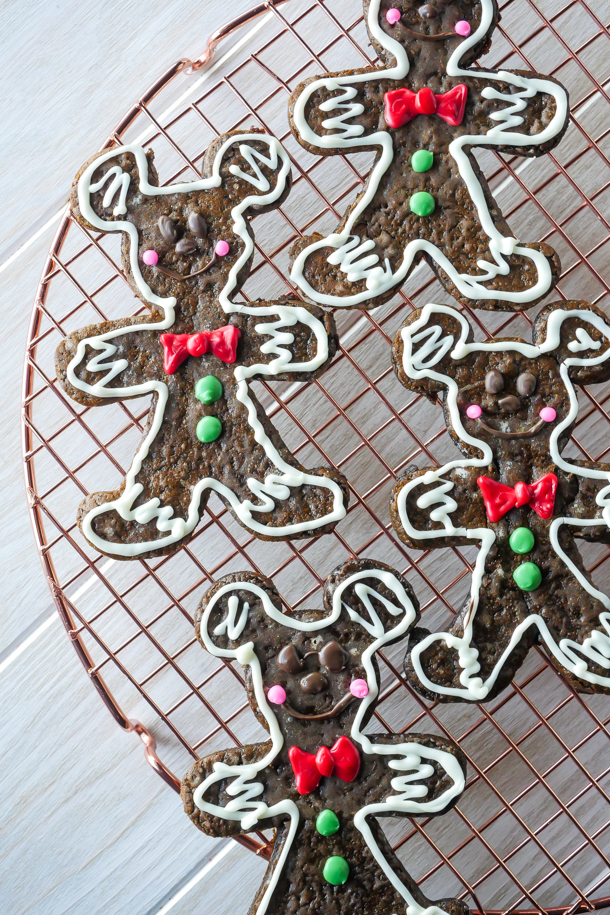
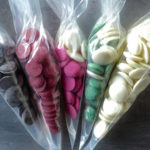
![]() Once you have your cookies baked and cooled, the fun part of decorating can begin (and kids can help here!). The cookies at Disneyland had a sugar glaze over the center. Personally, I think that glaze helped keep this super soft cookies from falling apart (take a close look at anyone holding up a cookie on IG and you will probably see a few cracks from handling them). I also included a glaze here, but that can be optional for you. The colorful decorations here are done with candy melts, which you can get in the colors needed, so for convenience you won’t have to buy additional food coloring. Only melt one bag of the candy melts at a time for decorating! It hardens quickly so you only want to handle a single bag at a time. To smooth out bumps in the chocolate, or to round out and smooth shapes, a scribe or a toothpick will be handy. But even here you’ll want to move quickly as the small amount of the candy melts will start to harden upon contact with the cookie.
Once you have your cookies baked and cooled, the fun part of decorating can begin (and kids can help here!). The cookies at Disneyland had a sugar glaze over the center. Personally, I think that glaze helped keep this super soft cookies from falling apart (take a close look at anyone holding up a cookie on IG and you will probably see a few cracks from handling them). I also included a glaze here, but that can be optional for you. The colorful decorations here are done with candy melts, which you can get in the colors needed, so for convenience you won’t have to buy additional food coloring. Only melt one bag of the candy melts at a time for decorating! It hardens quickly so you only want to handle a single bag at a time. To smooth out bumps in the chocolate, or to round out and smooth shapes, a scribe or a toothpick will be handy. But even here you’ll want to move quickly as the small amount of the candy melts will start to harden upon contact with the cookie.
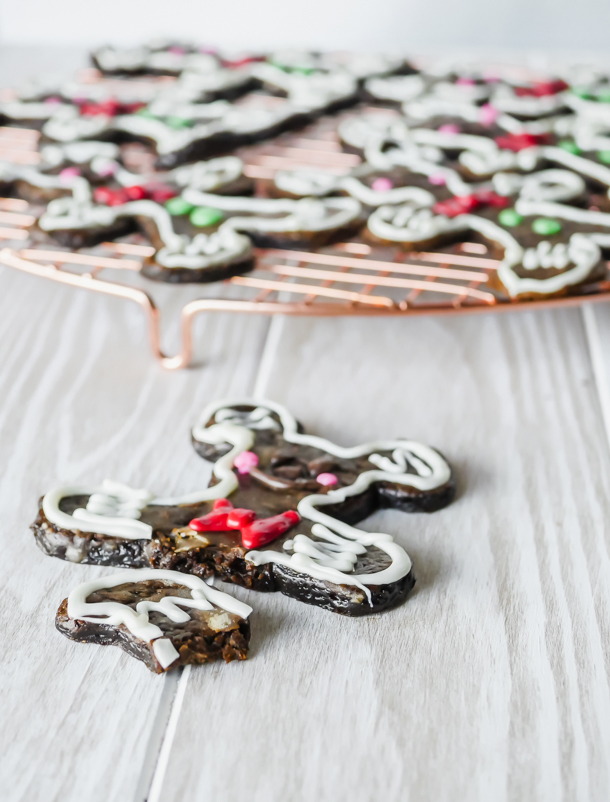
Even though so far I may seem a bit cautious with this recipe, you should make this cookie. It’s soft, slightly chewy, with all the deliciously warm baking spices you want in a gingerbread cookie. And if you spend the time cutting these out and decorating them for a loved one, it really shows and makes a great present.
I’ve covered lots of tips in the post above today, but I’ve summed them all up in the notes below. Happy baking and happy holidays everyone!
Print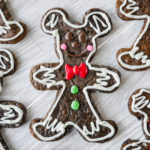
Mickey Mouse Gingerbread Men
- Yield: 10 5-1/2″ Mickey Mouse Gingerbread Men 1x
Description
The holiday season isn’t complete without gingerbread cookies and these oversized, soft, generously spiced, Mickey Mouse Gingerbread Men are great to eat and to give for presents! A Disneyland-inspired treat.
Ingredients
For the cookies:
- 4 cups (480 g) flour
- ¾ cup packed (5 ¼ ounces, 160 g) light brown sugar
- ¾ teaspoon baking soda
- 1 tablespoon ground cinnamon
- 1 tablespoon ground ginger
- 2 teaspoon ground cloves
- ½ teaspoon salt
- 8 tablespoons butter, room temperature, cut into pieces
- 2 eggs
- 2/3 cup molasses
- 1 teaspoon vanilla extract
- 1/4 cup arrowroot powder (or corn starch)
Glaze:
- 1/4 cup sugar
- 2 tablespoons water
Decoration:
- 1 cup white candy melts, separated
- 1/4 cup each green, pink, red, and light cocoa candy melts
Specialty Tools:
- Mickey Mouse Gingerbread Man cutter
- pastry brush
- plastic heat proof piping bags
Instructions
For the cookies:
- In the bowl of a stand mixer, combine the flour, brown sugar, baking soda, cinnamon, ginger, cloves, and salt. With the paddle attachment, mix on the lowest setting, adding in the butter pieces until the mixture resembles coarse sand.
- Next, mix in each egg until incorporated. Then pour in the molasses and vanilla extract. Mix on medium speed until well combined.
- Then, mix in arrowroot powder until incorporated.
- If baking sheets of dough first and then cutting, roll out dough into desired small sections about 1/4″ to 1/2″ thick, between two sheets of parchment. Chill for 30 minutes. If cutting and then baking, divide dough in half and roll out between two sheets of parchment. Transfer to baking sheets and chill in the freezer for 30 minutes. Then remove one pan at a time, peel the top layer of parchment off, cut out shapes, transfer to a new sheet of parchment and refrigerate for an additional 15-20 minutes.
- Preheat oven to 350°f, if baking whole sheets of dough: remove top sheet of parchment from the dough, and then bake sheets of dough for 14 minutes. If baking pre-cut shapes, place sheet pan directly from refrigerator to oven and bake 12-14 minutes.
- Let the dough rest for 5 minutes and then move the parchment off the cookie sheet and begin cutting out the shapes. Cool cookies to room temperature before beginning to decorate.
To decorate:
- Make the sugar glaze first by combining the sugar and water in a small saucepan over medium-high heat, stirring continually until all the sugar crystals have dissolved.
- Remove from heat, let cool slightly, and then apply a light coating of the liquid to the cookies using a pastry brush. Set aside cookies.
- Melt 2/3 cup of the white candy melts directly in the pastry bag for 30 seconds, knead the bag slightly and microwave in short bursts of 15-20 seconds until fully melted.
- Cut a small amount of the tip off the bag and make sure the candy melts is flowing freely by squeezing out a small amount first.
- Then, outline the cookies with the white candy melts, including hems (see photos).
- Continue with the other candy melts to complete the design.
- light cocoa for eyes, nose, and mouth
- pink plus 2 tablespoons (or more) of the white melts for the light pink cheeks
- red for the bow tie
- green plus a tablespoon of white candy melts for the buttons
- Decorations will fully harden in about an hour. Cookies can be kept in an airtight container for up to a week!
Notes
- To create the Mickey shape without a cutter, combine a gingerbread man cutter and a small circle cutter proportionate to the head for the ears. Slightly overlap the ears and head to secure when baked.
- The dough is very soft and will warm considerably while working with it. Always chill dough if it starts to feel warm so that it is easier to manipulate.
- If cutting and then baking, freeze rolled out cookie dough for 30 minutes and then cut shapes out immediately, using a metal spatula or bench scraper to help gently lift dough up if needed. Refrigerate cookie shapes after cutting for an additional 15 minutes before baking.
- The arrowroot powder helps keep the shape and reduces the cookies from spreading. It also reduces the puffiness of the cookie.
- To reduce scraps if baking and then cutting, lay out cutter and trace shapes on parchment as close together as possible, leaving a small amount of space for spreading. Flip the parchment over and roll out dough to that shape. Dough should be around 1/4″. Thicker dough will need more baking time.
- Sugar glaze will harden and become less tacky quicker if cookies are refrigerated after glazing.
- Move quickly while using the candy melts as they harden fast.
- To smooth out bumps in the chocolate, or to round out and smooth shapes, a scribe or a toothpick.
- Extra melted candy melts can be left to harden and stored in a cool, dry place, and melted again for another use.