Description
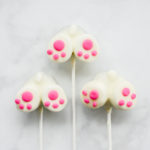
These cute bunny cake pops are filled with chocolate cake, and adorned with marshmallow feet and tail, all covered with white chocolate and pink candy melts. A Disneyland-inspired treat.
Ingredients
Scale
For the cake pops:
- 2 cups crumbled chocolate cake, lightly packed (or check out our post on making Mickey cake pops for cake recipes including chocolate, vanilla, and red velvet)
- 1/4 cup cream cheese frosting
For the decoration:
- 2-1/2 cups white chocolate
- 6 large marshmallows
- 2 tablespoons pink candy melts
Special tools:
Instructions
For the cake pops:
- Combine the cake crumbles and cream cheese together until smooth and no white streaks remain (either with a mixer, or by hand).
- Form into a 1/2″, 5″x5″ block (I use half of a loaf pan to help keep the shape), and let sit, refrigerated, overnight or for at least 6 hours. This helps the cake pops keep their shape. You could alternatively let these sit in the freezer as well for an hour or two depending on how cold your freezer is. Do not let them freeze.
- After the form has rested, using a 1-1/2″ circle cutter, cut 5 circles out of the block. Any extra cake can be combined to form new shapes, or can be formed into balls and frozen for later use.
- Insert lollipop sticks and set aside.
For the decoration:
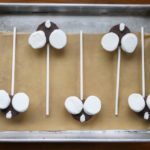
- First, cut the 5 marshmallows in half (I found kitchen shears were the best tool for this job). Set these aside for the feet. Then take the 6th marshmallow and cut or rip sections off to form the tails. Set aside.
- Next, melt the white chocolate. You can do this one of several ways:
- Melt in a candy pot until smooth (Wilton makes this one for their candy melts I use for dipping projects like this). This can take up to 20 minutes to get fully smooth chocolate or candy melts (see notes below about melting white chocolate). Follow the directions for your particular pot!
- Melt in the microwave in a microwave safe bowl, like glass, for 30 seconds. Stir and microwave again for an additional 30 seconds. Keep stirring and microwaving in short bursts of 15-20 seconds until melted and smooth.
- Melt in a double boiler on the stove. In a medium saucepan, bring about an inch of water to a simmer. Place a glass bowl on top and add candy melts. Stir until melted and smooth.
- Make sure the cake pops have come to room temperature. If they’re too cold, the chocolate will seize up and harden too soon.
- Next, dip each cake pop into the white chocolate, tapping each stick against the bowl to pop any air bubbles and to remove all the excess chocolate. Place on a parchment lined sheet pan and place the marshmallow feet and tail on the cake pop, pressing lightly to help adhere. Repeat with the rest of the cake pops and then let them firm up a little before doing the second dip.
- Once the cake pops have firmed up slightly, dip the whole cake pop a second time, again, tapping it against the side of the bowl to pop any air bubbles and to remove excess chocolate. Place back on the parchment and repeat with the rest of the cake pops.
- Let the cake pops firm up slightly again and melt the pink candy melts to finish decorating the cake pops. To melt the pink candy melts, microwave inside a microwave safe bowl, like glass, for 30 seconds. Stir and microwave again for an additional 30 seconds. Keep stirring and microwaving in short bursts of 15-20 seconds until melted and smooth. You can alternatively use a double boiler for melting or melt candy melts in a piping bag, kneading the candy melts between microwaving.
- If not melting directly in a piping bag, transfer melted candy melts into a piping bag and cut a small amount of the tip off to decorate.
- Draw on the feet with the piping bag on each cake pop. Set aside and let firm up at least a half hour, or refrigerate until ready to eat.
Notes
- Cake balls should not be too wet or too dry to hold their shape properly. If too wet, add more cake crumbles. If too dry, add more frosting a small bit at a time.
- I like to dry the cake crumbles out a bit before mixing with the frosting, and then letting that mixture sit overnight in the fridge to set up. This ensures a more solid cake pop when dipping.
- Boxed cake and canned frosting will also work for the cake pops if you don’t want to make them from scratch. Just follow the amounts for the crumbled cake and amount of frosting on those recipe pages listed above.
- If cake balls are slipping off the sticks, dip lollipop stick tip in the melted chocolate and insert into cake ball. Refrigerate a few minutes to set.
- Pure white chocolate, as opposed to candy melts, will have a thinner texture and may show dark spots after one dip due to its translucent nature. The first dip will also ensure that your marshmallows will adhere and not slide off into the chocolate on the second dip. If your kitchen is particularly warm, stick in the fridge for 10 minutes to harden slightly before second dip.
- White chocolate can get too hot very easily. If the white chocolate looks like it is seizing on your spoon when you have dipped in the chocolate and let it drip off, it is too hot. Keep stirring the white chocolate to cool it down. It will be the right consistency to dip the cake pops in when it drips smoothly off your spoon. This can take anywhere sometimes from 20 to 30 minutes to melt, and then cool down to the right consistency.
- If your white chocolate or candy melts is still very clumpy and thick, add a 1/4 teaspoon of coconut oil into it and continue mixing. This should thin out your mixture and get a smoother consistency.
- Save any extra white chocolate to reuse for another treat within a week. Let chocolate harden and then seal in an airtight container.
- Cake pops will last up to one week in the refrigerator in an airtight container.